
User's Manual

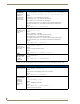
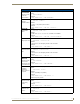

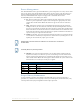


Table Of Contents
- MVP-9000i 9" Modero® ViewPoint® Touch Panel with Intercom
- Introduction
- Accessories
- Configuring Communication
- Overview
- IR Communication
- Modero Setup and System Settings
- Wireless Settings - Wireless Access Overview
- Configuring Wireless Network Access
- Step 1: Configure the Device’s WiFi Settings
- Step 2: Configure the Card’s Wireless Security Settings
- Step 3: Choose a Master Connection Mode
- Ethernet Over USB
- Using G4 Web Control to Interact with a G4 Panel
- Using the NetLinx Master To Control the G4 Panel
- Setup Pages
- Protected Setup Pages
- Upgrading Firmware
- Programming
- Overview
- Animated Transitions
- Touch Gesture Recognition
- Page Commands
- Programming Numbers
- "^" Button Commands
- Text Effects Names
- Button Query Commands
- Panel Runtime Operations
- Input Commands
- Embedded codes
- Panel Setup Commands
- Dynamic Image Commands
- Intercom Commands
- SIP Commands
- ^PHN- AUTOANSWER
- ^PHN-CALL
- ^PHN-DECLINE
- ^PHN-INCOMING
- ^PHN- LINESTATE
- ^PHN- MSGWAITING
- ^PHN-PRIVACY
- ^PHN-REDIAL
- ^PHN- TRANSFERRED
- ^PHN-ANSWER
- ^PHN- AUTOANSWER
- ?PHN- AUTOANSWER
- ^PHN-CALL
- ^PHN-DTMF
- ^PHN-HANGUP
- ^PHN-HOLD
- ?PHN- LINESTATE
- ^PHN-PRIVACY
- ?PHN-PRIVACY
- ^PHN-REDIAL
- ^PHN- TRANSFER
- ^PHN-SETUP- DOMAIN
- ^PHN-SETUP- ENABLE
- ^PHN-SETUP- PASSWORD
- ^PHN-SETUP- PORT
- ^PHN-SETUP- PROXYADDR
- ^PHN-SETUP- STUNADDR
- ^PHN-SETUP- USERNAME
- Battery Life and Replacement
- Appendix A: Text Formatting
- Appendix B: Wireless Technology
- Appendix C: Troubleshooting
- Overview
- Panel Doesn’t Respond To Touches
- Battery Will Not Hold Or Take A Charge
- MVP-9000i Isn’t Appearing In The Online Tree Tab
- MVP Can’t Obtain a DHCP Address
- My AP Doesn’t Seem To Be Working
- NetLinx Studio Only Detects One Of My Connected Masters
- Can’t Connect To a NetLinx Master
- Only One Modero Panel In My System Shows Up
- Panel Behaves Strangely After Downloading A Panel File Or Firmware
- Overview

Programming
182
MVP-9000i Modero® Wireless Touch Panel with Intercom
The following table lists and describes SIP setup commands. Using any of these commands causes the current
user to go offline.
SIP Commands (Cont.)
^PHN-
TRANSFER
Transfers the call
to the provided
number.
Syntax:
"’^PHN-TRANSFER, <connection id>, <number>’"
Variable:
connection id = The identifying number of the connection
number = The number to which you want to transfer the call.
Example:
SEND_COMMAND Panel,"'^PHN-TRANSFER, 1, 2125551000'"
SIP Setup Commands
^PHN-SETUP-
DOMAIN
Sets the realm for
authentication.
Syntax:
"’^PHN-SETUP-DOMAIN,<domain>’"
Variable:
domain = The realm used for authentication
Example:
SEND_COMMAND Panel,"’^PHN-SETUP-DOMAIN,asterisk’"
^PHN-SETUP-
ENABLE
Registers a new
user
Once the configuration has been updated, the ENABLE command should be run to re-
register the new user.
Syntax:
"’^PHN-SETUP-ENABLE’"
^PHN-SETUP-
PASSWORD
Sets the user
password for the
proxy server.
Syntax:
"’^PHN-SETUP-PASSWORD,<password>’"
Variable:
password = The password for the user name
Example:
SEND_COMMAND Panel,"’^PHN-SETUP-PASSWORD,6003’"
^PHN-SETUP-
PORT
Sets the port
number for the
proxy server.
Syntax:
"’^PHN-SETUP-PORT,<port>’"
Variable:
port = The port for the proxy server
Example:
SEND_COMMAND Panel,"’^PHN-SETUP-PORT,5060’"
^PHN-SETUP-
PROXYADDR
Sets the IP
address for the
proxy server.
Syntax:
"’^PHN-SETUP-PROXYADDR,<IP>’"
Variable:
IP = The IP address for the proxy server
Example:
SEND_COMMAND Panel,"’^PHN-SETUP-PROXYADDR,192.168.223.111’"
^PHN-SETUP-
STUNADDR
Sets the IP
address for the
STUN server.
Syntax:
"’^PHN-SETUP-STUNADDR,<IP>’"
Variable:
IP = The IP address for the STUN server
Example:
SEND_COMMAND Panel,"’^PHN-SETUP-STUNADDR,192.168.223.111’"
^PHN-SETUP-
USERNAME
Sets the user
name for
authentication
with the proxy
server.
Syntax:
"’^PHN-SETUP-USERNAME,<username>’"
Variable:
username = The user name (usually the phone extension)
Example:
SEND_COMMAND Panel,"’^PHN-SETUP-USERNAME,6003’"