
User's Manual


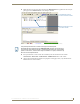
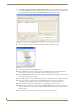


Table Of Contents
- MVP-9000i 9" Modero® ViewPoint® Touch Panel with Intercom
- Introduction
- Accessories
- Configuring Communication
- Overview
- IR Communication
- Modero Setup and System Settings
- Wireless Settings - Wireless Access Overview
- Configuring Wireless Network Access
- Step 1: Configure the Device’s WiFi Settings
- Step 2: Configure the Card’s Wireless Security Settings
- Step 3: Choose a Master Connection Mode
- Ethernet Over USB
- Using G4 Web Control to Interact with a G4 Panel
- Using the NetLinx Master To Control the G4 Panel
- Setup Pages
- Protected Setup Pages
- Upgrading Firmware
- Programming
- Overview
- Animated Transitions
- Touch Gesture Recognition
- Page Commands
- Programming Numbers
- "^" Button Commands
- Text Effects Names
- Button Query Commands
- Panel Runtime Operations
- Input Commands
- Embedded codes
- Panel Setup Commands
- Dynamic Image Commands
- Intercom Commands
- SIP Commands
- ^PHN- AUTOANSWER
- ^PHN-CALL
- ^PHN-DECLINE
- ^PHN-INCOMING
- ^PHN- LINESTATE
- ^PHN- MSGWAITING
- ^PHN-PRIVACY
- ^PHN-REDIAL
- ^PHN- TRANSFERRED
- ^PHN-ANSWER
- ^PHN- AUTOANSWER
- ?PHN- AUTOANSWER
- ^PHN-CALL
- ^PHN-DTMF
- ^PHN-HANGUP
- ^PHN-HOLD
- ?PHN- LINESTATE
- ^PHN-PRIVACY
- ?PHN-PRIVACY
- ^PHN-REDIAL
- ^PHN- TRANSFER
- ^PHN-SETUP- DOMAIN
- ^PHN-SETUP- ENABLE
- ^PHN-SETUP- PASSWORD
- ^PHN-SETUP- PORT
- ^PHN-SETUP- PROXYADDR
- ^PHN-SETUP- STUNADDR
- ^PHN-SETUP- USERNAME
- Battery Life and Replacement
- Appendix A: Text Formatting
- Appendix B: Wireless Technology
- Appendix C: Troubleshooting
- Overview
- Panel Doesn’t Respond To Touches
- Battery Will Not Hold Or Take A Charge
- MVP-9000i Isn’t Appearing In The Online Tree Tab
- MVP Can’t Obtain a DHCP Address
- My AP Doesn’t Seem To Be Working
- NetLinx Studio Only Detects One Of My Connected Masters
- Can’t Connect To a NetLinx Master
- Only One Modero Panel In My System Shows Up
- Panel Behaves Strangely After Downloading A Panel File Or Firmware
- Overview

Upgrading Firmware
109
MVP-9000i Modero® Wireless Touch Panel with Intercom
Upgrading Firmware
Overview
The MVP-9000i uses a native RNDIS USB driver for USB-over-Ethernet communication. When the device is
connected to the downloading computer (see instructions below for more details), it creates a new LAN
connection, and the user will need to supply a static IP address for this to be enabled. To enter a static IP
address, the user must edit the properties of the TCP/IP interface of the connection itself. This driver is
included in the installation of the latest version of NetLinx Studio, available from www.amx.com.
Upgrading Firmware via USB stick or MicroSD card
Firmware and TPDesign 4 file downloads may be made via microSD card, using the microSD port on the left
side of the device, or they may be made via USB stick. The MVP-9000i uses the CC-MINIUSB Mini USB to
PC Cable Adapter (FG5967-20) for programming, firmware updates, and touch panel file transfer between a
PC and the target device (FIG. 91). If a programming cable is not available, it may be purchased from
www.amx.com. The Mini-USB port for the connector is located on the left side of the device as viewed from
the front.
To upgrade the firmware on the MVP-9000i to the latest version:
1. Download the latest MVP-9000i firmware from www.amx.com and save it to a microSD card or USB
stick.
2. If using a USB stick for uploading, connect the male plug of CC-MINIUSB Cable Adapter to the mini-
USB port on the MVP-9000i, and then connect the USB stick to the female USB port. If using a microSD
card, insert the card into the slot on the left of the device.
3. Turn on the MVP-9000i and allow it to boot up. For best results, connect the panel to its power source or
place it in a Table or Wall Docking Station.
Programming the MVP-9000i requires the use of the latest versions of NetLinx Studio
and TPDesign 4, both available from www.amx.com.
FIG. 91 CC-MINIUSB MiniUSB to PC Cable Adapter
The firmware must be in a directory called “MVP-9000i,” saved at the root of the
microSD card or USB stick directory, to be recognized by the touch panel.