
User's Manual
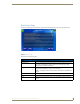
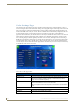
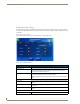
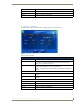
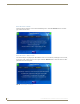


Table Of Contents
- MVP-9000i 9" Modero® ViewPoint® Touch Panel with Intercom
- Introduction
- Accessories
- Configuring Communication
- Overview
- IR Communication
- Modero Setup and System Settings
- Wireless Settings - Wireless Access Overview
- Configuring Wireless Network Access
- Step 1: Configure the Device’s WiFi Settings
- Step 2: Configure the Card’s Wireless Security Settings
- Step 3: Choose a Master Connection Mode
- Ethernet Over USB
- Using G4 Web Control to Interact with a G4 Panel
- Using the NetLinx Master To Control the G4 Panel
- Setup Pages
- Protected Setup Pages
- Upgrading Firmware
- Programming
- Overview
- Animated Transitions
- Touch Gesture Recognition
- Page Commands
- Programming Numbers
- "^" Button Commands
- Text Effects Names
- Button Query Commands
- Panel Runtime Operations
- Input Commands
- Embedded codes
- Panel Setup Commands
- Dynamic Image Commands
- Intercom Commands
- SIP Commands
- ^PHN- AUTOANSWER
- ^PHN-CALL
- ^PHN-DECLINE
- ^PHN-INCOMING
- ^PHN- LINESTATE
- ^PHN- MSGWAITING
- ^PHN-PRIVACY
- ^PHN-REDIAL
- ^PHN- TRANSFERRED
- ^PHN-ANSWER
- ^PHN- AUTOANSWER
- ?PHN- AUTOANSWER
- ^PHN-CALL
- ^PHN-DTMF
- ^PHN-HANGUP
- ^PHN-HOLD
- ?PHN- LINESTATE
- ^PHN-PRIVACY
- ?PHN-PRIVACY
- ^PHN-REDIAL
- ^PHN- TRANSFER
- ^PHN-SETUP- DOMAIN
- ^PHN-SETUP- ENABLE
- ^PHN-SETUP- PASSWORD
- ^PHN-SETUP- PORT
- ^PHN-SETUP- PROXYADDR
- ^PHN-SETUP- STUNADDR
- ^PHN-SETUP- USERNAME
- Battery Life and Replacement
- Appendix A: Text Formatting
- Appendix B: Wireless Technology
- Appendix C: Troubleshooting
- Overview
- Panel Doesn’t Respond To Touches
- Battery Will Not Hold Or Take A Charge
- MVP-9000i Isn’t Appearing In The Online Tree Tab
- MVP Can’t Obtain a DHCP Address
- My AP Doesn’t Seem To Be Working
- NetLinx Studio Only Detects One Of My Connected Masters
- Can’t Connect To a NetLinx Master
- Only One Modero Panel In My System Shows Up
- Panel Behaves Strangely After Downloading A Panel File Or Firmware
- Overview

Protected Setup Pages
107
MVP-9000i Modero® Wireless Touch Panel with Intercom
Connection Status icon: The icon in the upper-right corner of each Setup page shows online/offline state
of the panel to the master.
• Bright red - disconnected
• Bright green - connected. Blinks when a blink message is received to dark
green every 5 seconds for half a second then go back to bright green.
• Bright yellow - panel missed a blink message from the master. It will remain
yellow for 3 missed blink messages and then turn red. It will return to green
when a blink message is received.
Note: A lock appears on the icon if the panel is connected to a secured NetLinx
Master.
Enable: This option enables the SIP Stack on startup. If you disable this option, the
panel will not attempt to read the rest of the configuration and will not register
with a proxy server. However, point-to-point SIP will still be enabled allowing for
existing intercom functionality.
Status: This option displays whether you are connected to the proxy server.
SIP Settings Page (Cont.)
Gateway Address: This option enables you to enter the IP address or DNS name of the proxy
server that you want to use to register.
Port Number: The option displays the port you use to connect to the proxy server. The stan-
dard SIP port is 5060, but some providers use different ports.
STUN Address: This option enables you to enter the IP address or DNS name of the Simple
Traversal of UDP through NATs (STUN) server. This field is optional.
Local Domain: This is the realm used for authentication. This field is optional.
User Name: This option enables you to enter the user name used for authentication to the
proxy server. Normally, the user name is the same as the phone number
assigned to the extension you are using. This field is optional.
Password: This option enables you to enter the password for the user at the proxy server.
This field is optional.
Cancel/Save: Touch the Cancel button to return to the Protected Setup page without saving
any changes made on the SIP Settings page. Touch the Save button to save
the changes and return to the Protected Setup page.