
User's Manual
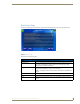
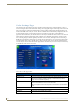
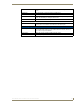
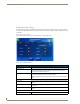
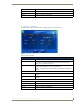
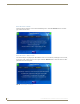
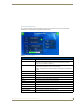


Table Of Contents
- MVP-9000i 9" Modero® ViewPoint® Touch Panel with Intercom
- Introduction
- Accessories
- Configuring Communication
- Overview
- IR Communication
- Modero Setup and System Settings
- Wireless Settings - Wireless Access Overview
- Configuring Wireless Network Access
- Step 1: Configure the Device’s WiFi Settings
- Step 2: Configure the Card’s Wireless Security Settings
- Step 3: Choose a Master Connection Mode
- Ethernet Over USB
- Using G4 Web Control to Interact with a G4 Panel
- Using the NetLinx Master To Control the G4 Panel
- Setup Pages
- Protected Setup Pages
- Upgrading Firmware
- Programming
- Overview
- Animated Transitions
- Touch Gesture Recognition
- Page Commands
- Programming Numbers
- "^" Button Commands
- Text Effects Names
- Button Query Commands
- Panel Runtime Operations
- Input Commands
- Embedded codes
- Panel Setup Commands
- Dynamic Image Commands
- Intercom Commands
- SIP Commands
- ^PHN- AUTOANSWER
- ^PHN-CALL
- ^PHN-DECLINE
- ^PHN-INCOMING
- ^PHN- LINESTATE
- ^PHN- MSGWAITING
- ^PHN-PRIVACY
- ^PHN-REDIAL
- ^PHN- TRANSFERRED
- ^PHN-ANSWER
- ^PHN- AUTOANSWER
- ?PHN- AUTOANSWER
- ^PHN-CALL
- ^PHN-DTMF
- ^PHN-HANGUP
- ^PHN-HOLD
- ?PHN- LINESTATE
- ^PHN-PRIVACY
- ?PHN-PRIVACY
- ^PHN-REDIAL
- ^PHN- TRANSFER
- ^PHN-SETUP- DOMAIN
- ^PHN-SETUP- ENABLE
- ^PHN-SETUP- PASSWORD
- ^PHN-SETUP- PORT
- ^PHN-SETUP- PROXYADDR
- ^PHN-SETUP- STUNADDR
- ^PHN-SETUP- USERNAME
- Battery Life and Replacement
- Appendix A: Text Formatting
- Appendix B: Wireless Technology
- Appendix C: Troubleshooting
- Overview
- Panel Doesn’t Respond To Touches
- Battery Will Not Hold Or Take A Charge
- MVP-9000i Isn’t Appearing In The Online Tree Tab
- MVP Can’t Obtain a DHCP Address
- My AP Doesn’t Seem To Be Working
- NetLinx Studio Only Detects One Of My Connected Masters
- Can’t Connect To a NetLinx Master
- Only One Modero Panel In My System Shows Up
- Panel Behaves Strangely After Downloading A Panel File Or Firmware
- Overview

Protected Setup Pages
106
MVP-9000i Modero® Wireless Touch Panel with Intercom
SIP Settings Page
The options on the SIP Settings page (FIG. 90) enable you to establish network settings for using your touch
panel as an IP phone. With a CSG SIP Communications Gateway (FG2182-01, -02, -03), you can use your
touch panel to make and receive local, long distance, and international phone calls, and have access to phone
features like call waiting, caller ID, call forwarding, call queuing, and voice mail. Setting up your touch panel
as a telephone requires that you set it up as one in the CSG SIP Communications Gateway. Refer to the CSG
SIP Communications Gateway Operation/Reference Guide for information on setting up your touch panel to
work as a telephone.
You may need to load a Duet module to enable the touch panel to receive SIP calls. The Duet module translates
between the standard interface and the device protocol. It parses the buffer for responses from the device,
sends strings to control the device, and receives commands from the UI module or telnet sessions. Refer to the
documentation supplied with the Duet Module for more details.
Features on this page include:
FIG. 90 SIP Settings page
A sample UI module is provided in the module package. It is not intended to cover
every possible application, but can be expanded as needed by a dealer to meet the
requirements of a particular installation.
SIP Settings Page
Back: Saves all changes and returns to the previous page.
WiFi/Wired icon: The icon to the left of the Connection Status Icon displays whether the current
connection to the Master is Wireless (image of a radio antenna) or Wired
(image of three networked computers).