
Setup guide
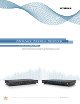


Mirage Media Server Set Up
5 of 19
Set Up Your Mirage Media Server
This section provides an overview of powering up your server for the rst time and using the
Remote Conguration Utility to congure the device.
NOTE
You must plug everything in and connect all wires before powering up.
We recommend attaching a display when you rst power up the server
as the IP address will be on screen.
Once you have made all the necessary connections, turn on the MMS by pressing the power
button on the front of the unit once. You should see that the power LED illuminates.
Wait 2-3 minutes for your server to completely boot up the rst time, or if your server is
connected to a video display, wait until the Now Playing screen shows on the display.
For a wiring diagram, please refer to the Mirage Audio System Quick Start Guide.
Conguring The MMS
The Mirage Media Server has a built-in web server that provides for remote conguration of
the server, control system integration, and control of music playback with the Mirage player
interface.
The MMS is congured at the factory to automatically obtain a network IP address from your
DHCP server (usually your router).
Using any computer on the same network, open the MMS Remote Conguration Utility with
your Internet browser using the default conguration address for your server model:
MMS-5A:
http://Mirage-1/cong
MMS-2A:
http://MMS-2/cong
Using IP:
http://server-ip-address/cong
On some computers (especially Macs) you will need to add the .local sufx to the end of the
server name (example:
http://Mirage-1.local/cong).
You can also look up the IP address of the server using the DHCP client table in your router’s
interface if necessary.
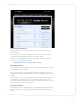
Once you have connected to the MMS conguration page, you will see several tabs for
conguring your MMS:
General Settings
The Server Settings tab allows you to congure the following options.
It is important to remember to press the Save button at the top of this tab after you are nished
making any changes to this page. If you navigate away from this page without pressing Save,
your changes will be lost.