
Wireless Touch Panel with Intercom Reference Guide


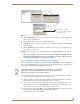
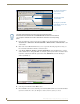
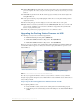
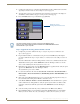
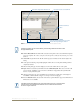
Table Of Contents
- MVP-8400iModero® ViewPoint® Wireless Touch Panel with Intercom
- MVP-8400i Modero Viewpoint Wireless Touch Panel With Intercom
- MVP-BP Power Pack
- NXA-CFSP Compact Flash
- Wireless Interface Cards
- Configuring Communications
- Modero Setup and System Settings
- Wireless Settings Page - Wireless Access Overview
- Configuring a Wireless Network Access
- Step 1: Configure the Panel’s Wireless IP Settings
- Step 2: Configure the Card’s Wireless Security Settings
- Step 3: Choose a Master Connection Mode
- Using G4 Web Control to Interact with a G4 Panel
- Using your NetLinx Master to control the G4 panel
- Upgrading MVP Firmware
- Setup Pages
- Navigation Buttons
- Setup Pages
- Information
- Protected Setup Pages
- Protected Setup Navigation Buttons
- G4 Web Control Page
- Calibration Page
- Wireless Settings Page
- Wireless Security Page
- Open (Clear Text) Settings
- Static WEP Settings
- WPA-PSK Settings
- EAP-LEAP Settings
- EAP-FAST Settings
- EAP-PEAP Settings
- EAP-TTLS Settings
- EAP-TLS Settings
- Client certificate configuration
- System Settings Page
- Other Settings
- Tools
- Programming
- Panel Calibration
- Appendix A: Text Formatting
- Appendix B - Wireless Technology
- Appendix C: Troubleshooting
- Checking AMX USBLAN device connections via Windows Device Manager
- Checking AMX USBLAN device connections via NetLinx Studio
- USB Driver
- Panel Not in Listed As a Connected Device
- Connection Status
- Panel Doesn’t Respond To Touches
- Batteries Will Not Hold Or Take A Charge
- Modero Panel Isn’t Appearing In The Online Tree Tab
- MVP Can’t Obtain a DHCP Address
- My WEP Doesn’t Seem To Be Working
- NetLinx Studio Only Detects One Of My Connected Masters
- Can’t Connect To a NetLinx Master
- Only One Modero Panel In My System Shows Up
- Panel Behaves Strangely After Downloading A Panel File Or Firmware
- Panel Fails to Charge in MVP-WDS
Upgrading MVP Firmware
43
MVP-8400i Modero Viewpoint Wireless Touch Panels
Upgrading MVP Firmware
Except for the MVP-KS (Kickstand for MVP Panels), all MVP panels and their accessories have on-
board firmware which is upgradeable through the use of the latest NetLinx Studio. The MVP acts as a
bridge between the NetLinx Studio program and the installed docking station. Studio can download
firmware to the target docking station by using the connected MVP to pass-along the Kit file to the
docking station. Refer to the NetLinx Studio version 2.x or higher Instruction Manual for more
information on how to download firmware to both a panel and a docking station.
1. Upload the latest Kit file (SW5965_xx version 2.70.xx or higher) to your specific Modero touch
panel and then confirm the firmware file update was successful. Refer to your panel’s instruction
manual for detailed communication and Kit file upload procedures.
Before beginning the Upgrade process:
Setup and configure your NetLinx Master. Refer to the your particular NetLinx Master
Instruction Manual for detailed setup procedures.
Calibrate and prepare the communication pages on the Modero panel for use. Refer to the
Panel Calibration section on page 159.
Refer to the NetLinx Studio version 2.x or higher Help file for more information on uploading
files via Ethernet.
Configure your panel for either direct connect or wireless communication. Refer to the
Configuring Communications section on page 19 for more detailed information about
Ethernet or Wireless communication.
The process of updating firmware involves the use of a communicating NetLinx Master. The required
steps for updating firmware to a Modero panel are virtually identical to those necessary for updating Kit
files to a NetLinx Master (except the target device is a panel instead of a Master). Refer to either your
Master’s literature or Studio 2.x Help file for those procedures.
The latest firmware 2.70.xx (or higher) kit file is panel-specific.
This new firmware also provides both backwards compatibility with the previous
802.11b cards and new security protocols for the new 802.11g wireless CF card.
If you don’t first update the firmware file on the panel, before proceeding with the card
upgrade process, you will be required to configure NetLinx Studio to communicate
with the target panel via a direct USB connection.
In this communication scenario, your PC acts as a Virtual NetLinx Master establishing
a secure USB connection to the target panel and then uploading the new Kit file.
It is recommended that firmware Kit files only be transferred over a direct connection
and only when the panel is connected to a power supply.
If battery power or wireless connection fails during a firmware upgrade, the panel
flash file system may become corrupted.
A touch panel which is not using a valid username and password will not be able to
communicate with a secured Master. If you are updating the firmware on or through a
panel which is not using a username or password field, you must first remove the
Master Security feature to establish an unsecured connection.