
Wireless Touch Panel with Intercom Reference Guide

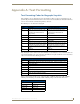


Table Of Contents
- MVP-8400iModero® ViewPoint® Wireless Touch Panel with Intercom
- MVP-8400i Modero Viewpoint Wireless Touch Panel With Intercom
- MVP-BP Power Pack
- NXA-CFSP Compact Flash
- Wireless Interface Cards
- Configuring Communications
- Modero Setup and System Settings
- Wireless Settings Page - Wireless Access Overview
- Configuring a Wireless Network Access
- Step 1: Configure the Panel’s Wireless IP Settings
- Step 2: Configure the Card’s Wireless Security Settings
- Step 3: Choose a Master Connection Mode
- Using G4 Web Control to Interact with a G4 Panel
- Using your NetLinx Master to control the G4 panel
- Upgrading MVP Firmware
- Setup Pages
- Navigation Buttons
- Setup Pages
- Information
- Protected Setup Pages
- Protected Setup Navigation Buttons
- G4 Web Control Page
- Calibration Page
- Wireless Settings Page
- Wireless Security Page
- Open (Clear Text) Settings
- Static WEP Settings
- WPA-PSK Settings
- EAP-LEAP Settings
- EAP-FAST Settings
- EAP-PEAP Settings
- EAP-TTLS Settings
- EAP-TLS Settings
- Client certificate configuration
- System Settings Page
- Other Settings
- Tools
- Programming
- Panel Calibration
- Appendix A: Text Formatting
- Appendix B - Wireless Technology
- Appendix C: Troubleshooting
- Checking AMX USBLAN device connections via Windows Device Manager
- Checking AMX USBLAN device connections via NetLinx Studio
- USB Driver
- Panel Not in Listed As a Connected Device
- Connection Status
- Panel Doesn’t Respond To Touches
- Batteries Will Not Hold Or Take A Charge
- Modero Panel Isn’t Appearing In The Online Tree Tab
- MVP Can’t Obtain a DHCP Address
- My WEP Doesn’t Seem To Be Working
- NetLinx Studio Only Detects One Of My Connected Masters
- Can’t Connect To a NetLinx Master
- Only One Modero Panel In My System Shows Up
- Panel Behaves Strangely After Downloading A Panel File Or Firmware
- Panel Fails to Charge in MVP-WDS
Appendix A: Text Formatting
164
MVP-8400i Modero Viewpoint Wireless Touch Panels
Text Area Input Masking
Text Area Input Masking can be used to limit the allowed/correct characters that are entered into a text
area. For example, in working with a zip code, a user could limit the entry to a max length of only 5
characters but, with input masking, you could limit them to 5 mandatory numerical digits and 4 optional
numerical digits. A possible use for this feature is to enter information into form fields. The purpose of
this feature is to:
With this feature, it is NOT necessary to:
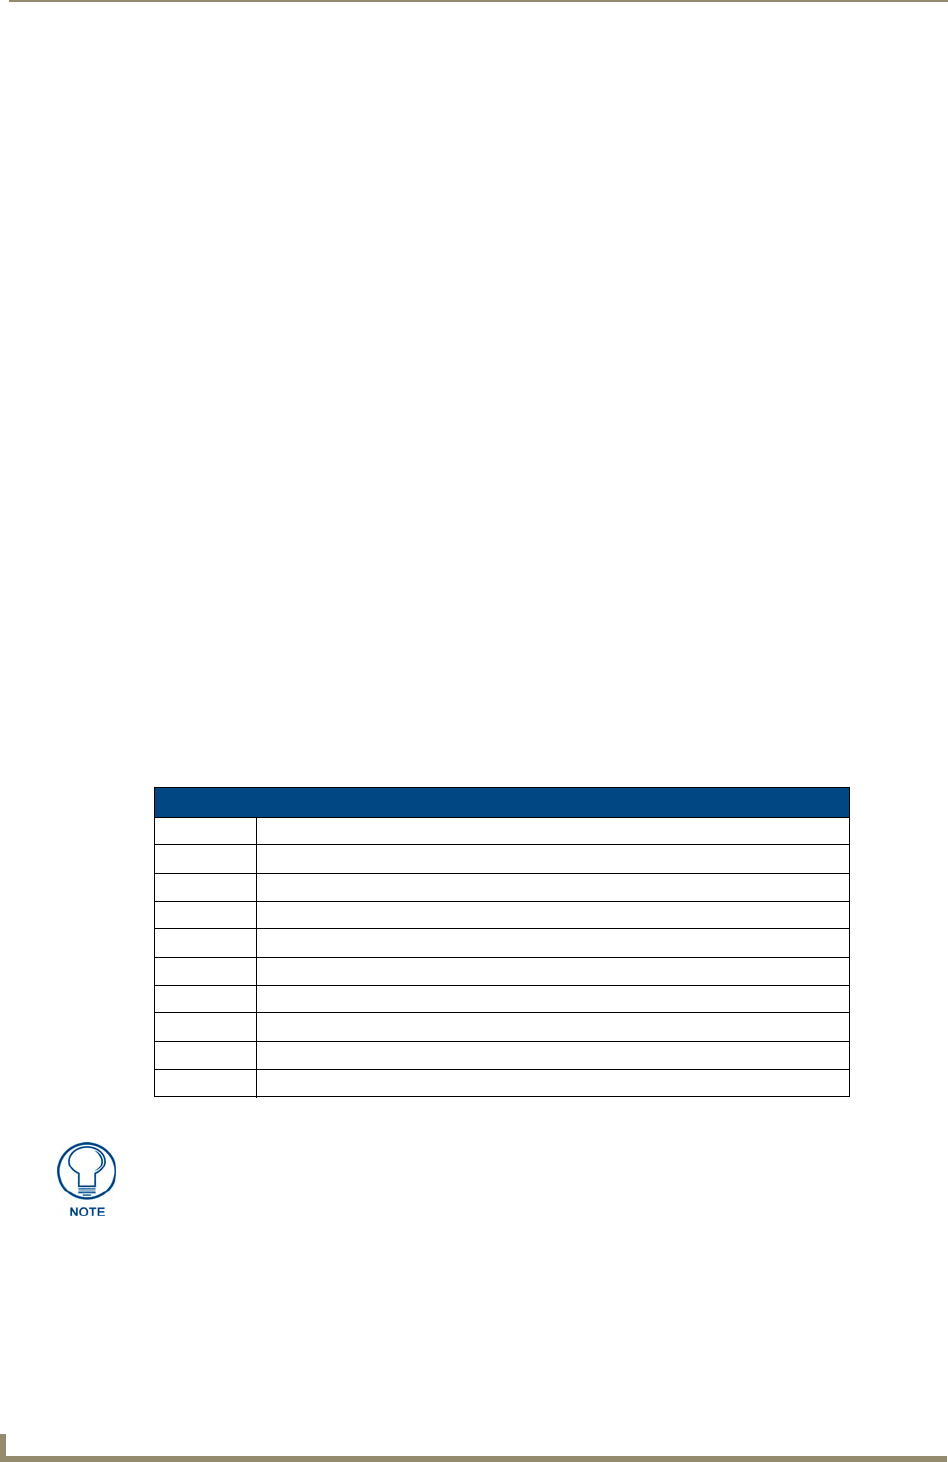
Input mask character types
These character types define what information is allowed to be entered in any specific instance. The
following table lists what characters in an input mask will define what characters are allowed in any
given position.
• Force you to use correct type of characters (i.e. numbers vs. characters)
• Limit the number of characters in a text area
• Suggest proper format with fixed characters
• Right to Left
• Required or Optional
• Change/Force a Case
• Create multiple logical fields
• Specify range of characters/number for each field
• Limit you to a choice of selections
• Handle complex input tasks such as names, days of the week or month by name
• Perform complex validation such as Subnet Mask validation
Character Types
Character Masking Rule
0 Digit (0 to 9, entry required, plus [+] and minus [-] signs not allowed)
9 Digit or space (entry not required, plus and minus signs not allowed)
# Digit or space (entry not required; plus and minus signs allowed)
L Letter (A to Z, entry required)
? Letter (A to Z, entry optional)
A Letter or digit (entry required)
a Letter or digit (entry optional)
& Any character or a space (entry required)
C Any character or a space (entry optional)
The number of the above characters used determines the length of the input masking
box. Example: 0000 requires an entry, requires digits to be used, and allows only 4
characters to be entered/used.