
Wireless Touch Panel with Intercom Reference Guide
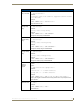
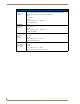
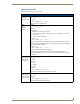
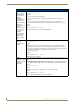

Table Of Contents
- MVP-8400iModero® ViewPoint® Wireless Touch Panel with Intercom
- MVP-8400i Modero Viewpoint Wireless Touch Panel With Intercom
- MVP-BP Power Pack
- NXA-CFSP Compact Flash
- Wireless Interface Cards
- Configuring Communications
- Modero Setup and System Settings
- Wireless Settings Page - Wireless Access Overview
- Configuring a Wireless Network Access
- Step 1: Configure the Panel’s Wireless IP Settings
- Step 2: Configure the Card’s Wireless Security Settings
- Step 3: Choose a Master Connection Mode
- Using G4 Web Control to Interact with a G4 Panel
- Using your NetLinx Master to control the G4 panel
- Upgrading MVP Firmware
- Setup Pages
- Navigation Buttons
- Setup Pages
- Information
- Protected Setup Pages
- Protected Setup Navigation Buttons
- G4 Web Control Page
- Calibration Page
- Wireless Settings Page
- Wireless Security Page
- Open (Clear Text) Settings
- Static WEP Settings
- WPA-PSK Settings
- EAP-LEAP Settings
- EAP-FAST Settings
- EAP-PEAP Settings
- EAP-TTLS Settings
- EAP-TLS Settings
- Client certificate configuration
- System Settings Page
- Other Settings
- Tools
- Programming
- Panel Calibration
- Appendix A: Text Formatting
- Appendix B - Wireless Technology
- Appendix C: Troubleshooting
- Checking AMX USBLAN device connections via Windows Device Manager
- Checking AMX USBLAN device connections via NetLinx Studio
- USB Driver
- Panel Not in Listed As a Connected Device
- Connection Status
- Panel Doesn’t Respond To Touches
- Batteries Will Not Hold Or Take A Charge
- Modero Panel Isn’t Appearing In The Online Tree Tab
- MVP Can’t Obtain a DHCP Address
- My WEP Doesn’t Seem To Be Working
- NetLinx Studio Only Detects One Of My Connected Masters
- Can’t Connect To a NetLinx Master
- Only One Modero Panel In My System Shows Up
- Panel Behaves Strangely After Downloading A Panel File Or Firmware
- Panel Fails to Charge in MVP-WDS
Programming
147
MVP-8400i Modero Viewpoint Wireless Touch Panels
Input Commands
These Send Commands are case insensitive.
Input Commands
^CAL
Put panel in
calibration mode.
Syntax:
"'^CAL'"
Example:
SEND COMMAND Panel,"'^CAL'"
Puts the panel in calibration mode.
^KPS
Set the
keyboard
passthru.
Syntax:
"'^KPS-<pass data>'"
Variable:
pass data:
<blank/empty> = Disables the keyboard.
0 = Pass data to G4 application (default). This can be used with VPC or text areas.
1 - 4 = Not used.
5 = Sends out data to the Master.
Example:
SEND COMMAND Panel,"'^KPS-5'"
Sets the keyboard passthru to the Master. Option 5 sends keystrokes directly to the
Master via the Send Output String mechanism. This process sends a virtual keystroke
command (^VKS) to the Master.
Example 2:
SEND COMMAND Panel,"'^KPS-0'"
Disables the keyboard passthru to the Master.
The following point defines how the parameters within this command work:
• Accepts keystrokes from any of these sources: attached USB keyboard or Virtual
keyboard.
^MBT
Set the mouse
button mode for
the virtual PC.
Syntax:
"'^MBT-<0-3>'"
Variable:
0 = None.
1 = Left.
2 = Middle.
3 = Right.
Example:
SEND COMMAND Panel,"'^MBT-1'"
Sets the mouse button mode for the virtual PC to LEFT.
^MDC
Set the mouse
double click ON
for the virtual PC.
Syntax:
"'^MDC'"
Example:
SEND COMMAND Panel,"'^MDC'"
Enables the double click for the virtual PC.