
Wireless Touch Panel with Intercom Reference Guide
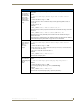
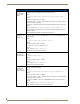
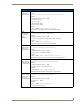
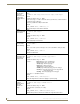
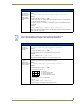
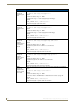
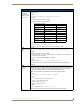
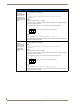
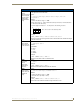
Table Of Contents
- MVP-8400iModero® ViewPoint® Wireless Touch Panel with Intercom
- MVP-8400i Modero Viewpoint Wireless Touch Panel With Intercom
- MVP-BP Power Pack
- NXA-CFSP Compact Flash
- Wireless Interface Cards
- Configuring Communications
- Modero Setup and System Settings
- Wireless Settings Page - Wireless Access Overview
- Configuring a Wireless Network Access
- Step 1: Configure the Panel’s Wireless IP Settings
- Step 2: Configure the Card’s Wireless Security Settings
- Step 3: Choose a Master Connection Mode
- Using G4 Web Control to Interact with a G4 Panel
- Using your NetLinx Master to control the G4 panel
- Upgrading MVP Firmware
- Setup Pages
- Navigation Buttons
- Setup Pages
- Information
- Protected Setup Pages
- Protected Setup Navigation Buttons
- G4 Web Control Page
- Calibration Page
- Wireless Settings Page
- Wireless Security Page
- Open (Clear Text) Settings
- Static WEP Settings
- WPA-PSK Settings
- EAP-LEAP Settings
- EAP-FAST Settings
- EAP-PEAP Settings
- EAP-TTLS Settings
- EAP-TLS Settings
- Client certificate configuration
- System Settings Page
- Other Settings
- Tools
- Programming
- Panel Calibration
- Appendix A: Text Formatting
- Appendix B - Wireless Technology
- Appendix C: Troubleshooting
- Checking AMX USBLAN device connections via Windows Device Manager
- Checking AMX USBLAN device connections via NetLinx Studio
- USB Driver
- Panel Not in Listed As a Connected Device
- Connection Status
- Panel Doesn’t Respond To Touches
- Batteries Will Not Hold Or Take A Charge
- Modero Panel Isn’t Appearing In The Online Tree Tab
- MVP Can’t Obtain a DHCP Address
- My WEP Doesn’t Seem To Be Working
- NetLinx Studio Only Detects One Of My Connected Masters
- Can’t Connect To a NetLinx Master
- Only One Modero Panel In My System Shows Up
- Panel Behaves Strangely After Downloading A Panel File Or Firmware
- Panel Fails to Charge in MVP-WDS
Programming
127
MVP-8400i Modero Viewpoint Wireless Touch Panels
"^" Button Commands (Cont.)
^GSN
Change the
bargraph slider
name or joystick
cursor name.
Slider names and cursor names can be found in the TPDesign4 slider name and cursor
drop-down list.
Syntax:
"'^GSN-<vt addr range>,<bargraph slider name>'"
Variable:
variable text address range = 1 - 4000.
bargraph slider name = See table below.
Example:
SEND_COMMAND Panel,"'^GSN-500,Ball'"
Changes the bargraph slider name or the Joystick cursor name to ’Ball’.
^ICO
Set the icon to a
button.
Syntax:
"'^ICO-<vt addr range>,<button states range>,<icon index>'"
Variable:
variable text address range = 1 - 4000.
button states range = 1 - 256 for multi-state buttons (0 = All states, for General buttons
1 = Off state and 2 = On state).
icon index range = 0 - 9900 (a value of 0 is clear).
Example:
SEND_COMMAND Panel,"'^ICO-500.504&510.515,1&2,1'"
Sets the icon for On and Off states for buttons with variable text ranges of 500-504 &
510-515.
^IRM
Set the IR
channel.
Pulse the given IR channel for onTime in tenths of seconds. Delay offTime in tenths of a
second before the next IR pulse is allowed. ^IRM allows the command itself to specify the
port number. ^IRM is needed because commands programmed on the panel itself can
only be sent to a single port number. (currently this is defined as 1 only).
Note: The port number of the IR will be the port number assigned in TPD4.
Syntax:
"'^IRM-<port>,<channel>,<onTime>,<offTime>'"
Variable:
port = User-defined port on the device (panel).
channel = 1 - 255 (channel to pulse).
onTime = 1/10th of a second.
offTime = 1/10th of a second.
Example:
SEND_COMMAND Panel,"'^IRM-10,5, 20, 10'"
Sets the port 10 IR channel 5 on time to 1 second and off time to 2 seconds.
Bargraph Slider Names:
Circle -M
None
Circle -S
Ball
Precision
Circle -L
Rectangle -L
Rectangle -M
Rectangle -S
Windows
Windows Active
Joystick Cursor Names:
Circle
None
Crosshairs
Arrow
Gunsight
Ball
Hand
Metal
Spiral
Target
View Finder