Operation/Reference Guide ® Mio Modero R-2 Remote Control Device M i o R e m o t e C on t r ol s L a s t R e v i s e d : 8 /2 / 2 0 0 7
AMX Limited Warranty and Disclaimer AMX warrants its products to be free of defects in material and workmanship under normal use for three (3) years from the date of purchase from AMX, with the following exceptions: • Electroluminescent and LCD Control Panels are warranted for three (3) years, except for the display and touch overlay components that are warranted for a period of one (1) year.
Software License and Warranty Agreement LICENSE GRANT. AMX grants to Licensee the non-exclusive right to use the AMX Software in the manner described in this License. The AMX Software is licensed, not sold. This license does not grant Licensee the right to create derivative works of the AMX Software. The AMX Software consists of generally available programming and development software, product documentation, sample applications, tools and utilities, and miscellaneous technical information.
Table of Contents Table of Contents Overview ............................................................................................................1 The Mio Modero® R-2 .............................................................................................. 1 Touch And Tilt Sensor ..................................................................................................... 2 Specifications ..................................................................................................
Table of Contents ii Mio Modero R-2
Overview Overview The Mio Modero® R-2 The Mio Modero® R-2 remote provides custom control features, contained in an elegant handheld rechargeable device. The Mio R-2 controls 6 different device modes, supports 3 macro functions, and is capable of executing 219 functions. The Mio R-2 can transmit in 38 KHz IR, 455 KHz IR, 418 RF (1way) (FG147-418), 433 RF (1-way) (FG147-433), or 38 KHz and one of the RF frequencies.
Overview Touch And Tilt Sensor The Mio R-2 wakes up upon touching either the chrome side rails or pressing a button. When holding the remote and it times out, you can reawaken the device by tilting it. Errant jostling such as a bumped table will not wake the device unless you are holding it.
Overview FCC compliance This device complies with Part 15 of the FCC rules. Subject to the following two conditions: 1. This device must not cause harmful interference and 2. This device must accept all interference, including interference that interferes with the operation of this device. Changes or modifications not expressly approved by the party responsible for compliance could void the user’s authority to operate the equipment.
Overview 4 Mio Modero R-2
Mio R-2 Setup Mio R-2 Setup Installing Your Custom Buttons 3. Flip and turn the Mio R-2 device so that the buttons are facing away from you and the device is upside down. 4. Holding the device in both hands, place your thumbs on the battery door and push up to slide the battery door free. 5. Unscrew the 6 screw points indicated in FIG. 2. 6 Screw Points Programming Jack FIG. 2 Internal Mio R-2 Components 6. Turn the unit over so the buttons are facing you. 7. Lift the top assembly away from the PCB. 8.
Mio R-2 Setup 6 Mio Modero R-2
Programming The Mio R-2 Programming The Mio R-2 Most functionality of the Mio R-2 is handled using the application, KeypadBuilder. Go to www.amx.com for the KeypadBuilder Instruction Manual. The Mio R-2 recognizes a select number of Serial Commands. For a full list and descriptions, consult the Persistent Serial Commands section on page 12. Using Connector Ports on The Mio R-2 The programming jack is used for communication between the device and KeypadBuilder. The programming jack uses a three-wire, 2.
Programming The Mio R-2 IR/RF Code Matrix The IR/RF Code emitted depends upon which of the 6 configurable modes is selected. Below is the list of codes for each button within each mode.
Programming The Mio R-2 IR/RF Code Matrix (Cont.) Button Label Mode 1 Mode 2 Mode 3 Mode 4 Mode 5 Mode 6 41 S. REV Z 7 47 87 127 167 207 42 PLAY A 1 41 81 121 161 201 43 S.
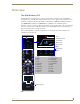
Programming The Mio R-2 Download Mode Pressing "3" on the remote toggles the Download mode OFF and ON. The Download mode must be ON before you can download a file to the Mio R-2 device. While the Download mode is ON the device will not go to sleep. A power cycle will return the device to Download OFF. Debug Mode Pressing button "4" on the remote toggles development mode between ON and OFF. The display indicates the selected mode.
Programming The Mio R-2 Updating Mio R-2 Firmware Updating firmware in the Mio R-2 is also done through the programming jack. To update the main firmware for the Mio R-2: 1. Connect the Mio R-2 to your computer via the programming jack (FIG. 3). 2. Put the device into Download mode, as shown on page 10. 3. Open NetLinx Studio. 4. Set the Master Communication Settings to Axcess Master and set the baud rate to 115200. 5. Go to Tools > Firmware Transfers > Send to Axcess Device...
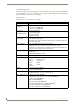
Programming The Mio R-2 Persistent Serial Commands There are a select number of persistent commands the Mio R-2 recognizes. Establish a HyperTerminal session with your device to use the following commands: Serial Commands @BRT Set Brightness level Syntax: "'BRIT-,'" Variables: brightness level # = a value from 0 - 32.
Mio Remote Charging Base Mio Remote Charging Base The Mio remotes are complemented either with a Mio-RCC charging base (FG147-02) or the Mio-RCC rechargeable upgrade kit (FG147-03K). One charging base, a new back housing and a Mio-RBP rechargeable lithium ion battery (FG147-10) are included with the rechargeable upgrade kit. The charging base upgrade kit transforms the Mio R-1, R-2 and R-3 into a rechargeable device.
Mio Remote Charging Base Specifications Rubber feet Angle barrel power connector (Bottom View) Charging contacts (Top View) FIG. 6 Mio Remote Charging Base (Top and Bottom view) The specifications for the Mio remote charging base and kit are as follows: Mio-RCC Remote Charging Kit (FG147-03K) with Base (FG147-02) Specifications Dimensions (HWD) Charging Base - 1.61 (4.09 cm) (height); 4.25 (10.80 cm) (diameter) Lithium Ion Battery - 2.13” x 1.38” x .28” (5.41 cm x 3.45 cm x .71 cm) Weight • 1.
Mio Remote Charging Base Installing The Rechargeable Battery 1. Flip and turn the Mio R-2 so that the buttons are facing away from you and the device is upside down. 2. Holding the device in both hands, place your thumbs on the battery door and push up to slide the battery door free. 3. If present, remove AAA batteries. 4. Remove the 6 screws shown in FIG. 7. 6 Screw Points FIG. 7 6 Screw Points of The Back Housing 5. Remove the back housing. 6.
Mio Remote Charging Base 9. Press the battery between the rubber pads, with sticker showing, in the housing area of the Mio remote. Confirm battery is flush with bottom of battery enclosure on bottom housing. 10. Replace the battery door and slide to lock it in place. 11. Begin charging the battery. Charging The Mio Remote with Charging Base The Mio remotes receive power for charging from a charging base. 1.
Mio Remote Charging Base Mio Modero R-2 17
AMX. All rights reserved. AMX and the AMX logo are registered trademarks of AMX. AMX reserves the right to alter specifications without notice at any time. ©2007 8/07 It’s Your World - Take Control™ 3000 RESEARCH DRIVE, RICHARDSON, TX 75082 USA • 800.222.0193 • 469.624.8000 • 469-624-7153 fax • 800.932.6993 technical support • www.amx.