
Specifications


Archive Service
69
Vision
2
Operation/Reference Guide
17. Repeat steps 11-16 for AMX Vision2. When finished, you can close the Services dialog.
18. In Windows, select Start > Control Panel > Administrative Tools > IIS Manager.
19. Select Connections > Sites > Default Web Site > v2. You will see a folder titled Archives.
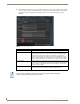
20. Right-click the Archives folder, and select Add Virtual Directory to open the Add Virtual Directory
dialog (FIG. 69).
21. In the Alias text box, enter “ArchiveNAS”.
22. Set the PhysicalPath text box to the UNC Path of the folder on the NAS, for example:
\\NASservername\ArchiveNAS.
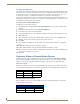
23. Click Connect as, and check the Specific User check box.
24. Select Set and enter “v2system” for the user name and “Vision2” for the password for the NAS share (see
FIG. 70). Click OK.
Do not restart these services at this time.
FIG. 69 Add Virtual Directory dialog
FIG. 70 Set Credentials dialog