
Specifications


Manage System
38
Vision
2
Operation/Reference Guide
User Interface Configuration
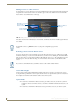
The User Interface Configuration screen allows the administrator to configure the background screen and
cursor colours, etc for Set-top box and tablet users, this is known as the template. There are two columns in
this screen:
On the left is a column used to configure the Tablet background. Use the Templates drop down
menu to select a new template. Click Apply to update the template, tablet users will see the new
Template when they next login to the Vision
2
system.
On the right is a column used to configure the Set-top box templates. Use the Templates drop down
menu to select a new template. Click Apply to update the Template. Note you will need to exit the
main Set-top box menu and press and hold the menu button to force it to refresh the Template.
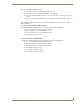
Templates are loaded from C:\inetpub\wwwroot\v2Services\ui\Generic\Templates on the master server. Each
template has its own folder. You can rename a template folder to change the names of the templates and
change the images used by the template if required.
Vision
2
contains a Template Editor application which enables you to create custom user interfaces for set-top
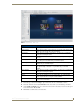
box and tablet users, click Go To Template Editor to access the editor. FIG. 43 displays the main screen.
The following table lists the Device and Template options available in the Template Editor. These options
appear across the top of the screen.
Adding a New Device to the Device List
Adding new devices to the device list is useful since each device uses specific settings geared toward each
individual device. By adding a new device, you can create a series of unique templates with settings that work
perfectly with that specific device.
Perform these steps to add a new device to the template list:
1. Click Add New Device. A series of options appears (FIG. 44).
2. Enter the name of the device in the Name field.
Note the template image filenames, dimensions, and file types must remain the same if you
make any changes
FIG. 42 UI Configuration Screen