
Specifications


Licensing
31
Vision
2
Operation/Reference Guide
2. This selection opens the Contact Information window, enter your contact information. Note If you
already have an amx.com account, click on Lookup Account to provide your credentials (email address
and password) to automatically populate the contact information for this license based on your existing
AMX account information.
3. Click Next to proceed to the Customer Information window. Select your industry sector from the drop
down menu.
4. Click Next to proceed to the Install New AMX Product License window, FIG. 38
5. Enter your Entitlement ID in the text box provided.
6. Click Next to prompt the License Manager to contact the AMX Licensing Server and activate the license
associated with the provided Entitlement ID.The License Activated window indicates that the license was
successfully activated.
7. Click Next to return to the Licensing Options Menu window
8. Proceed to the Vision2 License Management Screen section on page 33
View Existing Licenses
Select the product you want to view licenses for in this case Vision
2
and click Next, this screen shows the
contents of your license. In this case of Vision
2
it shows the names and quantities of each Vision
2
service that
you can install on the servers in your Vision
2
system. Now that you have licensed your Vision
2
system the next
step is to apply the services that are contained in your license to the relevant Vision
2
servers.
Upgrade License
Upgrade your Vision2 license to add more services as follows:
1. Obtain an Asset ID from AMX. Note you will need a separate Asset ID for each Service you want to
upgrade.
2. Connect to your Master Server
3. Click AMX License Manager on your master server desktop
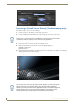
FIG. 37 Licensing Options Dialog
An error message will be displayed if the entitlement has already been registered to another
system or if the entitlement ID is invalid. Please contact AMX Technical support if you
encounter any difficulties obtaining your product license