
Specifications


Installation
12
Vision
2
Operation/Reference Guide
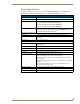
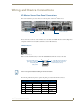
Setup networking on your set-top box as follows:
1. Select the DHCP menu
2. Change the DHCP setting to disabled
3. Enter an IP address, Netmask, Gateway and (optional) DNS server setting for your set top box
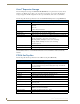
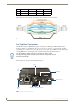
Set the browser home page for your set-top box to point to a page on your Vision2 master server:
1. Use the arrow keys on the keyboard to access the Browser option, and press the right arrow cursor key
to enter this page (FIG. 15).
2. Select the home page setting using the cursor keys and press the DEL key to start editing.
3. Delete any text using the backspace key and then enter the address of your Vision
2
master server. If you
have a DNS server you can enter the hostname of server, if not you will need to enter the server’s IP
address, the URL is as follows: http://<master server name>/aminoH140.aspx or if there is no DNS server
http://<master server IP>/aminoH140.aspx
4. Press enter and you will see another Password prompt, enter the password for modifying settings in the
space provided (the default is snake).
5. Set Full screen mode setting to Disabled and GFX resolution to the maximum resolution of the display
FIG. 14 Network Settings
FIG. 15 Set-top box Browser Configuration
The set-top box must be configured to point at your master server and not to any of the
slave servers