
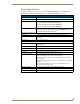
Specifications


Installation
11
Vision
2
Operation/Reference Guide
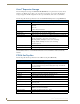
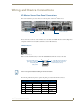
Use an HDMI cable to connect the HDMI port on the set-top box to an HDMI port on your video
source. HDMI also transmits an audio signal in addition to video.
Use a breakout cable to connect the AUDIO VISUAL port on the set-top box to your audio and
video sources. In place of connecting the breakout cable to your audio source, you can connect an
optical audio cable from the SPDIF port on the set-top box to your audio source.
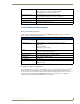
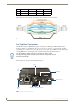
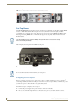
3. Connect an RJ-45 LAN cable to LAN port 1 on the rear of the unit. The other end of the cable connects to
your LAN. This connection accesses your Vision
2
server and can be used to uploads the latest firmware
and Vision
2
menus to the set-top box.
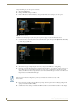
Login to the management pages on your set-top box as follows:
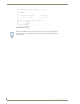
1. Press Alt-M on the keyboard to access the Enter Management Pages login, see FIG. 12
2. In the Password text box, enter the password (the default is leaves) and press Enter. The Set-top box
Management screen appears
3. Check that your set-top box has the correct firmware and opera browser installed, using the arrow keys on
the keyboard to access User Prefs and press the right arrow cursor key to enter this page
4. You are prompted whether you want to enter the User Preferences page. Press enter and use the right/left
cursor keys to change this setting to Yes.
5. Press enter again to confirm the new setting, you will prompted for the write password for modifying
settings in the space provided (the default is snake). You will need to enter this password whenever you
change settings.
6. You should now see a new set of menus, select the info menu and check the software version, make sure
that you are running Opera 10 version 2.34 or 2.5.2.
7. Select the back option and return to the main menu.
FIG. 12 Enter Management Password (default password - leaves)
FIG. 13 Software Version