
Specifications


Record Service
92
Vision
2
Operation/Reference Guide
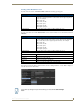
The following settings are available in the Recording section:
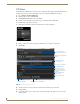
Recording a Video Stream
Perform these steps to record a video stream:
1. Select the IP address of the network the Live Channel is multicast on from the NIC drop down menu.
2. Select Continuous from the Recording type drop down.
3. Select the length of each individual recording from the Segment length options menu.
4. Use the Keep Archives for spin box to indicate how long you want the recordings to remain in the
archive.
5. Click Apply to save the new settings.
6. Change the Service Enable setting to Yes and click Apply to start recording the video stream.
Recordings are placed in a folder with the same name as the Record Service inside the DVR Recordings
folder.
7. Change the Service Enable setting to No and click Apply to stop recording.
Once recording is enabled, you cannot change any of the recording parameters.
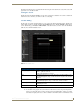
Recording Settings Options
NIC The IP address of the Network interface card from which to record. If the Live
Channel you wish record is multicast on a different NIC then you will need to
change this setting
Recording type This can be either Continuous, Manual, or Scheduled. Continuous recordings
create a new recording in the Archive at specific intervals according to the
value defined in the Segment length option. Manual recordings require the
user to actually start and stop the recording process themselves.
Segment length This value defines the length of each individual recording created by a
continuous recording. Available options are 15, 30, and 60 minutes.
Keep Archives for To prevent the continuous recording mode from filling up the hard disk used by
the archive the system will automatically delete generated recordings after the
number of days specified here. To prevent specific recordings being deleted,
cut and paste video from the relevant sub-folder within the DVR Recordings
folder into the main archive.
Write to Archive This defines the archive in which you want the recordings to save. Note that
you can only record to Archives on the same server as the Record service or to
NAS archives.
All automatic recordings are placed in a special area of the archive called DVR
Recordings
Record From This enables you to select which Live Channel to record.
If you configure a firewall on your Vision2 servers then you must permit incoming
multicasts.