
Specifications


Interactivity
84
AMX InspiredSignage XPress Programming Guide
Playback projects
In some circumstances, you may want to use XPress to create media player-like applications. This may include
the ability to run introductory videos in an exposition display, or running a video file to augment a particular
operation on a keyboard menu. Creating a playback project involves three major steps:
Controlling the play/pause mode of a media file, using the playback.svg file.
Controlling menu buttons (play, stop, pause, etc.), using the menu_button.svg file.
Showing and controlling the progress of the media file, using the slider.svg file.
In this example, the object is to create a basic media player that runs one media file. This file will be controlled
with five individual controls:
Play - The media file runs from its beginning to its end.
Pause - The media file stops at the selected point, restarting at that point when play resumes.
Stop - The media file returns to its beginning when restarted.
Back - The media file automatically returns to its beginning.
Slider - The media file may be run forward or in reverse, depending upon where in its scale the
slider cursor is located.
Playback template
The playback.svg file has several functions, including allowing you to play and pause a media file and getting
information about the file’s running time. To investigate its features:
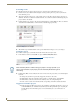
1. In the My Projects tab in the Workspace, right-click anywhere in the Workspace and select New Project
(FIG. 86).
2. Enter Playback into the Name field and click OK.
3. Double-click the index.svg file to open it, and click the Layers tab in the Edit Mode Workspace if it is not
already open.
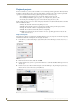
4. From the Interactivity folder in the My Templates tab of the Workspace, drag and drop the playback.svg
file into the Layers tab on the index.svg file (FIG. 87).
FIG. 86 New Project
FIG. 87 Playback.svg