
User manual

Installation
12
MAX-AVP Audio-Video Player
4. Carefully remove the top of the chassis. The rack-ears will mount to the sides of the top section of
the chassis.
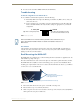
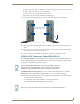
5. Insert the four mounting posts on the rack-ear into a matching set of holes on the chassis, with the
rack-mounting holes on the rack ears facing forward and away from the chassis (FIG. 5).
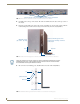
6. On each of the four mounting posts, install washers and secure with a nut (FIG. 6):
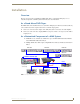
FIG. 4 Remove the four screws that secure the top of the enclosure to the bottom
FIG. 5 Insert the four mounting posts on the rack-ear into a matching set of holes on the chassis
Remove the four screws that secure the top of the chassis to the bottom
Rack-ear
MAX-AVP chassis
(top section - top view)
front
Side panel of chassis
Insert the 4 mounting posts on the
rack-ears into a matching set of holes
on the chassis
There are several rows of holes on the top section of the chassis that can be used for
installing the rack-ears. In this example, we’ll use the second row of holes from the
front to facilitate securing the washers and nuts
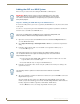
FIG. 6 Install the flat washer, split lock-washer and nut to each of the four mounting posts
Rack-ear
Side panel of chassis
nut
split lock-washer
flat washer