
Corporation Distribution Matrix Instruction Manual


Installation & Setup
18
Octaire Instruction Manual
To install and set up an Octaire system in a rack:
1.
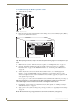
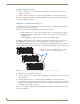
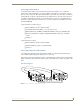
Attach rack ears per FIG. 8.
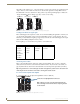
2. Place the enclosure in the rack and attach front-mounting screws to hold it firmly in place (FIG. 9);
repeat for any additional enclosures.
Tip: When placing enclosures, keep in mind that the optimal viewing angle for a control panel is eye
level.
3. Multi-enclosure systems – Link the enclosures together; see “Linking Enclosures” on page 19.
4. Optional – Establish communication with an external control device/system; see “Attaching
External Control” on page 24. For TCP/IP information, see “Connecting to the APWeb Server”
on page 35.
5. Attach only the first source device and the first destination device; see “Attaching Inputs &
Outputs” on page 21. Multiple BNC connectors attached to corresponding connectors on the
enclosures designated on the “Octaire AutoPatch Connector Guide” (page 96) are required for all
video signals except composite.
Do not apply power to the source and destination devices until after the Octaire has power (Step 7).
Tip: Using lacer bars or some other type of cable management system lessens the strain
from cable weight on the connectors and makes servicing the Octaire easier.
6. If applicable – Connect cables for vertical interval sync (VIS) signals; see “Cabling & Setup for
Vertical Interval Sync” on page 32.
7. Apply power to the system according to the power-up procedure; see “Applying Power & Startup”
on page 27.
Note: We recommend using surge protectors and/or AC line conditioners (see page 27).
FIG. 8 Attach rack ears
FIG. 9 Place enclosure(s) in rack and secure with screws