
Installation guide


Kaleidescape Part No. 101-0105-00 Rev 3 Page 57
Kaleidescape Installation Guide Physical Installation
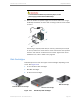
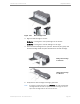
4. Place the disk cartridge in a well-padded container for safe storage and
transport.
5. Insert a new disk cartridge in the empty slot.
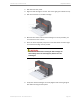
6. For the 3U Server, close the front panel. For the 1U Server, replace the
front panel by aligning the six posts on the rear of the front panel with
the slots in the chassis and pushing the panel until the panel snaps into
place.
Adding a Disk Cartridge in a 3U or 1U Server
A disk cartridge can be added at any time to increase server storage
capacity, whether the server is running or not.
Use the following procedure to add a disk cartridge to a 3U or 1U Server.
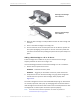
1. Access the front panel of the server.
3U Server – Pull down the front panel.
1U Server – Tug gently on both sides of the front panel and remove.
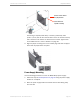
2. Verify that the latch on the disk cartridge, the gray plastic wedge that
extends from the top of the disk cartridge, works properly. See
Figure 3-14.
The latch is designed to retract when the Kaleidescape logo (or white button
on a blank) is pressed, and to pop up and engage with the chassis when a
disk cartridge is inserted. If the latch sticks in the retracted position the disk
cartridge does not lock in place and cannot operate properly.
Note: If the latch sticks, follow the procedure to resolve the problem at
www.kaleidescape.com/go/latch.
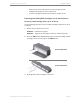
Removing a disk cartridge
from a 3U Server
Removing a disk cartridge
from a 1U Server