
Installation guide


Kaleidescape Part No. 101-0105-00 Rev 3 Page 28
Kaleidescape Installation Guide Physical Installation
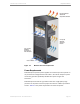
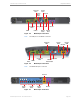
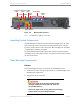
3. Attach the server to the rack by fastening rack ears with the four screws
provided. A Phillips #3 screwdriver is required.
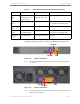
4. Check that disk cartridges are firmly seated.
Note: Do NOT operate the server with empty slots. Open slots compromise the
cooling system. Insert blank cartridges into empty slots.
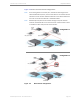
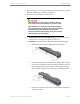
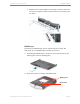
a. 1U Server - Unpack disk cartridges and blanks. Save packaging.
0 Remove the front panel by tugging gently on both sides.
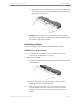
0 Install disk cartridges, then blanks. Insert the first disk cartridge
into the first storage slot and push the disk cartridge in until the
disk cartridge clicks into place. Refer to Removing and Adding
Disk Cartridges or Blanks on page 55 for a detailed procedure.
0 Press firmly, then press once more to be sure disk cartridges are
completely seated.
Disk cartridges are sensitive and susceptible to damage
from shock. Use care when handling. Do not bump or drop.
Disk cartridges are susceptible to electrostatic discharge.
Be careful not to touch the exposed connector at the back of
the disk cartridge. Static electricity can damage the
electronics inside the disk cartridge. Always store and ship
disk cartridges in an antistatic bag.