
Installation guide

Kaleidescape Part No. 101-0105-00 Rev 3 Page 18
Kaleidescape Installation Guide Quick Start
6. If the system has more than one server, select the
GROUPS
tab and
assign servers to the correct groups. See Viewing and Changing Groups
on page 95 for more information on assigning groups.
Step 3 – Set Up the Movie and Music Players
1. Unpack and check against the packing list.
2. Mount the player according to the instructions provided with the
component.
3. Plug one end of an Ethernet cable into the player
NETWORK
port and
plug the other end into a 1000Base-T network switch. Verify that the
switch is connected to the same network as the server.
4. Connect audio and video cables as appropriate for the installation.
5. Connect the player AC power cable to a high-quality surge protector with
a line-noise filter. The front panel status lights of movie players glow blue
in a few seconds. If a Music Player does not glow when plugged in, press
the
POWER
button to turn it on.
After about 30 seconds, longer during a software upgrade, the
components pulse twice to signal that the component is ready to use.
(Kaleidescape player power supplies are universal input and operate on
any nominal line voltage between 100–240 V, 50–60 Hz.)
Note: If the front panel does not turn blue when power is connected, verify
that the power is on by pressing the
POWER
button on the player or the
remote. If the player glows amber, verify that the server is running,
verify network connections, then refer to Troubleshooting Amber Lights
on page 108.
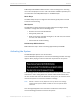
6. Open a web browser on the same network and enter
http://my-kaleidescape/installer (Windows) or
http://my-kaleidescape.local/installer (Mac) to bring up the browser
interface.
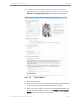
7. Sel ect the
GROUPS
tab and add the player to the same group as the
server.
Note: If there is more than one server on the network, the player glows
amber until assigned to a group.
8. Select the
COMPONENTS
tab and set appropriate audio, video and other
preferences as applicable based on installation requirements.
9. Turn on A/V equipment. The Kaleidescape logo or the onscreen user
interface appears on the display when the A/V equipment is set to the
correct input for the Kaleidescape system.