
Installation guide

Kaleidescape Part No. 101-0105-00 Rev 3 Page 17
Kaleidescape Installation Guide Quick Start
0 Check disk cartridges for sticking latches, insert into server, then
press each disk cartridge firmly to verify that each is completely
seated. Replace front panel.
b. 3U Server –
0 Open the front panel, remove disk cartridges and place on
cushioned, anti-static surface. Do not stack cartridges.
0 Mount server.
0 Check disk cartridges for sticking latches, reinsert into server,
and press each disk cartridge firmly to verify that each is
completely seated. Close the front panel.
2. Connect one end of an Ethernet cable into the server
NETWORK
port and
plug the other end into a 1000Base-T network switch.
Connect the server AC power cable to a high-quality surge protector with
a line-noise filter. Front panel status lights glow blue immediately. After
about two minutes, disk cartridge status lights glow blue, turn off, then
turn on again, and the server is ready to use.
Check the color of the network indicator light on the server network port
and confirm the correct color for a 1000Base-T connection.
The left light indicates activity and is orange when a link is established.
The right light blinks green for activity on a 1U Server and blinks amber
on a 3U Server.
The 1U Server and 3U Server power supplies are universal input and
operate on any nominal line voltage between 100–240 V, 50–60 Hz.
3. Power on the server if front panel does not light.
a. 1U Server – Press the
POWER
button on the front panel.
b. 3U Server – Open the front panel and press the
POWER
button.
If any status on the front of the server is amber, see Troubleshooting
Amber Lights on page 108.
4. Open a web browser on a computer connected to the same network and
enter
http://my-kaleidescape/installer (Windows) or
http://my-kaleidescape.local/installer (Mac) to bring up the browser
interface.
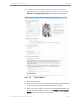
5. Select the
COMPONENTS
tab and confirm that the serial number for the
server on the components page matches the serial number on the
server. (The serial number is located on the back of the server and
behind the front panel.)