Kaleidescape System Installation Guide January 2012
Kaleidescape Installation Guide Kaleidescape, Inc. 440 Potrero Avenue Sunnyvale, CA 94085 USA This document is for informational purposes only. Kaleidescape makes no representations or warranties, express or implied, regarding the accuracy or completeness of the information contained herein and Kaleidescape shall have no obligation to provide updates to this information in the future. Copyright © 2008–2012 Kaleidescape, Inc. All rights reserved.
Kaleidescape Installation Guide Contents 1 Overview The Kaleidescape System . . . . . . . . . . . . . . . . . . . . . . . . . . . . . . . . . . . .7 System Components . . . . . . . . . . . . . . . . . . . . . . . . . . . . . . . . . . . . .7 Data Protection . . . . . . . . . . . . . . . . . . . . . . . . . . . . . . . . . . . . . . . . .8 System Control . . . . . . . . . . . . . . . . . . . . . . . . . . . . . . . . . . . . . . . . . . . . .9 Installation Requirements . . . . . . . . . . . . . . . . . . .
Kaleidescape Installation Guide Kaleidescape Players . . . . . . . . . . . . . . . . . . . . . . . . . . . . . . . . . . 29 Mini System . . . . . . . . . . . . . . . . . . . . . . . . . . . . . . . . . . . . . . . . . . 32 Connecting Components to the Network . . . . . . . . . . . . . . . . . . . . . . 34 Servers . . . . . . . . . . . . . . . . . . . . . . . . . . . . . . . . . . . . . . . . . . . . . . M500 Player. . . . . . . . . . . . . . . . . . . . . . . . . . . . . . . . . . . . . . . . . .
Kaleidescape Installation Guide Region Settings . . . . . . . . . . . . . . . . . . . . . . . . . . . . . . . . . . . . . . . 91 Screen Masking . . . . . . . . . . . . . . . . . . . . . . . . . . . . . . . . . . . . . . . 93 Viewing and Changing Groups. . . . . . . . . . . . . . . . . . . . . . . . . . . . . . . 95 Viewing Diagnostic Information. . . . . . . . . . . . . . . . . . . . . . . . . . . . . . 96 5 Control Systems Communication . . . . . . . . . . . . . . . . . . . . . . . . . . . . . . . . . .
Kaleidescape Installation Guide Link Local Address. . . . . . . . . . . . . . . . . . . . . . . . . . . . . . . . . . . . 157 Server Serial Numbers . . . . . . . . . . . . . . . . . . . . . . . . . . . . . . . . 157 Installer Pages . . . . . . . . . . . . . . . . . . . . . . . . . . . . . . . . . . . . . . . 158 Network Switches . . . . . . . . . . . . . . . . . . . . . . . . . . . . . . . . . . . . . . . . 158 Gigabit Switch . . . . . . . . . . . . . . . . . . . . . . . . . . . . . . . . . . . . . . .
Kaleidescape Installation Guide Section 1 Overview The Kaleidescape Installation Guide describes how to prepare the site network, set up and configure system components, and add new components to an existing installation. This document also describes basic operation and user configuration. Any Kaleidescape component can be used in any Kaleidescape System, regardless of the date of manufacture. Software updates are issued automatically via the Internet.
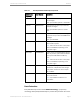
Kaleidescape Installation Guide Table 1-1 Overview Currently Available Kaleidescape Components Kaleidescape Component Model Number Description 1U Server KSERVER-1500 One rack-unit server with up to four 2 TB Disk Cartridges. Holds up to 150 Blu-ray Discs or 900 DVDs. 3U Server KSERVER-5000 Three rack-unit server with up to fourteen 2 TB Disk Cartridges. Holds up to 600 Blu-ray Discs or 3,600 DVDs.
Kaleidescape Installation Guide Overview and music. With RAID-K technology, a failed hard drive does not cause any loss of data. Unlike other variations of RAID technology, RAID-K allows new drives with different storage capacities to be added to the array. However, RAID-K technology does NOT allow swapping disk cartridges between servers. The 3U Server has an additional protection feature, a hot spare disk cartridge.
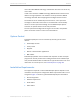
Kaleidescape Installation Guide Overview Internet Family Room 1000 Mbps router/switch (with DHCP) Mini System 1U Server M300 Player Guest Bedroom Master Bedroom Figure 1-1 Home Theater M500 Player M300 Player Typical Installation General Equipment The following basic items are required: • #2 Phillips screwdriver to rack mount system components • High-quality surge protector and sufficient outlets • Computer with a web browser Network Requirements The site network must meet the following minimu
Kaleidescape Installation Guide Overview Video Cables Some Kaleidescape players have up to four video outputs including a combined audio/video HDMI output. For more information about video installation, see Video and Audio Settings on page 71.
Kaleidescape Installation Guide Overview for the server power source; a UPS is optional. See Table 3-1 on page 22 for a detailed list of component power consumption. A/V Connections to the Kaleidescape Players There are two options for installing Kaleidescape components.
Kaleidescape Installation Guide Overview A Mini Player Rack-Mount Shelf contains a rack-mounting kit for mounting one or two mini players in a 19 in. rack. This shelf is available separately and can hold either the 1080p Mini Player or the M300 Player. Music Player The Music Player ships in a single box with an IEC-type AC power cord and screws for rack mounting.
Kaleidescape Installation Guide Note: Overview Activation must be performed by the system owner, not the dealer. 1. Open a web browser and go to www.kaleidescape.com/activate. The Activate your Kaleidescape System page appears. See Figure 1-2. Figure 1-2 Activation Window 2. Enter user information. 3. Scroll down and enter system information. Note that entering the serial number for a single component activates the entire system. 4.
Kaleidescape Installation Guide A message appears confirming a successful activation. See Figure 1-3. Figure 1-3 Activation Confirmation Message 5. Keep the Kaleidescape System on and connected to the Internet until the reminder message disappears. When activation is complete, Kaleidescape sends an email message back verifying activation. Kaleidescape Part No.
Kaleidescape Installation Guide Section 2 Quick Start This section describes the basic steps required to connect and test Kaleidescape System components. If problems occur, refer to Troubleshooting on page 107. Step 1 – Verify Network Connections All Kaleidescape components must be connected to the same local network. Connect the components to a 1000Base-T network switch. These instructions assume there is a router or DHCP server on the network to assign DHCP addresses.
Kaleidescape Installation Guide Quick Start 0 Check disk cartridges for sticking latches, insert into server, then press each disk cartridge firmly to verify that each is completely seated. Replace front panel. b. 3U Server – 0 Open the front panel, remove disk cartridges and place on cushioned, anti-static surface. Do not stack cartridges. 0 Mount server.
Kaleidescape Installation Guide Quick Start 6. If the system has more than one server, select the GROUPS tab and assign servers to the correct groups. See Viewing and Changing Groups on page 95 for more information on assigning groups. Step 3 – Set Up the Movie and Music Players 1. Unpack and check against the packing list. 2. Mount the player according to the instructions provided with the component. 3.
Kaleidescape Installation Guide Quick Start 10. To import content on a Kaleidescape M500 Player, press the EJECT button on the front panel and place a DVD, Blu-ray Disc or CD in the tray. Press the IMPORT button to close the tray. Front panel lights begin pulsing, indicating that the import has begun. 11. Test the movie player using either the browser interface or an IR remote control. Test the music player using the browser interface. a.
Kaleidescape Installation Guide Section 3 Physical Installation Planning the Installation Ventilation and Clearance All Kaleidescape components, except the Kaleidescape M300 Player, fit standard 19-inch racks and ship with removable mounting brackets. The Mini Player Rack-Mount Shelf is an optional accessory kit for mounting up to two M300 Players in a 19-inch rack. Figure 3-1 shows minimum clearance requirements.
Kaleidescape Installation Guide Physical Installation Hot air exhausted outside the component enclosure 2 in. (5 cm) minimum clearance in back 1 in. (2.5 cm) minimum clearance on front and sides Cool air intake Figure 3-1 Minimum Clearance Requirements Power Requirements Kaleidescape component power supplies are universal input and operate on any nominal line voltage between 100–240 V, 50–60 Hz. Verify that power outlets are grounded, preferably shielded from power surges and brownouts.
Kaleidescape Installation Guide Physical Installation Table 3-1 Component Power Requirements Component Power Consumption Maximum Current Draw 1U Server 66 W typical consumption with four 2 TB Disk Cartridges (86 W max) 1.0 A @ 100 V 0.42 A @ 240 V 3U Server 183 W typical consumption with fourteen 2 TB Disk Cartridges (205 W max) 3 A @ 100 V 1.3 A @ 240 V Mini System 85 W typical consumption with four 500 GB Mini Disk Cartridges (74 W standby; 90 W max) 1.5 A @ 100V 0.
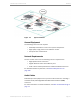
Kaleidescape Installation Guide Physical Installation Figure 3-2 shows two basic network configurations. Note: If the existing switch has too few ports, or Ethernet cable lengths to the switch exceed 328 ft (100 m), add an extra switch to the network. Do NOT substitute a router. Connect additional switches to the switch. Do NOT use the router to connect two switches or bandwidth suffers.
Kaleidescape Installation Guide Physical Installation A/V Connections to Kaleidescape Players Kaleidescape players can be installed in either of the following locations: • In an A/V closet with cables running from the player to the display • In the same area as the A/V equipment Locating the player in the same area as the A/V equipment allows for direct control with an IR remote to the IR receiver on the front of the player and convenient access to the disc tray.
Kaleidescape Installation Guide Physical Installation Table 3-2 Cable Requirements for Kaleidescape Players (Continued) Signal Player Connections Cable Cable Connectors Component (video) Three RCA connections 75-ohm YPbPr analog colored green (Y), blue component video cable (Pb), and red (Pr) Three RCA plugs S-Video (video) S-Video S-Video plug (4-pin mini-DIN) Digital coaxial (audio) Orange RCA Digital audio coaxial cable RCA plug Digital optical (audio) TosLink (not available on the M300
Kaleidescape Installation Guide Physical Installation Composite Video Coaxial Audio Network Network Reset Button Component Video HDMI S-Video Figure 3-5 Note: Analog Audio USB Optical Audio Remote IR-IN M500 Player Connections The USB port on the M500 is reserved. Composite Video DC Power HDMI Figure 3-6 Note: RS-232 Component Video Coaxial Audio Analog Audio Network Reset Button Remote IR-IN Network USB M300 Player Connections The M300 USB port is reserved.
Kaleidescape Installation Guide Physical Installation Component Composite Coaxial Video Video Audio S-Video HDMI Analog Audio Optical Audio Remote IR-IN Zone 1 Zone 2 Zone 3 RS-232 USB Network Figure 3-8 Note: Mini System Connections The Mini System USB port is reserved. Installing System Components The Kaleidescape installation can be as simple as plug-and-play. Or apply optional settings such as local time zone and parental controls, and the system is ready to deliver movies and music.
Kaleidescape Installation Guide Physical Installation 3. Attach the server to the rack by fastening rack ears with the four screws provided. A Phillips #3 screwdriver is required. 4. Check that disk cartridges are firmly seated. Disk cartridges are sensitive and susceptible to damage from shock. Use care when handling. Do not bump or drop. Disk cartridges are susceptible to electrostatic discharge. Be careful not to touch the exposed connector at the back of the disk cartridge.
Kaleidescape Installation Guide Physical Installation 0 Replace the front panel aligning the six posts on the back of the front panel with the six slots in the chassis and push the panel to snap the panel into place. b. 3U Server - Open the server front panel and push firmly on disk cartridges to verify that pre-installed disk cartridges and blanks have not become loose during shipment. Kaleidescape Players Use the following procedure to rack mount Kaleidescape players.
Kaleidescape Installation Guide Physical Installation c. Replace the front panel. Align the three pegs in the front panel with the holes in the player chassis and press until the front panel snaps into place. M300 Player Rack mount the M300 Player with an optional rack-mount shelf. This shelf holds up to two M300 Players and fills one rack unit. 1. If installing two M300 Players, remove the two screws that secure the blanking plate, then the blanking plate. 2.
Kaleidescape Installation Guide Physical Installation 3. The player serial number is not visible after the player is mounted. Attach the extra serial number label (included in the packing box) to an area where the number can be read. Serial number 4. Align the mounting slots with the shelf pegs, and slide the player towards the back of the shelf until the player clicks into place. Repeat if installing a second player. 5. Turn shelf over and attach retaining screws.
Kaleidescape Installation Guide Physical Installation 8. Fasten the shelf to the rack using the lower holes in the rack ears. 9. Install screws in the upper two holes to secure the shelf. Note: The Kaleidescape M300 Player can also be mounted against a wall. See Wall Mounting the M300 Player on page 46. Mini System Use the following procedure to install the rack mount kit and mount the Mini System. 1.
Kaleidescape Installation Guide Physical Installation Use care when handling the Mini System. The Mini System contains fragile disk cartridges. 4. Position the cooling duct with the flat side down and the grille facing the front of the system. 5. Fasten the cooling duct to the Mini System with the six cooling duct screws packaged with the system. Use a #2 Phillips screwdriver; be careful not to overtighten the screws (2 in-lbs maximum torque). 6. Turn the Mini System right side up. 7.
Kaleidescape Installation Guide Physical Installation 8. Attach to rack in the best forward horizontal position. Be sure rack ears are equally aligned from the front. Connecting Components to the Network Use the following procedures to connect components to the network. Connect servers before connecting other components. The two lights above the network connection indicate activity and the type of connection. Servers 1. Connect the Ethernet cable to the port labeled NETWORK on the back of the server.
Kaleidescape Installation Guide Physical Installation 2. Plug the other end of the server Ethernet cable into a 1000Base-T Ethernet switch port. The server has an RS-232 serial port labeled CONTROL reserved for control systems. For more information, see Control Systems on page 98. M500 Player 1. Connect the Ethernet cable to the port labeled NETWORK on the back of the player. 2. Plug the other end of the Ethernet cable into an Ethernet switch.
Kaleidescape Installation Guide Physical Installation a. Connecting to a serial controller The M500 player acts as standard Data Terminal Equipment (DTE) with an RS-232 serial controller, connected via a female–female DB-9 serial cable. Use the pinout shown in Figure 3-9 to wire the DB-9 female connector.
Kaleidescape Installation Guide Physical Installation M300 Player 1. Plug an Ethernet cable into the port labeled NETWORK on the back of the player. 2. Plug the other end of the Ethernet cable into an Ethernet switch. A Gigabit switch is strongly recommended, and required if more than one player is used to watch Blu-ray movies at the same time. The left light indicates connection speed. When a 1000Base-T link is established, this light is amber. When a 100Base-TX link, this light is green.
Kaleidescape Installation Guide Physical Installation 3. Connect appropriate A/V cables. Refer to Table 3-2 for cable restrictions. 4. Connect control cables. The Music Player can connect to two types of controllers. 0 0 Serial controller Ethernet IP To connect serial controller cable. see M500 Player IR cabling instructions above. No additional cabling is required for Ethernet (TCP/IP) controllers if the controller is part of the network. Mini System 1.
Kaleidescape Installation Guide Physical Installation Wireless and powerline connections work well for providing Internet access to the Kaleidescape server, for connecting control systems, and for accessing the browser interface from a computer. However, a wired Ethernet network is required between the Kaleidescape components because of the small tolerance for latency while streaming movies or music.
Kaleidescape Installation Guide Physical Installation wireless bridge or powerline adapter is connected to the Mini System. Note that a wireless router performs the functions of both a router and a WAP. Internet access device Router (if not integrated) WAP or Powerline adapter Wireless bridge or Powerline adapter Mini System Figure 3-10 Kaleidescape Mini System with Wireless or Powerline Networking Equipment Figure 3-11 is a sample wireless configuration for a Mini System and an M300 Player.
Kaleidescape Installation Guide Physical Installation Figure 3-12 is a sample configuration for a 3U Server with an M500 Player and an M300 Player connected to an Ethernet switch. The switch is connected to the Internet using either wireless or powerline networking equipment.
Kaleidescape Installation Guide Physical Installation 3U Server with front panel down 1U Server with front panel off 3. Check that all lights are blue before closing the front panel. Do NOT operate the server with empty slots. Empty slots compromise the cooling system. Fill any empty slots with blank disk cartridges. 4. Leave the server connected to the Internet for at least one hour. 5. After waiting an hour, power off the server, then restart.
Kaleidescape Installation Guide Physical Installation 2. Press the POWER button on the front of the player. The front panel glows blue. M300 Player 1. Plug the DC power cord from the power supply into the socket labeled DC-IN on the back of the player. 2. Plug the AC power cord into the power supply. 3. Plug the other end of the AC power cord to a grounded outlet with a highquality surge protector. The M300 Player does not have a power button.
Kaleidescape Installation Guide Physical Installation 2. Press the POWER button on the front of the player. The front panel glows blue. Mini System 1. Plug the power cord into the socket labeled AC-IN on the back of the Mini System. Plug the other end of the cable into a grounded outlet with a high-quality surge protector. 2. To power on with the power button, pull down the front panel and press the POWER button located to the right of the disk cartridges.
Kaleidescape Installation Guide Physical Installation Standby mode allows other components in the system to access the content on the Mini System and music zones 2 and 3 remain operational. However, while in standby, zone 1 cannot be used for movies or music. To power off the Mini System, press and hold the POWER button for 10 seconds. The disk cartridge lights turn off. Note: In case of power failure, when power is reinstated, the Mini System returns to the same state as when the power failure occurred.
Kaleidescape Installation Guide Physical Installation 5. Press the side panel tabs into the slots. 6. Slide panel forward until the panel locks into place and is flush with the back of the player. 7. Repeat for right side panel, number 502-1003. Note: Panels are purely cosmetic. If space is a consideration, panels can be left off. Wall Mounting the M300 Player The M300 Player ships with a bracket for mounting the player to a vertical surface and a bracket for mounting the power supply.
Kaleidescape Installation Guide Physical Installation 2. Find a mounting spot that allows for cable length limitations. Make allowances for strain relief. 3. Determine if the power supply must be mounted with the player to keep the player within the DC cable length limitation [4 feet (1.2 meters)]. Note: Do NOT lengthen the DC cable of the power supply. 0.5 in. (1.3 cm) min. clearance for side vents 1 in. (2.5 cm) min. clearance in front Do NOT lengthen DC power cable 4 ft (1.2 m) 2 in. (5 cm) min.
Kaleidescape Installation Guide Physical Installation 5. Prepare mounting holes. Place the bracket or bracket template against the wall and mark the locations of the four holes. Invert bracket for mounting orientation with connectors up 6. Drill holes for fasteners. If the surface is wood or a similar material, drill a 3/32 in. (2 mm) pilot hole at each location. 7. Check that the mounting screws are the appropriate length. Do not use the screw anchors for wood. a.
Kaleidescape Installation Guide Physical Installation 3. Slide the bracket down until the player clicks into place. 4. Fasten the bracket to the player with the retaining screw provided. Do NOT use the screw that was removed, that screw is too short. 5. Place the player and bracket over mounting holes. 6. Check that the mounting screws are the appropriate length. Do not use the screw anchors for wood. 7.
Kaleidescape Installation Guide Physical Installation a. If mounting to drywall (hollow wall), or masonry (solid wall), drill a 3/16 in. (5 mm) hole for the screw anchors. Insert the anchors and tap with a hammer until anchors are flush with the surface. b. Tighten each screw with additional turns to expand the anchor inside the wall. See Table 3-3. c. If mounting the power supply with the player, repeat steps for the power supply bracket.
Kaleidescape Installation Guide Physical Installation 3/16 in. hole for anchor or 3/32 pilot hole Screw anchor for drywall or masonry If mounting to drywall (hollow wall), or masonry (solid wall), drill a 3/16 in. (5 mm) hole for the screw anchors. Insert the anchors and tap with a hammer until anchors are flush with the surface. Tighten each screw additional turns, refer to Table 3-3 on page 50. 3.
Kaleidescape Installation Guide Physical Installation To avoid electrical hazard and protect the player, use the power supply provided with the M300 Player. 3. Place the bracket and power supply over the holes and mount using a #2 Phillips screwdriver to fasten with mounting screws until the bracket is secure. If mounting to drywall (hollow wall) or masonry (solid wall), drill a 3/16 in. (5 mm) hole for the screw anchors. Insert the anchors and tap with a hammer until anchors are flush with the surface.
Kaleidescape Installation Guide Physical Installation Disk cartridges are sensitive mechanical devices susceptible to damage from shock. Handle carefully. Protect from bumps and drops. Always transport and ship disk cartridges in anti-static, well-cushioned containers. Handling Disk Cartridges Kaleidescape servers house disk cartridges that contain high-capacity hard drives to store movies and music. Disk cartridges are shipped with the server.
Kaleidescape Installation Guide Physical Installation Server Fault Tolerance RAID-K Data Protection Every Kaleidescape server includes RAID-K technology for content protection.
Kaleidescape Installation Guide Physical Installation When a failed disk cartridge is replaced, the replacement cartridge becomes the new hot spare disk cartridge. Note: Because the hot spare must be able to replace any disk cartridge in the array, the capacity of the hot spare cannot be smaller than any other disk in the array. (Servers other than the 3U Server do not have a hot spare disk cartridge and cannot begin failure recovery until a replacement cartridge is installed.
Kaleidescape Installation Guide Physical Installation Power off the server and remove the disk cartridge. Contact Kaleidescape Support for return information. • The disk cartridge was previously installed in another server. Removing and Adding Disk Cartridges in a 3U and 1U Server Removing a Disk Cartridge from a 3U or 1U Server Use the following procedure to remove a disk cartridge or blank from a 3U or 1U Server. 1. Access the front panel of the server. 3U Server – Pull down front panel.
Kaleidescape Installation Guide Physical Installation Removing a disk cartridge from a 3U Server Removing a disk cartridge from a 1U Server 4. Place the disk cartridge in a well-padded container for safe storage and transport. 5. Insert a new disk cartridge in the empty slot. 6. For the 3U Server, close the front panel. For the 1U Server, replace the front panel by aligning the six posts on the rear of the front panel with the slots in the chassis and pushing the panel until the panel snaps into place.
Kaleidescape Installation Guide Physical Installation Figure 3-14 Disk Cartridge Latch 3. Align the disk cartridge to the slot. 3U Server – Latch goes to the top with lights at the bottom. 1U Server – Latch goes to the left with lights to the right. 4. Insert the disk cartridge into the open slot. Push firmly but gently until the disk cartridge clicks into place. Do NOT slam the disk cartridge. Adding a disk cartridge to a 3U Server Adding a disk cartridge to a 1U Server 5.
Kaleidescape Installation Guide Physical Installation 6. For the 3U Server, close the front panel. For the 1U Server, replace the front panel by aligning the six posts on the rear of the front panel with the slots in the chassis and pushing the panel until the panel snaps into place. Removing and Adding 5U Server Disk Cartridges Removing a 5U Server Disk Cartridge Use the following procedure to remove a disk cartridge or blank from a 5U Server. 1. Pull down the front panel. 2.
Kaleidescape Installation Guide Physical Installation 1. Pull down the front panel. 2. Align the disk cartridge to the slot. The status light goes towards the top. 3. Pull the latch down on the disk cartridge. 4. With the latch down, slide the disk cartridge in as far as possible, just until the latch starts to close. 5. Close the latch completely and push on the label above the status light until the disk cartridge is firmly seated.
Kaleidescape Installation Guide Physical Installation Removing and Adding Mini Disk Cartridges Removing a Mini Disk Cartridge Use the following procedure to remove a disk cartridge or blank from a Mini System. 1. Pull down the front panel on the server. 2. Pull out the latch release on the disk cartridge. 3. Pull on the latch release and remove the disk cartridge. 4. Insert a new disk cartridge in the empty slot. Kaleidescape Part No.
Kaleidescape Installation Guide Physical Installation Close the front panel. Adding a Mini Disk Cartridge Kaleidescape disk cartridges can be added at any time to increase server storage capacity, whether the server is running or not. Use the following procedure to add a disk cartridge to a Mini System. 1. Pull down the front panel. 2. Align the disk cartridge to the slot. The status light must be on the right with the latch release handle closed. 3. Guide the cartridge all the way into the slot.
Kaleidescape Installation Guide Section 4 System Configuration Browser Interface Kaleidescape Systems are configured through the browser interface with two main links: installer pages and user pages.
Kaleidescape Installation Guide System Configuration Troubleshooting if the Browser Interface Does Not Load If using a Windows operating system and the web browser cannot load the browser interface using one of the methods above. Refer to Network Requirements on page 156. Viewing System Information After the Kaleidescape server is installed, powered on, and has an active network link, use the following procedure to check server status and change settings for the installation site. 1.
Kaleidescape Installation Guide System Configuration Figure 4-1 Installer HOME Page If a component has a problem, an alert appears on every page of the browser interface. Figure 4-2 shows an example alert. Figure 4-2 Example of a Browser Interface Alert Setting System Preferences Use the following procedure to set system preferences. 1. Open the installer pages of the browser interface. 2. Select the PREFERENCES tab. See Figure 4-3. Kaleidescape Part No.
Kaleidescape Installation Guide System Configuration Figure 4-3 Installer PREFERENCES Page 3. Change the System URL if setting up multiple (non-grouped) systems at the same site. This descriptive name provides direct access to a server. Enter a descriptive name in the SYSTEM URL field. Characters must be lower case with no spaces. Click SAVE CHANGES. 4. Set the Time Zone. Select from the drop-down menu and click SAVE CHANGES. 5. Set the Music Zone Control.
Kaleidescape Installation Guide System Configuration Configuring System Components The COMPONENTS tab lists properties for system components. Use the following procedures to view and set video and audio format preferences, and network settings. System Components 1. Open the installer pages of the browser interface and select the COMPONENTS tab.
Kaleidescape Installation Guide System Configuration 2. Input meaningful Device Names for each player or Mini System, for example Living Room or Guest Room. Then click OK. The Device Name identifies the component throughout the user interface. For example, the Device Name appears as the name of the onscreen display control panel for the component movie zone and on the PARENTAL CONTROL tab in the user pages of the browser interface. 3.
Kaleidescape Installation Guide System Configuration Note: M-Class players always give preference to the 16:9 version. 9. Select the Screen Saver Timeout period. This option selects how long the onscreen display stays on before showing the screen saver. Use the drop-down menu to select the timeout duration, then click OK. If selecting a screen saver timeout of more than 5 minutes (default), a warning message appears about display burn-in. See Figure 4-5.
Kaleidescape Installation Guide System Configuration Figure 4-6 Component Temperature Help Window Restart The RESTART button is used to restart components remotely. It takes about two minutes to restart a server or Mini System. Any imports in progress are aborted. Restarting the server prompts the server to check for software updates, and Movie Guide and Music Guide updates. A restart also clears alerts; however, if the condition still exists, the alerts reappear.
Kaleidescape Installation Guide System Configuration Each component must be configured individually. Players have several video outputs which are all active simultaneously. Use the VIDEO tab to optimize video for each player in the system. If a player is connected to more than one display device (either using several video outputs from the player or a matrix switcher) video cannot be optimized for each display device.
Kaleidescape Installation Guide System Configuration 1. Select the Primary Video Output format from the drop-down menu. The primary output is typically the output that connects to the primary display device (the display most watched). Default setting is HDMI. 2. The player synchronizes audio and video for the primary video output, although all video outputs remain active. The video outputs cannot be controlled independently. • When HDMI is the primary video output, component video output is 480i/576i.
Kaleidescape Installation Guide System Configuration 5. Click OK to save settings. 6. Select Show Advanced Video Settings for options related to performance and calibration. See Figure 4-8. Figure 4-8 Kaleidescape Part No.
Kaleidescape Installation Guide System Configuration a. Select the appropriate radio button for Adjust onscreen display picture size to control how messages are placed at the edges of the display. 0 LARGE is the default when HDMI is selected as the primary output. 0 SMALL is the default when HDMI is NOT the primary output. Use this setting if messages near the edge of the screen are cut off on the display with the large setting, for example, Pause, or Play.
Kaleidescape Installation Guide System Configuration Figure 4-9 Audio Settings for M500 and M300 Players Table 1 shows the output with default settings. These settings provide maximum compatibility. Table 1 Outputs with the Player Decode (Default) Audio Setting Audio Output Format HDMI Coax/Optical Analog CD PCM stereo PCM stereo Stereo DVD PCM up to 5.1 channels Source bitstream Blu-ray Disc PCM up to 5.1 channels DTS up to 5.1 channels Stereo or PCM Stereo Stereo 1.
Kaleidescape Installation Guide System Configuration Player Decode Mode Select PLAYER DECODE (default) to hear Blu-ray secondary audio or when coaxial, optical, or analog audio outputs are used. PLAYER DECODE sends 48 kHz PCM output over HDMI, up to 5.1 channels depending on content and cabling. In PLAYER DECODE mode, optical/coaxial outputs carry DTS Digital Surround when the soundtrack has more than two channels. Audio can be output over optical/coaxial from any Blu-ray movie in this manner.
Kaleidescape Installation Guide System Configuration In BITSTREAM PASS-THROUGH mode, optical/coaxial audio outputs are silent. 2. Configure the Number of audio channels. Select the audio capabilities of the receiver. (Option is available only if PLAYER DECODE is selected.) If the audio level for movies is lower for M-Class players than the audio level for music and there are only two speakers, set the number of audio channels to two. 3.
Kaleidescape Installation Guide System Configuration Figure 4-10 Advanced Audio Settings for M500 and M300 Players a. Audio track for DVD movies Some DVDs have more than one version of the movie soundtrack in the preferred language. Select which audio format to use when these movies are played. b. HDMI capability override Audio receivers connected via HDMI automatically provide information via EDID used to determine the audio formats sent by Kaleidescape Part No.
Kaleidescape Installation Guide System Configuration the player to the receiver. In rare cases, these capabilities must be overridden because of an EDID that is inaccurate or has been corrupted by an HDMI extender or switcher. c. Stereo mode for movies Select whether PCM stereo audio from any output contains simple left and right channels, or contains additional channel information compatible with Dolby Surround decoders.
Kaleidescape Installation Guide System Configuration Troubleshooting Audio Problems with M-Class Players Problem Action No audio over analog, 1. Play a CD, which always produces the stereo audio optical, coaxial, or HDMI output. If there is no output, check for a problem with connection cabling, audio receiver or processor, or television. 2. If the CD plays, but movie audio does not, verify that the PLAYER DECODE setting is selected in the audio settings. With this setting all audio outputs are active.
Kaleidescape Installation Guide System Configuration Video Settings for the Mini System and 1080p Player Figure 4-11 shows video configuration settings for the Mini System and 1080p Player. Figure 4-11 Video Settings for the Mini System or 1080p Player (top) 1. Select the Primary Video Output format from the drop-down menu. The primary video output is typically the output that connects the player to the primary display device (the display most watched). Default setting is HDMI. Kaleidescape Part No.
Kaleidescape Installation Guide System Configuration The player synchronizes audio and video for the primary video output, although all video outputs remain active. The video outputs cannot be controlled independently. 2. Select Video Mode from the drop-down menus. Video mode choices for other video outputs are automatically set depending on the primary video output selected and its video modes.
Kaleidescape Installation Guide System Configuration Figure 4-12 Note: Letterbox Effect The movie player can only zoom letterboxed 4:3 movies recognized by the Kaleidescape Movie Guide. 5. Select Black Level for component video. Click the radio button next to 0 IRE BLACK LEVEL SETUP (recommended) or 7.5 IRE BLACK LEVEL SETUP. See Figure 4-13. Note: This setting only affects video displays that use component video as the primary video output.
Kaleidescape Installation Guide System Configuration 0 IRE black level refers to the EIA-770.2 video standard, which uses 0 IRE for black and is referred to as darker or enhanced black level. The 0 IRE selection works well with most displays and processors. If this setting produces loss of detail in dark areas of the image, try 7.5 IRE instead. Note: If the display has been calibrated and the black level is changed, the display must be recalibrated for correct black and white levels. 6.
Kaleidescape Installation Guide System Configuration Non-M-Class player optical and coaxial digital outputs are always active, regardless of any other settings. HDMI audio is only active if the HDCP handshake is successful. Analog stereo outputs are active for any audio except DTS Digital Surround. Audio from movies with any audio format is output over HDMI, optical and coaxial cables, and the audio system must do the decoding. Note: The movie player always outputs PCM audio when playing a CD. 2.
Kaleidescape Installation Guide Figure 4-15 Kaleidescape Part No.
Kaleidescape Installation Guide System Configuration 1. Select all the types of outputs that the display supports by checking the checkboxes. 2. Select native video modes for the displays from the drop-down menus. The native mode refers to the number of pixels in the display resolution. 3. Select Primary video output from the drop-down menu. 4. Select the video mode for each format from the drop-down menus. The video mode can be selected automatically or can be specified.
Kaleidescape Installation Guide System Configuration the preferred language. (The disc must contain subtitles or an overdub soundtrack in the selected language for these options to be active.) 3. Click OK to save settings. Network Settings Kaleidescape components, by default, obtain IP addresses from a DHCP server. Use the following procedure if a static IP address must be set (used with control systems) or to change other network parameters. 1. Select the NETWORK tab.
Kaleidescape Installation Guide System Configuration With DHCP reservations, network parameters such as IP address, subnet mask, router IP, and DNS servers are configured in one place (at the DHCP server). If any of these parameters change, only the DHCP server has to be modified. For most installations, the DHCP server built into the router is perfectly adequate. DHCP reservations are usually made using MAC addresses. The procedure to create DHCP reservations is device-specific.
Kaleidescape Installation Guide System Configuration Figure 4-19 CONTROL Tab Settings for Players 2. Select the appropriate serial port settings for the player from the drop-down menus. Table 3 shows server settings and default serial port settings for players. Server control settings cannot be changed but control software settings must match the server control settings.
Kaleidescape Installation Guide System Configuration Kaleidescape component through another component. This is called command routing. Assigning a unique device identifier allows a controller to communicate with multiple Kaleidescape devices with one connection. The only module provided by Kaleidescape that requires CPDIDs to be set is the AMX module. Other modules communicate directly with the player. Note: It is NOT usually necessary to connect a server to a control system.
Kaleidescape Installation Guide Figure 4-20 System Configuration REGION Tab Settings M-Class players are shipped with Blu-ray Disc region A or region B. The Blu-ray Disc region code of an M-Class player cannot be changed by the end user or installer. Only Blu-ray Discs compatible with the region code can be played. Many Blu-ray Discs are region-free and can be played on any M-Class player.
Kaleidescape Installation Guide System Configuration Note: When inserting a DVD from a different region, disable automatic tray ejection temporarily to keep the DVD in the player during the region change. Open the COMPONENTS tab of the browser interface and select DO NOT EJECT DISC from the When Import Finishes drop-down menu. Click OK to save changes. 2. Select the REGION tab. 3. Select the new required DVD region from the Region drop-down menu. Default is 1 - UNITED STATES, CANADA. 4. Click OK.
Kaleidescape Installation Guide System Configuration 1. Select the SCREEN MASKING tab. See Figure 4-21. Figure 4-21 SCREEN MASKING Tab Settings 2. Select the type of screen masking on the display. Click on the appropriate radio button. a. Select DOES NOT USE SCREEN MASKING OR IT USES AUTOMATICALLY CONTROLLED SCREEN MASKING if the display uses an automatically controlled screen masking system.
Kaleidescape Installation Guide System Configuration Note: For more information on programming a control system for automatic screen masking, refer to the control system documentation on www.kaleidescape.com/support/control-systems. 3. Select how to display subtitles when screen masking is used. Click on the appropriate radio button. DVDs often place subtitles below the movie image to avoid interfering with the movie image.
Kaleidescape Installation Guide System Configuration Figure 4-22 Installer GROUPS Page 2. To add a component to a group, find the component, then select the group from the ADD TO GROUP drop-down menu. The page reloads and the component now has an amber REMOVE FROM GROUP link to remove the component from the group. 3. To remove a component from a group, click the REMOVE FROM GROUP link. The page reloads and the component now has a drop-down menu.
Kaleidescape Installation Guide System Configuration Figure 4-23 Installer DIAGNOSTICS Page 2. Check Kaleidescape Services DNS Name Resolution to verify that the server can resolve the IP address for each Kaleidescape service listed. If not, change the network settings for the DNS server address. Note: If a time appears in the Last Success column, this is the time the server successfully identified the IP address of the service. 3.
Kaleidescape Installation Guide Section 5 Control Systems Kaleidescape players support almost any control device. • • • • • • Infrared (IR) remotes Touch panels Computer with a web browser Web tablets One-way keypads iPhone or iPod software applications Kaleidescape provides control modules along with touch panel templates and sample programs for most leading control systems. Kaleidescape also provides databases and IR codes for popular IR remotes.
Kaleidescape Installation Guide Control Systems Touch panel Processor Display Router Kaleidescape player Figure 5-2 Kaleidescape Player and Touch Panel Web tablet Speakers Amplifier Wireless Router Kaleidescape player Figure 5-3 Kaleidescape Player and Web Tablet Communication A control device communicates with a Kaleidescape System using a simple text-based protocol over Ethernet or RS-232, or IR.
Kaleidescape Installation Guide Control Systems Kaleidescape recommends using TCP/IP over Ethernet for control connection in most cases. TCP/IP over Ethernet has several advantages over RS-232. • • • • • • Enables significantly faster communications Provides error detection and correction Uses standard Cat5/5e/6 cable and pinout Allows longer cable run Requires only a single network port Usually requires no additional equipment or wiring Bandwidth can be a key issue, especially with multi-zone systems.
Kaleidescape Installation Guide Control Systems • Code set used by Toshiba DVD players and other manufacturers including Philips, Magnavox, Zenith, Onkyo, and Marantz • Code set used by Kenwood DVD players Types of Remotes IR remotes (other than the Kaleidescape Remote) fall into the following basic categories: • Pre-programmed • Learning • PC Programmable Pre-programmed Remotes Pre-programmed remotes only require setting the remote to control a Toshiba or Kenwood DVD player.
Kaleidescape Installation Guide Control Systems Access the browser interface, go to the HOME tab, and select a player or music zone from the CONTROL PANELS section on the bottom right of the Home page. See Figure 5-4. Figure 5-4 Home Page of the User Pages of the Browser Interface Depending on the selection, the control panel for the onscreen display or music zone appears. Figure 5-5 shows the control panel for a player with an onscreen display.
Kaleidescape Installation Guide Control Systems Figure 5-6 Music Zone Control Panel Web Tablet Any Windows-based web tablet can be used as a dedicated Kaleidescape controller with the Web Tablet Setup program. This program prompts for information, then creates shortcuts on the Start Menu. The web tablet now displays the player control panel in full screen mode when turned on. For more information on web tablet control, go to www.kaleidescape.com/support/control-systems.
Kaleidescape Installation Guide Figure 5-7 Control Systems Example Onscreen Display with Video Onscreen Display without Video Onscreen Display without Video (OSD No Video) provides supplemental information with text-based details for content. The touch panel replicates the details pages for movies or albums while browsing the onscreen display. See Figure 5-8. Figure 5-8 Kaleidescape Part No.
Kaleidescape Installation Guide Control Systems Standalone Control for Music Zones The standalone music control interface for music zones provides text-based music controls on touch panels in rooms without video displays (e.g., hallways). A user can browse and control music playback. See Figure 5-9. Figure 5-9 Example Music Control Interface When selecting the touch screen for an installation, consider whether a video display is present and the technical capabilities of the touch panel.
Kaleidescape Installation Guide Control Systems An installer can program a keypad to control music on a Kaleidescape System as long as the keypad can send a programmer-defined string over RS-232 or TCP/IP. Kaleidescape also provides keypad control modules for several manufacturers that can be downloaded from the Kaleidescape website. Note: The keypad must be able to send a programmer-defined string. Presets cannot be triggered via IR.
Kaleidescape Installation Guide Chapter 6 Troubleshooting Preparation The following tools are recommended: 0 0 0 0 A laptop with an Ethernet port and a serial port A router with at least four ports At least three tested Cat5e or Cat6 patch cables Null modem serial cable The following equipment is optional, but useful and can save time.
Kaleidescape Installation Guide Troubleshooting Troubleshooting Power Problem Probable Cause The front panel does not glow when power is applied. Check that the power source is turned on and 1. Power source is not turned on or there is a power cables are secure. Verify the socket is live by using a socket tester. loose power connection. 2. The component is in standby mode. Solution Use the ON button on a remote control to exit standby mode and turn on the player.
Kaleidescape Installation Guide Problem Troubleshooting Probable Cause Solution The front panel glows 3. There are no available DHCP addresses. amber, and network link and activity status lights are on. Configure the network DHCP server with larger IP address range. Disk cartridge status light glows solid amber. Turn off the server, wait 30 seconds for the drive to spin down, then check for sticking latch and reseat the disk cartridge.
Kaleidescape Installation Guide Troubleshooting Troubleshooting Problems with the Network Problem Probable Cause Solution Network status lights are not on. 1. Component has not finished the boot process. Wait two minutes for component to finish booting. If the component does not boot, contact Kaleidescape Support.
Kaleidescape Installation Guide Problem Troubleshooting Probable Cause Component does not 5. Incorrect network settings. show up on COMPONENTS tab of the browser interface. Solution • Make sure all settings are correct. Check the list of Kaleidescape devices by entering my-kaleidescape/lskd.html into the browser. This procedure will confirm if the IP address settings are correct. • Network settings might have to be changed through the serial port. Refer to the article at www.kaleidescape.
Kaleidescape Installation Guide Troubleshooting Problem Probable Cause Server is offline/not communicating with Kaleidescape. 1. Internet connection is Contact the Internet service provider. down. 2. Incorrect DNS Solution Change to a valid DNS server. 3. MTU (Maximum This setting can usually be changed in the Transmission Unit) size router. 4.
Kaleidescape Installation Guide Troubleshooting Problem Probable Cause Solution Duplicate IP address 1. The static IP address assigned is within the DHCP range. Either change the DHCP range on the DHCP server (usually the router), or change the static IP address to be outside the range. Be careful not to set IP address to the same IP address as another static device. 2. Two DHCP servers on the same network.
Kaleidescape Installation Guide Troubleshooting Troubleshooting Problems with the Browser Interface Problem Probable Cause Solution Cannot access the browser interface. 1. Server is not powered on. Verify that the server is powered on. 2. Not using the correct For Mac, use access URL for a Mac. http://my-kaleidescape.local or http://my-kaleidescape.local/installer or ks- followed by the server twelve-digit serial number; for example, http://ks-00001000040b.
Kaleidescape Installation Guide Problem Troubleshooting Probable Cause Information in browser 1. Multiple Kaleidescape interface does not Systems are set up on match the system. the local network and using the same System URL. Solution Use address http://ks-[server_serial_number]/installer to open the installer pages of the browser interface, select the PREFERENCES tab to change the System URL. Note: If NetBIOS does not resolve, use the server IP address. 2.
Kaleidescape Installation Guide Troubleshooting Troubleshooting Problems with Imports Problem Probable Cause Solution CD, DVD or Blu-ray Disc fails to import (possibly ejecting). 1. Disc is not a CD, DVD or Blu-ray Disc, contains computer data, or was inserted with label down. Verify that the disc is a movie or album and is face up in the tray. IMPORT tab message: “Disc is not a DVD or music CD” 2. Disc has already been Movie or album has already been imported.
Kaleidescape Installation Guide Troubleshooting Problem Probable Cause Solution CD, DVD or Blu-ray Disc fails to import (possibly ejecting). 9. Disc is poorly authored. • Use the Kaleidescape loan process to send the disc for processing. For more information go to www.kaleidescape.com/loan. • See list of poorly authored DVDs at www.kaleidescape.com/go/poorly-authoreddvds. 10. Disc cannot be imported. IMPORT tab message: “DVD/Blu-ray Disc cannot be imported” 11.
Kaleidescape Installation Guide Problem Troubleshooting Probable Cause 1. Network fault between DVD import takes player and server. longer than about 30 minutes per disc or Blu-ray Disc takes 2. DVD is poorly longer than about authored. 60 minutes per disc (average speed). 3. Disc is dirty, scratched, or flawed. Solution Verify there are no network disconnects or faulty Ethernet cables and slow switches, and that the network is active. These DVDs can take several hours to import.
Kaleidescape Installation Guide Troubleshooting Troubleshooting Problems with Audio & Video Problem Probable Cause Solution No audio 1. Audio cables loose or disconnected. Check audio cable connections and terminations. 2. Wrong audio source selected Verify that the audio system is set to play Kaleidescape audio. • Use one of the multichannel audio outputs 3.
Kaleidescape Installation Guide Problem Troubleshooting Probable Cause Audio level for movies Setting for number of too low audio channels is incorrect No video Solution If using two speakers with an M-Class player, set the number of audio channels to two channels. Open the COMPONENTS tab in the browser interface, click the SETTINGS button for the player, select the AUDIO tab, and make AUDIO settings changes. 1. Video cables are loose Check video cable connections.
Kaleidescape Installation Guide Troubleshooting Problem Probable Cause Solution Video appears distorted or compressed. Display aspect ratio not set properly Stop playback. • Open the COMPONENTS tab in the browser interface, click the SETTINGS button for the component, select the VIDEO tab, and check the media format playback options. • Check the aspect ratio settings on the display device or scaler. Video stalls or stutters. 1.
Kaleidescape Installation Guide Cannot enter the passcode. Troubleshooting Remote is not programmed correctly. Program the remote correctly. Kaleidescape components can be programmed with IR codes for a standard Toshiba or Kenwood DVD player. Numeric keypad is not Keypad was not added to showing up on the the template. touch panel. Add keypad to the touch panel template. Parental control is not Default level is set working on a specific incorrectly for that player. player.
Kaleidescape Installation Guide Troubleshooting Troubleshooting Kaleidescape Conductor Problem Probable Cause Conductor does not connect. 1. Computer name is too Check computer properties and verify that the long. computer name is 14 characters or less. Change the name if necessary. 2. NetBIOS problem. Solution • See Network Requirements on page 156. • Contact Kaleidescape Support. Conductor does not work on the Mac. This configuration is not supported. Conductor is not supported on a Mac.
Kaleidescape Installation Guide Appendix A Product Specifications Kaleidescape 1U Server, Model KSERVER-1500 Dimensions: 17.5 in. × 1.7 in. × 18.8 in. (W × H × D) (44.5 cm × 4.3 cm × 47.8 cm) • 1 rack unit • Front panel protrudes 1 in. (2.5 cm) Weight: • 15.0 lbs (6.8 kg) with no disk cartridges installed • 24.0 lbs (10.9 kg) with four 2 TB Disk Cartridges installed Disk Cartridges • KDISK-2000-L: 2.2 lbs (1.0 kg) • KDISK-BLANK-L: 0.35 lbs (0.16 kg) • KDISK-1000-L: 2.0 lbs (0.
Kaleidescape Installation Guide Product Specifications Kaleidescape 3U Server, Model KSERVER-5000 Dimensions: 17.5 in. × 5.2 in. × 19.3 in. (W × H × D) (44.5 cm × 13.2 cm × 49.0 cm) • 3 rack units • Front panel protrudes 1.1 in. (2.8 cm) Weight: • 29.0 lbs (13.2 kg) with no disk cartridges installed • 59.0 lbs (26.8 kg) with fourteen 2 TB Disk Cartridges installed Disk Cartridges • KDISK-2000-L: 2.2 lbs (1.0 kg) • KDISK-BLANK-L: 0.35 lbs (0.16 kg) • KDISK-1000-L: 2.0 lbs (0.
Kaleidescape Installation Guide Product Specifications Kaleidescape M500 Player, Model KPLAYER-M500 Dimensions: 17.5 in. × 1.7 in. × 13.8 in. (W × H × D) (44.5 cm × 4.3 cm × 35.0 cm) without side panels Video Outputs: • HDMI • 1 rack unit Component YPbPr (RCA connectors) • • S-Video • Front panel protrudes 1 in. (2.5 cm) • Composite (RCA connector) Weight: 10.0 lbs (4.
Kaleidescape Installation Guide Product Specifications Kaleidescape M300 Player, Model KPLAYER-M300 Dimensions: 8.4 in. × 1.7 in. × 10.6 in. (W × H × D) (21.3 cm × 4.3 cm × 26.9 cm) Note: Optional rack-mount shelf is available to hold two M300 Players in one rack unit Weight: • 3.0 lbs (1.4 kg) includes 1 lb (0.5 kg) power supply • Rack-mount shelf: 0.5 lbs (0.
Kaleidescape Installation Guide Product Specifications Kaleidescape Music Player, Model KMUSIC-4000 Dimensions: 17.5 in. × 1.7 in. × 13.8 in. (W × H × D) (44.5 cm × 4.3 cm × 35.0 cm) • 1 rack unit • Front panel protrudes 1 in. (2.5 cm) Weight: 10.0 lbs (4.
Kaleidescape Installation Guide Product Specifications Kaleidescape Mini System, Model KSYSTEM-120 Dimensions: • With side panels 17.8 in. × 3.3 in. × 17.3 in. (W × H × D) (45.1 cm × 8.4 cm × 43.9 cm) • Without side panels 16.0 in. × 3.3 in. × 17.3 in. (W × H × D) (40.6 cm × 8.4 cm × 43.9 cm) • With rack-mount kit (2 rack units) 16.0 in. × 3.5 in. × 17.3 in. (W × H × D) (40.6 cm × 8.9 cm × 43.9 cm) Weight: • 20.0 lbs (9.1 kg) without Mini Disk Cartridges installed • 24.0 lbs (10.
Kaleidescape Installation Guide Product Specifications Disc Media: CD Audio, CD-R, CD-RW, DVD, DVD-R, DVD-RW, DVD+R, DVD+RW, DualDisc Connections: • 100Base-TX/1000Base-T Ethernet (RJ45) • Front panel IR receiver window • IR input (1/8 in. mini-plug) • RS-232 control port (DB-9 male) Certifications: • CSA (IEC 60950-1:2001, CSA 60950-1-03) • FCC Class B • GOST R • CE • RoHS compliant Kaleidescape Part No.
Kaleidescape Installation Guide Appendix B Notices Compliance FCC Notice This equipment has been tested and found to comply with the limits for a Class B digital device, pursuant to Part 15 of the FCC Rules. These limits are designed to provide reasonable protection against harmful interference in a residential installation.
Kaleidescape Installation Guide Notices Third-Party Software and Technology Licensing Information Kaleidescape Entertainment Appliance Operating System (KEAOS) This product includes software that is based in part on the work of the FreeType Team. The FreeType Project homepage is at http://www.freetype.org. — This product includes software that is based in part on the work of the Independent JPEG Group.
Kaleidescape Installation Guide Notices 2. Redistributions in binary form must reproduce the above copyright notice, this list of conditions and the following disclaimer in the documentation and/or other materials provided with the distribution. 3. All advertising materials mentioning features or use of this software must display the following acknowledgement: This product includes software developed by the University of Illinois at Urbana, and their contributors. 4.
Kaleidescape Installation Guide Notices Redistribution and use in source and binary forms, with or without modification, are permitted provided that the following conditions are met: 1. Redistributions of source code must retain the above copyright notice, this list of conditions and the following disclaimer. 2.
Kaleidescape Installation Guide Notices THIS SOFTWARE IS PROVIDED BY THE OpenSSL PROJECT "AS IS" AND ANY EXPRESSED OR IMPLIED WARRANTIES, INCLUDING, BUT NOT LIMITED TO, THE IMPLIED WARRANTIES OF MERCHANTABILITY AND FITNESS FOR A PARTICULAR PURPOSE ARE DISCLAIMED.
Kaleidescape Installation Guide Notices IN CONTRACT, STRICT LIABILITY, OR TORT (INCLUDING NEGLIGENCE OR OTHERWISE) ARISING IN ANY WAY OUT OF THE USE OF THIS SOFTWARE, EVEN IF ADVISED OF THE POSSIBILITY OF SUCH DAMAGE. The licence and distribution terms for any publically available version or derivative of this code cannot be changed. i.e. this code cannot simply be copied and put under another distribution licence [including the GNU Public Licence.
Kaleidescape Installation Guide Notices PURPOSE ARE DISCLAIMED.
Kaleidescape Installation Guide Notices INTEL SOFTWARE IS PROVIDED "AS IS," AND INTEL WILL NOT PROVIDE ANY SUPPORT, ASSISTANCE, INSTALLATION, TRAINING OR OTHER SERVICES. INTEL WILL NOT PROVIDE ANY UPDATES, ENHANCEMENTS OR EXTENSIONS. INTEL SPECIFICALLY DISCLAIMS ANY IMPLIED WARRANTIES OF MERCHANTABILITY, NONINFRINGEMENT AND FITNESS FOR A PARTICULAR PURPOSE. 2.
Kaleidescape Installation Guide Notices choose to provide in the future and is free to discontinue its online services at any time. To the extent that you, the End User, provide any information or original works of authorship to be added to AMG Databases, you represent and warrant that you are the sole author of such work(s) and further hereby assign to AMG all rights of copyright therein, including the right to register the copyright in such work(s) as part of the AMG Database.
Kaleidescape Installation Guide Notices 1. Redistributions of source code must retain the above copyright notice, this list of conditions and the following disclaimer. 2. Redistributions in binary form must reproduce the above copyright notice, this list of conditions and the following disclaimer in the documentation and/or other materials provided with the distribution. 3.
Kaleidescape Installation Guide Notices 2. Redistributions in binary form must reproduce the above copyright notice, this list of conditions and the following disclaimer in the documentation and/or other materials provided with the distribution. 3. All advertising materials mentioning features or use of this software must display the following acknowledgement: "This product includes cryptographic software written by Eric Young (eay@cryptsoft.com).
Kaleidescape Installation Guide Notices 2. Redistributions in binary form must reproduce the above copyright notice, this list of conditions and the following disclaimer in the documentation and/or other materials provided with the distribution. 3. All advertising materials mentioning features or use of this software must display the following acknowledgement: This product includes software developed by the University of California, Berkeley and its contributors. 4.
Kaleidescape Installation Guide Notices drives, memory cards and the like). An independent license for such use is required. For details, please visit http://mp3licensing.com. Kaleidescape M-Class Distribution This distribution includes software from the following libraries that are licensed under the GNU General Public License, Version 2.
Kaleidescape Installation Guide Notices These libraries are covered by the GNU Lesser General Public License, Version 2.1, a copy of which is available at http://www.gnu.org/licenses/. A source code version of these Libraries, as defined in the GNU Lesser General Public License, Version 2.1, may be obtained by request sent to info@kaleidescape.com. — This distribution includes software that is subject to the following Copyright Notice, List of Conditions, and Disclaimer.
Kaleidescape Installation Guide Notices 2. Redistributions in binary form must reproduce the above copyright notice, this list of conditions and the following disclaimer in the documentation and/or other materials provided with the distribution. Neither the name of the University nor the names of its contributors may be used to endorse or promote products derived from this software without specific prior written permission.
Kaleidescape Installation Guide Notices Copyright (c) 2000-2004 convergence (integrated media) GmbH Permission is hereby granted, free of charge, to any person obtaining a copy of this software and associated documentation files (the "Software"), to deal in the Software without restriction, including without limitation the rights to use, copy, modify, merge, publish, distribute, sublicense, and/or sell copies of the Software, and to permit persons to whom the Software is furnished to do so, subject to the
Kaleidescape Installation Guide Notices Copyright 2002,2003,2004,2005 David A. Schleef All rights reserved. Redistribution and use in source and binary forms, with or without modification, are permitted provided that the following conditions are met: 1. Redistributions of source code must retain the above copyright notice, this list of conditions and the following disclaimer. 2.
Kaleidescape Installation Guide Notices 3. The names of its contributors may not be used to endorse or promote products derived from this software without specific prior written permission. THIS SOFTWARE IS PROVIDED BY THE COPYRIGHT HOLDERS AND CONTRIBUTORS "AS IS" AND ANY EXPRESS OR IMPLIED WARRANTIES, INCLUDING, BUT NOT LIMITED TO, THE IMPLIED WARRANTIES OF MERCHANTABILITY AND FITNESS FOR A PARTICULAR PURPOSE ARE DISCLAIMED.
Kaleidescape Installation Guide Notices 4. The names "OpenSSL Toolkit" and "OpenSSL Project" must not be used to endorse or promote products derived from this software without prior written permission. For written permission, please contact openssl-core@openssl.org. 5. Products derived from this software may not be called "OpenSSL" nor may "OpenSSL" appear in their names without prior written permission of the OpenSSL Project. 6.
Kaleidescape Installation Guide Notices THIS SOFTWARE IS PROVIDED BY ERIC YOUNG "AS IS" AND ANY EXPRESS OR IMPLIED WARRANTIES, INCLUDING, BUT NOT LIMITED TO, THE IMPLIED WARRANTIES OF MERCHANTABILITY AND FITNESS FOR A PARTICULAR PURPOSE ARE DISCLAIMED.
Kaleidescape Installation Guide Notices 2. Redistributions in binary form must reproduce the above copyright notice, this list of conditions and the following disclaimer in the documentation and/or other materials provided with the distribution. 3. The name of the author may not be used to endorse or promote products derived from this software without specific prior written permission.
Kaleidescape Installation Guide Notices modify, merge, publish, distribute, sublicense, and/or sell copies of the Materials, and to permit persons to whom the Materials are furnished to do so, subject to the following conditions: The above copyright notice and this permission notice shall be included in all copies or substantial portions of the Materials.
Kaleidescape Installation Guide iOS Frameworks CommonCrypto/CommonDigest.h, CommonCrypto/CommonCryptor.h, Security/ Security.h This product includes software from iOS frameworks available at http:// opensource.apple.com/source/ and licensed under the terms of the Apple Public Source License version 2.0, http://www.opensource.apple.com/license/apsl/. Berkeley Sockets This product includes third-party software included with the Xcode toolset.
Kaleidescape Installation Guide 2. Redistributions in binary form must reproduce the above copyright notice, this list of conditions and the following disclaimer in the documentation and/or other materials provided with the distribution. 3. All advertising materials mentioning features or use of this software must display the following acknowledgement: This product includes software developed by the University of California, Berkeley and its contributors. 4.
Kaleidescape Installation Guide More information about Cinavia technology is provided at the Cinavia Online Consumer Information Center at http://www.cinavia.com. To request additional information about Cinavia by mail, send a postcard with your mailing address to: Cinavia Consumer Information Center, P.O. Box 86851, San Diego, CA, 92138, USA. This product incorporates proprietary technology under license from Verance Corporation and is protected by U.S. Patent 7,369,677 and other U.S.
Kaleidescape Installation Guide Appendix C Network Requirements This appendix provides information on designing, troubleshooting and optimizing Ethernet networks used with Kaleidescape movie servers. The Browser Interface The browser interface is used to view and edit information about movies and music and configure a system. For Windows Use the following procedure to open the browser interface using Windows. 1. Open a web browser and enter http://my-kaleidescape.
Kaleidescape Installation Guide Network Requirements 5. Install Bonjour for Windows. Go to the Bonjour download page and click the DOWNLOAD button. 6. Enter http://my-kaleidescape.local again. For Mac Use the following procedure to open the browser interface using a Mac. 1. Open a web browser and enter http://my-kaleidescape.local. If the browser interface does not appear or is slow to appear, go to the next step. 2. Enter the browser interface IP address in the web browser. a.
Kaleidescape Installation Guide Network Requirements To open the browser interface for a specific server, enter http://ks- followed by the twelve-digit serial number of the server. For example, for a server with the serial number 0000 0001 2345, enter http://ks-000000012345 for Windows or http://ks-000000012345.local for Mac. A dealer who has a demonstration system plus one or more customer systems on the dealer’s network can access the browser interface for each system using this method.
Kaleidescape Installation Guide Network Requirements Network Connections Cat5, Cat5e and Cat6 network cabling can be used. Network cabling must have all four pairs of the cable terminated at each connector for 1000Base-T speed. Kaleidescape strongly recommends the use of wired Ethernet network connections between servers and players.
Kaleidescape Installation Guide Network Requirements Kaleidescape components, go to the COMPONENTS tab of the browser interface at http://my-kaleidescape/installer/components.html. Resetting an M-Class Player to Use a DHCP Address To remove a static IP configuration on an M-Class player, press the network RESET button on the back of the player to return the player to the factory default DHCP setting. The network RESET button is located just left of the analog audio connectors.
Kaleidescape Installation Guide Appendix D Installation Checklist This installation checklist helps clarify the information and equipment required for a Kaleidescape installation, and verify that the installation site meets basic requirements. Important First Steps Ask the customer to activate the system at www.kaleidescape.com/activate. Provide the serial number of one of the components, which is required for activation. The system can be installed and tested prior to activation.
Kaleidescape Installation Guide Installation Checklist Allow enough time to import the customer’s content. It takes about 1 hour to import a Blu-ray Disc, 30 minutes to import a DVD, and 15 minutes to import a CD. Tools and Supplies Having the following items on hand can help the installation go smoothly.
Kaleidescape Installation Guide Installation Checklist Controls and Displays If using a control system (Crestron, AMX, etc.) to control the Kaleidescape System, determine if the control will be done over TCP/IP, Serial RS-232, or IR. If using control via TCP/IP, assign each Kaleidescape component a DHCP reservation on the DHCP server. Assign and document the following for all Kaleidescape components and the control system. Device (e.g.