
Instruction manual


Web-Based Configuration Pages
26
IS-SPX-1000 & IS-SPX-1300 Inspired Signage XPress Players
Fixed IP Configuration
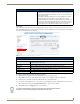
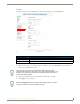
To manually configure an IS-SPX Player to connect to a specific network with a fixed IP address:
1. Get the information on the network to be reached. This includes a range of free IP addresses that can be allocated to
the IS-SPX Player without network conflicts and the correct subnet mask.
2. On the Network Settings page Basic tab, check the Static radio button to enable the Static Network Settings fields.
3. Enter a static IP address in the range of the free IP addresses of your network.
4. Make sure that the subnet mask corresponds to your network configuration.
5. Enter the other network parameters if known.
6. Press the Apply button to validate the changes.
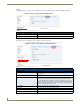
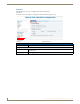
Advanced
The Advanced tab on the Network Settings page includes additional options for accessing networks and proxy servers
and changing SNMP settings.
If the IS-SPX Player has been configured with an incorrect IP address, it will need to
be reinitialized to factory default and the configuration procedure restarted.
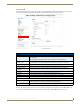
FIG. 20 Administration - Network Settings - Advanced
Administration - Network Settings - Advanced
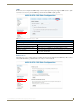
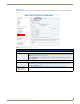
Identification:
Device name: This field displays the name assigned to the device in the network. To
change the Device Name, enter a new name in the field and press the Apply
button. The default is the device’s Serial Number.
Multiscreen ID: This field displays the device’s Multiscreen ID. To change the Multiscreen ID,
enter a new ID name or number in the field and press the Apply button. The
default is the device’s Serial Number.
Network API:
Enable API server using port: Click to change the port for the API server. Click Apply to save any changes.
Continued