
Instruction manual

Web-Based Configuration Pages
25
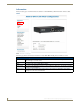
IS-SPX-1000 & IS-SPX-1300 Inspired Signage XPress Players
Network Settings
Although the IS-SPX Player may be used on its own with a display and power source, it may also be installed as part of
a network. The Network Settings page allows configuration with direct or remote networks.
Connections
The Connections tab enables users to configure the player network connections.
Automatic DHCP Configuration
To manually configure an IS-SPX Player to connect to a specific network using DHCP for the attribution of network
addresses:
1. On the Network Settings page under the Basic tab, check the DHCP radio button.
2. Validate the new network configuration by pushing the Update button.
3. Re-enter the device’s IP address to verify that the configuration is complete.
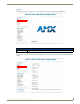
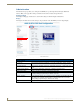
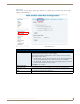
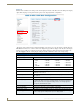
FIG. 19 Administration - Network Settings - Connections
Administration - Network Settings - Connections
Network Settings:
Use this interface
for the network:
Use this dropdown menu to choose between Ethernet or a 3G Modem.
DHCP: Click to use the DHCP protocol. If selected, all of the fields below the button are grayed out.
Static: Click this button to use the Static protocol. If selected, all of the fields below the button are enabled,
and the appropriate network information must be entered.
Address: Enter the IP address for the network server.
Netmask: Enter the Subnet Mask address.
Gateway: Enter the Gateway address.
DNS Server 1-3: In these fields, enter the address of the primary DNS server and any secondary servers, if available.
DNS Suffix: Enter the DNS suffix for the network.
Apply Click on Apply to save all changes made.
If the IS-SPX Player has been configured to use DHCP but the DHCP server cannot
be contacted by the device, you need to reinitialize the unit to its factory default and
restart the configuration procedure.