
Instruction manual


Installation
11
IS-SPX-1000 & IS-SPX-1300 Inspired Signage XPress Players
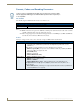
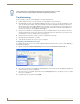
2. Select the update time.
3. Press Apply to validate your changes.
Getting Connected
The IS-SPX Player has a special procedure for connection for the first time to a PC using the RJ-45 Ethernet interface.
This step is required to remote publish content on an IS-SPX Player. This procedure requires an IS-SPX Player and one
of the following configurations:
PC with RJ-45 10/100/1000 Ethernet interface and an Ethernet cable.
PC with RJ-45 10/100 Ethernet interface and an Ethernet crossover cable.
PC with RJ-45 10/100 Ethernet interface, a switch and 2 Ethernet cables.
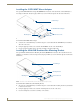
To make a remote connection for the first time:
1. Connect the PC, through the switch if using one in the particular configuration, to the IS-SPX Player following one
of the above schemes.
2. Power up the PC (and switch, if applicable).
3. Power up the IS-SPX Player.
4. Make sure that the IS-SPX Player has completed the booting phase: allow about 1 minute from the start of the
powerup. If the device is connected to a display, you should see the default animated logo.
5. Check that the LED is blinking green once per second.
6. Open a web browser and enter the IP address of the IS-SPX Player in the location bar at the top to open the Web-
Based Configuration Pages (for more information, please refer to the Web-Based Configuration Pages on page 13).
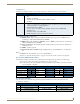
Accessing and Changing the IS-SPX Player IP Address
The IS-SPX Player automatically uses DHCP to assign an IP address to the device when first configured, but this may be
changed to a preassigned IP address. To access the IP address for the IS-SPX Player:
1. In a Zero-Configuration-enabled application, such as NetLinx Studio or in a ZeroConfiguration-enabled browser,
look for the entry for the IS-SPX Player and its assigned serial number. (This serial number may be found on the
underside of the device.)
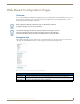
2. Click on the entry to open the device’s Web-Based Configuration Pages. (For more information, please refer to the
Web-Based Configuration Pages on page 13.)
3. In the Status page of the Information section, the IP address is displayed below the serial number and firmware
version.
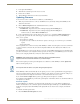
To change the IP address of the IS-SPX Player:
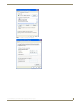
1. From the Web-Based Configuration Pages, click the Network Settings listing in the Administration menu.
2. In the Basic tab of the Network Settings page, click the Static radio button to switch the settings from DHCP to
Static.
3. In the fields below the Static radio button, enter the desired IP address in the Address field.
4. Add the subnet mask, gateway, and DNS information into the appropriate fields and press Apply.
This procedure applies only if you have not modified the default network configuration
of the IS-SPX Player. See the Resetting the IS-SPX Player to Factory Default
Settings on page 9 to make sure that your IS-SPX Player is in the default network
configuration.
Note that the IS-SPX Player does not need to be connected to a display. Allow about
one minute to the IS-SPX Player to boot up, with the green light blinking once per
second.