
Instruction manual


Installation
9
IS-SPX-1000 & IS-SPX-1300 Inspired Signage XPress Players
Installation
Overview
The installation of an IS-SPX Player starts by plugging in two cables: the power cable and the video cable (HDMI and/or
VGA) to the display. As soon as it is connected to the power line, the device will boot in a few seconds and automatically
select the resolution supported by the associated digital display. Content rendering will begin in less than 1 minute.
When connected to a local network through the RJ45 connector, the IS-SPX Player supports both DHCP for automatic
configuration of the network and manual configuration by specifying a static IP address and network properties. A hook
and loop strip can be used to secure the IS-SPX Player to any desired position on a wall or behind a display. The unit can
be easily located near the display, as it does not put off significant heat nor does it contain any moving mechanical parts.
Once installed, getting started with the IS-SPX Player is a matter of a few simple steps. The following sections show how
to connect one or more units to a network and how to publish content from the XPRESS software to specific displays.
Powering up the IS-SPX Player
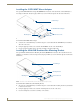
1. Check your digital display. The IS-SPX Player can drive a digital display through HDMI or VGA connections.
Make sure that your display supports at least one of the two.
2. Get the correct video cable for the display. Older displays may require a VGA cable.
3. Connect the IS-SPX Player to the display. Simply plug the HDMI or the VGA cable between the corresponding
video connector on the IS-SPX Player and the corresponding video input connector of your display.
4. Power up the display. Make sure to select the right video input.
5. Power up the IIS-SPX Player. Use the cables and the power converter provided in the IS-SPX Player package. Plug
the power converter on one side to a 110-220V outlet and on the other to the back panel DC jack. Shortly after
power up, the screen displays the AMX splash screen.
The first time the IS-SPX Player boots, the automatic configuration procedure takes about 2 minutes. The process will be
reduced to less than 50 seconds when you reboot the IS-SPX Player again. During this booting process, the front panel
LED shows green and red activity.
At the end of the boot process, the screen will start displaying the animated AMX logo. This is the default content. At
this time, the green LED blinks regularly on and off every second to indicate that the IS-SPX Player is in operating
normally.
If your system does not behave as described above make sure that the digital displays are functional and that the right
input has been selected (some displays have multiple inputs and you may need to manually select the right one). Also
check that the reset push button is not being pressed by some other system component. If the set-up appears correct, try
to power cycling the IS-SPX Player unit by unplugging and plugging the power.
Resetting the IS-SPX Player to Factory Default Settings
To reinitialize the IS-SPX Player to its factory default settings:
1. Unplug the IS-SPX Player from the power.
2. Push the reset button and keep it pressed.
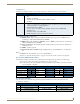
In order to facilitate the best transmission of data, including EDID information,
standard pinouts for VGA cables should be used.
When installing the IS-SPX Player , be careful to avoid any water or high humidity
exposure.
The following procedure will delete all previously saved content and configurations on
the IS-SPX Player.