
Specifications

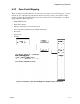

Programming Overview
150972 6-3
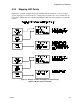
3. Select for Program Menu.
4. From the next menu, select for JumpStart.
5. The message "WARNING Will reset all system options" displays on the LCD. Select Yes
to continue. A series of messages displays for the next several seconds. JumpStart scans
the SLC loops for devices. This can take several minutes, depending on the number of
devices attached.
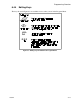
6. When the message "Configure System Done" displays on the LCD, press any key to con-
tinue.
7. Select one of the following options from the menu that displays.
- Review System Press if you need to review the JumpStart configuration.
- Repeat JumpStart Press if you need to rerun JumpStart for any reason.
- Accept Configuration 1. If you are ready to make the JumpStart configuration permanent, select .
2. The system will ask you if the installation contains duct detectors. If there
are none, select for No and skip to Step 8. If the system contains duct
detectors, select for Yes and continue with Step 3.
3. From the list that displays, select the 5815 device that contains the duct
detectors.
4. The first photoelectric or ionization detector on the system will display.
Select for DUCT and for NonDUCT.
5. Press to select the next detector. Select for DUCT and for Non-
DUCT. Continue until all duct detectors have been selected. (Note: You can
move backwards through the list with .)
6. When you reach the last detector on this device, press .
7. The system will ask you if there are more duct detectors in the system. If
there are, select for Yes and repeat from Step 3. If there are no more
duct detectors, select for No and continue with Step 8.
8. The system will restart in 10 seconds. You can press to restart immedi-
ately. Do not select for System Diagnostics. (This feature is for use in
testing at the factory.)
9. After the system resets, it will use the new JumpStart configuration.
7
6
1 1
2 2
3 3
2
1
1 2
1 2
1
2
1
2