
Operating instructions

Unpacking
Remove the VP301 from the shipping container
and examine it for any signs of shipping damage
or missing items, (check inventory list on page 5).
All shipping materials should be saved if the unit
is to be moved or should need to be returned for
service or repair.
Installation
The VP301 is designed to be placed on a table or
rack mounted. If the rack mounting installation kit is
to be used, the rack mount ears are installed by
removing the 4 screws retaining the side panels and
installing the rack mount ears using the 4 screws.
Remove the four feet from the unit. When installing
in a rack, it will be necessary to support the unit by
using rack support rails supplied by the rack manu-
facturer.
Do not support the unit by the rack mount ears
alone!
Contact Faroudja to order rack kits.
Ventilation
The VP301 will require that air flows freely through
both the bottom and top vent holes. Blocking these
holes will greatly reduce the reliability of the unit
and lead to the possibility of overheating.
When the unit is rack mounted, a minimum of
1.25" (1 rack unit height) of free space is to be pro-
vided for both the top and bottom of the unit to
allow for proper cooling. It is also recommended
that the rack be forced air cooled.
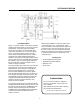
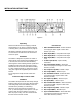
Rear Panel I/O
11. Video Termination Switch Ð Select ON when
not looping the Video signal to other video
devices, (75 Ohm).
12. Video Input (BNC) Ð Composite Video Input
13. Video Input (RCA) Ð Composite Video Input
14. Video Input (BNC) Ð Composite Video Input
Loop
15. S-Video Input (4 Pin) Ð input internally
terminated.
16. R/R-Y Termination Switch Ð Select ON
when not looping the R/V signal to other video
devices (75 Ohm).
17. R/R-Y Input Loop (BNC) Ð Red/R-Y Input
18. R/R-Y Input (BNC) Ð Red/R-Y Input
19. G/Y Termination Switch Ð Select ON when
not looping the G/Y signal to other video
devices (75 Ohm).
10. G/Y Input Loop (BNC) Ð Green/Y Input
11. G/Y Input (BNC) Ð Green/Y Input
12. B/B-Y Termination Switch Ð Select ON when
not looping the B/B-Y signal to other video
devices (75 Ohm).
13. B/B-Y Input Loop (BNC) Ð Blue/B-Y Input
14. B/B-Y Input (BNC) Ð Blue/B-Y Input
15. Sync Termination Switch Ð Select ON when
not looping the Composite Sync signal to
other video devices (75 Ohm).
8
INSTALLATION INSTRUCTIONS
Figure 2