
User manual


Phoenix
32
User Manual www.RealmCtrl.com
4
distance limitations, etc. In a distributed environment, all NetLinx systems must be
assigned a unique ID that may range from 1 through 32,767. Phoenix
32
Server
always assumes that the Head End NetLinx control system is configured as System
1, which may not be the default ID set at the factory. Therefore, this must be
accomplished using AMX NetLinx Studio 3.x . Consult the NetLinx control system
documentation for instructions regarding this procedure.
2.2.4. Step 4: Upload the compiled NetLinx token file.
Phoenix
32
is sold with a NetLinx token file that must be uploaded to the NetLinx
control system. This is known as a “NetLinx Token” and will have an extension of
“.tkn”. This file must be uploaded to the NetLinx master using either AMX
FileTransfer or NetLinx Studio. This document is authored with the assumption
that the reader is familiar with the procedure required to upload the NetLinx token.
If you require assistance with this step, please consult the documentation that
accompanies the AMX applications.
2.2.5. Step 5: Upload Infrared (IR) Codes
Phoenix
32
does not restrict the media devices that may be utilized to any particular
make or model. Instead, Phoenix
32
allows control of any device that provides the
industry standard IR control interface, as well as relay and RS-232 control. Instead
of providing control of a limited set of IR controlled devices, Phoenix requires that
the IR files for any device adhere to a template. This template is provided in
Appendix B: Infrared Code Map on page 141. Capturing, manipulation, and
uploading of IR files is accomplished via AMX IREdit . Information regarding use
of the IREdit application is provided by AMX. Ensure that all IR emitting devices,
including the Television Managers, are properly loaded before moving on.
2.2.6. Having uploaded the NetLinx token to the NetLinx control system, and after loading
all necessary IR files, you are now ready to “shift gears” and install the Phoenix
32
Windows Server. Place the CD that was provided by RealmCtrl into the CD-ROM
drive on the Phoenix
32
Server PC, then launch “Setup.exe” from the CD. When
prompted, select the “Typical” installation option and allow Setup to run through to
completion, following any other prompts that may surface. When Setup completes,
it will ask if you want to view the “ReadMe” file. We recommend that you take a few
moments to scan through the recent entries within the “ReadMe” file in case there
are any last minute notes or pertinent instructions that are not included within this
document.
Once Setup completes, and assuming the Phoenix
32
Server can reach the NetLinx
control system via TCP/IP, and vice versa, you’re now ready to launch Phoenix
32
and begin configuring your facility.
3. Logging into Phoenix
32
for the first time
When launched, Phoenix
32
will prompt to enter login information. The database comes with
one existing user called “RealmCtrl” having a password of “phoenix.” This user may be
edited or deleted later. For now, select the “RealmCtrl” user and enter the password, then
click “OK”.
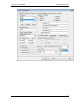
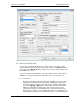
3.1. Configuring the NetLinx communication parameters
The Phoenix
32
Server must be configured to communicate with the NetLinx control
system by entering the TCP/IP address of the NetLinx master on the NetLinx
Communications and Diagnostics dialog. Until this step is completed, the system is