
User manual


Phoenix
32
User Manual www.RealmCtrl.com
34
new requirement surfaces in the future for which MultiServer (or some modified
version of MultiServer) would be a good solution.
6.1.7. {Configuration} – the {Configuration} menu is one of the most oft used selections
for technicians and Media Center administrators. Selecting this menu item will
launch the Facility Configuration dialog, which is a multi-tabbed dialog that covers
almost every aspect of the NetLinx control system. Because the Facility
Configuration dialog covers a broad scope of functionality and is used often when
configuring and maintaining the system, it is covered elsewhere in this manual. For
more information regarding the Facility Configuration dialog, see sections 4 and
8.
6.1.8. {NetLinx System ID} – selection of this menu item will launch the Set NetLinx
System ID dialog. The value of the System ID should only be changed under the
instruction of a RealmCtrl Technical Support Engineer. The System ID defined
within this dialog corresponds to the System ID of the Head End NetLinx control
system and is set to 1 under normal circumstances.
6.1.9. {Hub Systems} – this menu option will launch the Hub System Communications
dialog. From there, the IP address for all Hub Systems can be entered. Each Hub
System consists of another NetLinx control system that serves a maximum of 255
AXlink Television Managers. Smaller sites (~250 rooms or less) will never need to
launch the Hub Systems dialog. If your site utilizes multiple NetLinx masters to
exceed the 255 device barrier, additional documentation will be provided regarding
this capability.
6.1.10. {Routing Window} – select this menu item to launch the System Routing
dialog, which will provide a graphical overview of the topology of your facility. From
within the System Routing dialog, any object may be double-clicked to access its
properties.
6.1.11. {Exit} – select this menu item to exit the Phoenix
32
Server application. Only
users with Exit rights may close Phoenix. Exit rights are defined on the Users Tab
(see section 9.2.4).
6.2. Resources
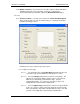
6.2.1. {Locate Media} – select this menu item to launch the Locate Media dialog and
search the media database. The Locate Media dialog allows searching of
Recorded Media, Broadcast Channels, and Physical Items. An example of the
Locate Media dialog is shown in Figure 10: The Locate Media dialog.