
User manual


Phoenix
32
User Manual www.RealmCtrl.com
27
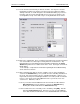
5.3.7. Locate and select the title that you want to schedule. You may also select the
format that you want to air, and the source that you prefer to utilize, by double-
clicking on the title, as shown in Figure 8: The Title Details Dialog. If you choose
instead to only select a title, Phoenix will select a source for you using a “least
used” algorithm, to help ensure that usage is evenly distributed across devices.
Figure 8: The Title Details Dialog
5.3.8. Enter notes, if applicable. This is an optional step that may be useful for reminders
or to assist another user who may be on duty when the event launches. Any
information that you enter within the Notes field will be displayed on the Event
Details dialog when the user double-clicks on the event. See Figure 9: The Event
Details dialog
for an example. Comprehensive information regarding the Event Details dialog
can be found in section 5.8.
5.3.9. After selecting the title that you need to schedule, move on to the destinations
section of the Schedule dialog. Here you will select the controlling destination for
the event. Any event may have only one controlling destination. However, you
may include as many non-controlling destinations as need be (known as included
rooms). If you do not need to add additional rooms to your event, move on to
section 5.3.11. Otherwise, read on…
5.3.9.1. If you need to include additional rooms then click the checkbox labeled
[Other Rooms] that is in the “Options” section of the Schedule dialog.
Clicking this checkbox will launch the Other Rooms dialog.
5.3.9.2. To add rooms to the event that you are scheduling, click [Add]. This will
launch the Select Rooms dialog. From here you can select all additional
rooms that should be included in the event. Standard Windows conventions