
User manual


Phoenix
32
User Manual www.RealmCtrl.com
21
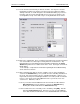
Distribution Tab, then click [Channels]. This will launch the “Direct Pass Channels”
dialog.
4.5.4.1. To add a channel, click the [Add] button, then select the channel from the list
and click [Add]. You may select multiple channels simultaneously by using
Ctrl+Click and Shift+Click. Once you have added all desired channels, click
the [Done] button.
4.5.4.2. To delete a channel, select the channel from the list and click the “Delete”
button.
4.5.5. Update the NetLinx system.
The final step to the facility configuration process is to perform a NetLinx Update.
This is the procedure whereby Phoenix
32
Server translates and transmits the
database settings to NetLinx. Click on {NetLinx/Communication}, then click
[Update] (this assumes you have already properly established your communication
parameters; see section 6.5.1 for more information).
4.6. Create your media titles
Having defined the basic topology of your system within Phoenix, and assuming that the
system you have created accurately reflects the physical topology of your hardware and
routing, you are now ready to leave the Facility Configuration dialog and start entering
media titles. The media titles will be selectable when scheduling and when requesting
Video On Demand, if applicable (not all facilities support Video On Demand). Click [OK]
on the Facility Configuration dialog, then click the {Tools} menu item and select
{Management}. This will take you to the Media Tab where you may begin entering your
library database. We recommend that you first enter some “generic” titles for sake of
testing, then follow up with the actual mass data entry once the control system has been
validated. For sake of this express setup portion of the manual, we will cover only the
basic highlights required to build the basic facility configuration and define some assets
for testing. Comprehensive explanations of the Resource Management dialog is
covered in section 9.
4.6.1. To create a new title, click [New] and enter the name of the title. Also enter the
approximate length in minutes. You may also enter a subject and description but
this is not required. You will note that the New Title dialog also includes some user
definable fields within which you may enter data if you so choose. For more
information regarding these fields, see section 9.1.5.
4.6.2. After you create your title, you must associate a format with the title. The format is
used by Phoenix to determine which source(s) can support the title. Also, Phoenix
determines the number of copies that are available within your library according to
the number of formats associated with the title. Therefore, if you enter three VHS
and one DVD format within the Formats section (by clicking [New]), Phoenix will
assume that you have four copies of the title, three being VHS format and one
being on DVD.
4.6.3. Ignore the section labeled “Groups” for now. For information on this field, see
section 9.3.
4.6.4. Enter digital media parameters, if applicable. If the title that you entered resides on
a digital file server then some additional information is required.