
User manual


Phoenix
32
User Manual www.RealmCtrl.com
9
Channel for a room, click [Default Channel…] and click the radio labeled,
[Use the following Default Channel], then select the new Default Channel
from the drop list. Note that Phoenix will only list channels on the Distribution
Group that the Destination is connected to, and that the term “channel”
applies to both broadband (RF) and baseband (hardwired) inputs. If the
Default Channel button is disabled, this is because the Destination is not
connected to a Distribution Group and consequently cannot be routed.
4.1.2. Create the Display Manager(s)
Having named your new destination, it is now time to add the Display Manager(s).
A Display Manager is analogous to a “Television Manager”. At a typical Phoenix
facility, all controllable rooms will contain some type of Display Manager.
To add a Display Manager, click the plus sign ( [+] ) in the lower right-hand corner,
then enter the AMX Device ID of the Display Manager. This will typically be a
number between 1 and 255 and it must correspond to the physical address of the
Television Manager on the Axink bus, as defined by the Television Manager’s dip
switch settings. There are exceptions, such as when the room contains a separate
NetLinx master that supports additional custom control capabilities (known as a
“Remote room” topology). This basic overview of the installation process does not
address Remote room topologies. See section 11 for information regarding
Remote rooms.
When entering the AMX Device ID of the Television Manager, you will notice that
Phoenix requests three items: a Device, a Port, and a System. This requirement is
in keeping with the NetLinx nomenclature for device addressing. At a typical
Phoenix facility, the Port will always be 1 and the System will always be 1.
However, if your facility includes multiple NetLinx control systems for sake of
overcoming the 255 device barrier then the System ID may be greater than 1, to
indicate that the Display Manager is connected to a different NetLinx system.
If the destination that you are creating contains multiple Display Managers to
control multiple display devices then they should all be entered now. After they are
all entered, select the first one to configure its settings.
If your room does not contain a physical Display Manager (such as an AMX AXB-
TM5, AXB-TMX, or an AXB-TMC) then you should still create one in Phoenix using
any unused AMX ID and Port/System settings of 1.
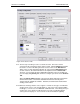
4.1.3. Configure the Display Managers
After you have created all Display Managers that physically exist within the
destination (there may be only one), select the first one in the list. Now you are
ready to define its parameters within the section labeled “Display Controller
Settings”.
4.1.3.1. Define the Display Manager Type
Start by selecting the make and model of the Display Manager. This will
typically be an AXB-TM5, AXB-TMX, or AXB-TMC (Television Manager with
Clock). If the destination that you are creating does not have a Television
Manager then select “AXB-TMX/TM5.” If your site includes any other
controlling device then select that option instead.