Phoenix32 Operating Manual Version 1.
Table of Contents 1 Introduction 1.1 Overview 1.2 About This Document 2 Installation 2.1 Groundwork 2.2 Basic Installation Procedure 3 Logging into Phoenix32 for the first time 3.1 Configuring the NetLinx communication parameters 4 Entering your facility configuration 4.1 Define your Destinations 4.2 Define your Sources 4.3 Define your Distribution Groups 4.4 Define your Channels 4.5 Route your facility 4.6 Create your media titles 4.7 Schedule some test events 4.
Table of Contents, Continued 8 Facility Configuration 8.1 The Destinations Tab 8.2 The Sources Tab 8.3 The Distribution Tab 8.4 The Channels Tab 8.5 The Categories Tab 8.6 The Formats Tab 8.7 Setups 8.8 System Events 8.9 Paging 9 Resource Management 9.1 The Media Tab 9.2 The Users Tab 9.3 The Groups Tab 9.4 The Members Tab 9.5 The Defaults Tab 9.6 The Items Tab 9.7 The Periods Tab 9.8 The Types Tab 10 Using Phoenix Control Interfaces 10.1 The handheld CT5 wireless remote control 10.2 The G1 Web Client 10.
Phoenix32 User Manual www.RealmCtrl.com 1. Introduction 1.1. Overview Phoenix32 is a robust media retrieval, campus automation, and facility management solution. The Phoenix32 application suite manages distribution and control of digital and analog media content along with the power states and tuning of all display devices distributed throughout the campus. Phoenix32 works in concert with control system hardware developed and manufactured by AMX LLC, Crestron, Contemporary Research, and Aurora MultiMedia.
Phoenix32 User Manual www.RealmCtrl.com example: “Click {Server}.” Dialog and tab names are shown in bold and italicized. For example, “Rooms are configured using the Destinations tab. 2. Installation 2.1. Groundwork 2.1.1.Installation of Phoenix32 should be implemented by a qualified AMX NetLinx Installer who has experience with distributed control systems and a general aptitude for audio/visual control system support.
Phoenix32 User Manual www.RealmCtrl.com then you may need to install the ME-260 instead of the NI series controllers. This is because many Synergy sites make use of the AXcess Master Port Expander (MPE) controller that allows long AXlink runs from the Head End control system to the Television Managers that are disbursed throughout the campus.
Phoenix32 User Manual www.RealmCtrl.com distance limitations, etc. In a distributed environment, all NetLinx systems must be assigned a unique ID that may range from 1 through 32,767. Phoenix32 Server always assumes that the Head End NetLinx control system is configured as System 1, which may not be the default ID set at the factory. Therefore, this must be accomplished using AMX NetLinx Studio 3.x . Consult the NetLinx control system documentation for instructions regarding this procedure. 2.2.4.
Phoenix32 User Manual www.RealmCtrl.com unusable. The procedure is described in detail in section 6.5.1. Please skip to that section and configure your communication settings, then return to the following section.. 4. Entering your facility configuration Although the NetLinx control system has been loaded with the code required to run Phoenix32, and the Server is fully installed, your system is not yet usable. This is because the facility configuration has not been entered into the Server application.
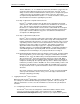
Phoenix32 User Manual www.RealmCtrl.com Figure 1: The Destinations Tab.
Phoenix32 User Manual www.RealmCtrl.com Figure 1: The Destinations Tab 4.1.1.Define the Destination Name The first step in creating a destination is to define its name. This name should correspond to the actual room name that is being created. Click [New] and enter a room name on the New Room dialog. Ignore the Text Fields, Numeric Fields, and Room Attributes for now. If you are wondering exactly what the Text Fields, Numeric Fields, and the Room Attributes are, they are defined below.
Phoenix32 User Manual www.RealmCtrl.com impact on the behavior of the control system. If you choose to enter information into the Text Fields, you should first change the generic “Text Field 1,” “Text Field 2,” and “Text Field 3” labels to indicate exactly what information you are entering. This can be accomplished by clicking [Defaults] and entering new labels for the Text Fields. This is also true of the Room Attributes and Numeric Fields. 4.1.1.2.
Phoenix32 User Manual www.RealmCtrl.com Channel for a room, click [Default Channel…] and click the radio labeled, [Use the following Default Channel], then select the new Default Channel from the drop list. Note that Phoenix will only list channels on the Distribution Group that the Destination is connected to, and that the term “channel” applies to both broadband (RF) and baseband (hardwired) inputs.
Phoenix32 User Manual www.RealmCtrl.com 4.1.3.2. Set the “Manage Power” preference If the destination that you are creating does not include a Display Manager then you are finished. Click “Apply” and move on by creating other destinations or proceeding to Section 4.2. Assuming the destination does contain a Display Manager, you must define your preference regarding power management for the Display Manager that you just created. This can be accomplished by setting the “Manage Power” checkbox accordingly.
Phoenix32 User Manual www.RealmCtrl.com * Note: values for all four timing parameters constitute 10ths of seconds. Therefore, to set a value to 5 seconds, you would enter the value of 50. If you enter only the number 5 then you will be setting the corresponding timing parameter to ½ second. 4.1.3.5. Define the Channel Type The hundreds of different Display Manager makes and models require different methods to tune properly.
Phoenix32 User Manual www.RealmCtrl.com read on to understand how to configure the Secure Web Client Dialog… 4.1.4.2. The Secure Web Client add-on allows login restrictions based off a static IP address. Following is an example of the dialog: 4.1.5.If the Television Manager(s) within the destination that you are defining resides on the local Head End AXlink then you are done with the configuration of the destination for now, although you will revisit the tab as the facility configuration “fleshes out.
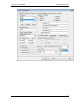
Phoenix32 User Manual www.RealmCtrl.com Figure 2: The Sources Tab 4.2.1.The first step in creating a source is to define its name. This name should correspond to the actual device that is being created. Click the [New] button within the Sources section of the dialog and enter a source name on the New Source dialog. There is other information that may be entered on the New Source dialog as well. However, all of that information is also duplicated on the Sources Tab.
Phoenix32 User Manual www.RealmCtrl.com creation of media titles. Phoenix allows scheduling by media title and not by source, although Phoenix does allow selection of a preferred source if so desired. This is further explained in section 5.3. 4.2.3.Enter the Control Card using the [Control Card] drop-down. The cards listed correspond to AMX card types. The most common card types used to control Head End sources are: infrared (DT_AXCIRS), serial (DT_AXC232), and relay (DT_AXCREL8 and DT_AXCREL14).
Phoenix32 User Manual www.RealmCtrl.com using the NetLinx naming nomenclature having a Device, a Port, and a System. The Device portion of the address is the AXlink ID. For AXcess systems, Port will always be “1”. However, because NetLinx cards allow control of multiple sources using the same device, the Port may not be “1” if you are using NetLinx control cards within your Head End.
Phoenix32 User Manual www.RealmCtrl.com (assuming the person scheduling the event does not select a specific source). One of the factors taken into account is the usage hours, since Phoenix utilizes a “least used” algorithm to spread the load across all of your Head End sources. Therefore, these fields are saved and displayed for informational purposes but they cannot be edited. 4.2.11.
Phoenix32 User Manual www.RealmCtrl.com 4.3.1.Within the “Video Distribution Groups” section, all existing distribution groups are listed. To create a new one, click the [New] button and enter a name such as “Combiner” or “Switcher”. For the moment, ignore the fields labeled “Default Channel” (see section 4.1.1.4 for more information) and “Preview Room” (see section 8.3 for more information). To delete a distribution group, select the group name and click the “Delete” button 4.3.2.
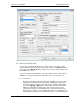
Phoenix32 User Manual www.RealmCtrl.com no acknowledgement is received), enter a value of “50”. 4.4. Define your Channels Select the Channels Tab to define the system channels. Channels represent the broadband or baseband feeds that are available either as scheduled events or as “Direct Pass” channels (aka “Channel Ring” or “Surf Ring” channels). An example of the Channels Tab is shown in Figure 4: The Channels Tab. Figure 4: The Channels Tab 4.4.1.
Phoenix32 User Manual www.RealmCtrl.com 4.4.2.1. Wiring Connection – this type of channel feeds the input of a distribution group. It may be either broadband (RF) or baseband. If you create a wiring connection, you must also click the [Outputs wired to…] button and select the input to which the channel connects.
Phoenix32 User Manual www.RealmCtrl.com 4.5.1.1. When using the Destinations Tab, click the [Input wired to…] drop-down, then select the output of the combiner or switcher to which the input of the display device(s) within the destination is connected. 4.5.1.2. When using the Distribution Tab, select the distribution group that the destination is connected to, then click the [Mapping…] button that is next to the “Output Count” field.
Phoenix32 User Manual www.RealmCtrl.com Distribution Tab, then click [Channels]. This will launch the “Direct Pass Channels” dialog. 4.5.4.1. To add a channel, click the [Add] button, then select the channel from the list and click [Add]. You may select multiple channels simultaneously by using Ctrl+Click and Shift+Click. Once you have added all desired channels, click the [Done] button. 4.5.4.2. To delete a channel, select the channel from the list and click the “Delete” button. 4.5.5.
Phoenix32 User Manual www.RealmCtrl.com 4.6.4.1. If creating an AMX MultiMedia MAX (AMX-MMS) title, you must enter the disc ID that was assigned to the title when it was ripped to the hard drive. This value must be entered within the “Disc ID” section. If your facility includes a MultiMedia MAX file server, additional documentation will be provided that describes how you may determine the Disc ID that the MAX assigns to the title. 4.6.4.2.
Phoenix32 User Manual www.RealmCtrl.com Figure 5: The Schedule Dialog 4.7.2.For sake of your test, select any title and destination, then click [Request]. Phoenix should notify you that the event was successfully scheduled, and you should see the newly scheduled event on the Future Events list. If the request is declined, investigate your routing and ensure that you have defined a source that has the same format as the title that you are scheduling.
Phoenix32 User Manual www.RealmCtrl.com regarding these specialized event types. 5.1.1.Recorded Media events – this type of event constitutes any media that is stored as a format. Examples would include DVD, VHS, Laser Disc, CD, Cassette, UMatic, etc. When you select the [Recorded Media] radio button, the list of Recorded Media titles will be displayed within the Titles List (see Figure 7: The Titles List). Information regarding the management of media titles is discussed in sections 4.6 and 9.1.
Phoenix32 User Manual www.RealmCtrl.com [Load]. 5.2.1.3. Red circle with diagonal line: The event will launch at the scheduled time. However, Phoenix is of the impression that something needs attention and, if said attention is not given by a member of the Media Center staff, the event is likely to fail. An example would be a previous event that is sitting in the Past Events list that utilizes the same source as the event in question.
Phoenix32 User Manual www.RealmCtrl.com Figure 6: Date/Time Controls 5.3.3.The buttons shown in Figure 6: Date/Time Controls that are labeled with single characters represent Month, Day, Year, Hour, Minute, and Second respectively. To increase any of these items, click the appropriate button above the date and time. To decrease any of these items, click the appropriate button beneath the date and time. 5.3.4.
Phoenix32 User Manual www.RealmCtrl.com 5.3.7.Locate and select the title that you want to schedule. You may also select the format that you want to air, and the source that you prefer to utilize, by doubleclicking on the title, as shown in Figure 8: The Title Details Dialog. If you choose instead to only select a title, Phoenix will select a source for you using a “least used” algorithm, to help ensure that usage is evenly distributed across devices. Figure 8: The Title Details Dialog 5.3.8.
Phoenix32 User Manual www.RealmCtrl.com apply, which means you can use Ctrl+Click and Shift+Click to select multiple rooms. To deselect a room from the list, click on the room name while holding down the Ctrl key. Once you have selected all rooms that should be included within the event, click [Select]. This will populate the list of rooms within the Other Rooms dialog. Click [Done] when you are finished adding rooms. This will close the Select Rooms dialog and return you to the Other Rooms dialog.
Phoenix32 User Manual www.RealmCtrl.com in Figure 9: The Event Details dialog . Figure 9: The Event Details dialog 5.3.13. To edit the parameters of the scheduled event, click the “Edit” button. This will launch the Schedule dialog, allowing you to change any the parameters that were entered when the event was originally scheduled. After you make the necessary changes, which may entail changing the date, time, media, destination(s), etc., click [Request] to complete the edit operation.
Phoenix32 User Manual www.RealmCtrl.com 5.4. Scheduling of Broadcast Channel events 5.4.1.To schedule Broadcast Channels, first select the [Broadcast Channel] radio button within the “Schedule Type” section of the Schedule dialog. 5.4.2.Broadcast Channel events are scheduled using a procedure almost identical to scheduling of Recorded Media events (described in section 5.3). The one difference is that the Media section will contain a list of channels instead of a list of recorded media titles.
Phoenix32 User Manual www.RealmCtrl.com 5.7. Scheduling of System Events 5.7.1.To schedule a System Event, first select the [System Control] radio within the “Schedule Type” section of the Schedule dialog. 5.7.2.System Events are used to act upon any controllable device within the system and they must first be created using the Events Tab under {Tools/Management} (see section 8.8).
Phoenix32 User Manual www.RealmCtrl.com yellow circle icon, as a warning that manual intervention is required by the Media Center. If the time for an event to launch nears and Phoenix still has not been notified that the media is loaded, the Server will start to beep prior to the event launch. The time before an event when the Server will start to beep is defined by the “Event Warning Time,” which is defined on the Defaults Tab (see section 9.5).
Phoenix32 User Manual www.RealmCtrl.com 5.8.7.[Edit] – click [Edit] to launch the Schedule dialog. This will allow modification of any event parameters, assuming you have rights to edit the event in question. 5.8.8.[Delete] – click [Delete] to remove the event from the Future Events list. Phoenix will prompt for a confirmation. 5.8.9.[Done] – this simply closes the dialog and is no different than clicking on the “X”. 6.
Phoenix32 User Manual www.RealmCtrl.com new requirement surfaces in the future for which MultiServer (or some modified version of MultiServer) would be a good solution. 6.1.7.{Configuration} – the {Configuration} menu is one of the most oft used selections for technicians and Media Center administrators. Selecting this menu item will launch the Facility Configuration dialog, which is a multi-tabbed dialog that covers almost every aspect of the NetLinx control system.
Phoenix32 User Manual www.RealmCtrl.com Figure 10: The Locate Media dialog 6.2.1.1. To filter the list by Group, click the [Group] drop-down and select the desired group. The list beneath the [Group] drop-down will display the members of the Group. This list is also filtered according to the “Media Type” selected, which may be either [Recorded Media], [Broadcast Channels], or [Physical Items]. 6.2.1.2. The “Formats” list displays all formats available for the selected title, channel, or item.
Phoenix32 User Manual www.RealmCtrl.com 6.2.1.6. To close the Locate Media dialog, click [Done], or simply click the [X] in the upper right-hand corner. 6.2.1.7. Note that the Locate Media dialog can also be launched from the toolbar by clicking the leftmost icon that looks like a book. 6.2.2.{Schedule} – select this menu item to launch the Schedule dialog, which is the dialog that will be used for all scheduling from the Server.
Phoenix32 User Manual www.RealmCtrl.com 6.2.6.{Month at-a-glance} – this menu item is selectable only if the Month At-A-Glance capability was purchased for your facility. In that case, supplemental documentation will be provided that explains the Month At-A-Glance dialog. 6.3. Print 6.3.1.{Current Schedule} – select this item to launch the Current Schedule Reports dialog, shown in Figure 12: Current Schedule Reports.
Phoenix32 User Manual www.RealmCtrl.com 6.3.1.1.4. Select the [Room] radio button if you wish to sort by room. In this case, only those future events that are scheduled to the selected room(s) will be included within the report. Note that you may select multiple rooms using Ctrl+Click and Shift+Click. 6.3.1.1.5. Select the [Source] radio button if you wish to sort by source. In this case, only those future events that utilize the selected source(s) will be included within the report.
Phoenix32 User Manual www.RealmCtrl.com • [RMS unavailable] – show all rejections that occurred due to unavailable room, media, and source. • [DL Unavailable] – show all Distance Learning rejections that occurred. Figure 13: The Schedule History Reports dialog 6.3.3.{System} – select this item to print system configuration reports. Such reports can be useful for troubleshooting and to help understand the overall system. This dialog behaves much like the Current Schedule dialog described in section 6.3.
Phoenix32 User Manual www.RealmCtrl.com Figure 14: The System Reports dialog 6.4. Tools 6.4.1.{Management} – select this menu item to launch the Resource Management dialog, which is the central interface for management of Media Titles, Users, Groups, Members, Defaults, Items, Periods, and Types. The Resource Management dialog encompasses much of the facility assets and is used often while managing the many elements of the facility configuration.
Phoenix32 User Manual www.RealmCtrl.com within the regular backup schedule of your facility. If you need information regarding the procedure to backup your Phoenix database manually, please contact RealmCtrl. 6.4.4.{Database Tools} – this menu item is for database maintenance and should only be used under the instruction of a RealmCtrl Technical Support Engineer.
Phoenix32 User Manual www.RealmCtrl.com 6.4.5.3. For comprehensive information regarding in-room control capabilities, see section 10. 6.4.6.{Switches} – selection of this menu item will launch the Active Switch Paths dialog, which will display all routing information pertinent to the active events. Any route may be resent by selecting it and pressing [Resend Take].
Phoenix32 User Manual www.RealmCtrl.com Figure 17: The Event Play List dialog 6.4.8.1. Because the VTI-6 character generator is no longer manufactured by AMX Corp., this dialog will typically apply only to those facilities that have upgraded from Synergy to Phoenix. 6.4.8.2. The Event Play List dialog does serve another purpose at those facilities that utilize Winnov encoders for realtime digital encoding of analog media.
Phoenix32 User Manual www.RealmCtrl.com Figure 18: The Media Record Import dialog 6.4.9.1. When importing MARC records, you must define the duration of the titles that will be imported and the number of DVD, VHS, and LDP format(s) that you would like to associate with the title(s). All of this information can be altered later via the Media tab under {Tools/Management} (see section 9.1). 6.4.9.2.
Phoenix32 User Manual www.RealmCtrl.com ASCII text file by using the following format: Title|Description|Minutes|Seconds|Frames|Subject| Field1|Field2|Field3|Format The separator (delimiter) is the pipe character (shift \). Make sure there are no spaces after the Format field, or Phoenix will not import the file. The Seconds, Frames, Subject, Description, and Fields 13 may be blank. However the Minutes field requires a number other than zero.
Phoenix32 User Manual www.RealmCtrl.com ID number, etc.). The title field is limited to 64 characters. Approximately 32 characters will show in the Titles list of the Media tab in the Resource Management dialog box. • Description - This field is limited to 511 characters, of you which you will initially see only 120 characters in the Title Details of the Media tab (use the scroll bar to see the rest). • Minutes - This field requires the play time length in minutes of the media title.
Phoenix32 User Manual www.RealmCtrl.com Figure 19: The NetLinx Communications & Diagnostics dialog 6.5.1.1. To enable TCP/IP communications between the Phoenix Server and the NetLinx control system, select the [Enable] checkbox. To disable communications, deselect the [Enable] checkbox. When connected, the connectivity icon to the right of the checkbox will display a connected cable and will turn green.
Phoenix32 User Manual www.RealmCtrl.com 6.5.1.3. The “NetLinx Diagnostics” section allows enabling and disabling of debugging and diagnostics messages when connected to the NetLinx master via Telnet or serially through the Program Port. For viewing NetLinx messaging levels, RealmCtrl recommends usage of the Indigo Telnet client developed by ShadeBlue Software (see www.ShadeBlue.com). Before any messages can be viewed, the “MSG ON” command must be entered first.
Phoenix32 User Manual www.RealmCtrl.com RS-232, this messaging level will enable or disable the associated messages. This messaging level also governs Hub Systems. • [Remote Ping Messages] – displays messages whenever pings are sent to, or acknowledgements are received from, a Remote system. The Remote system may communicate with the Head End either via TCP/IP or RS-232. This messaging level can be useful when troubleshooting communication issues with Remote systems.
Phoenix32 User Manual www.RealmCtrl.com section for more information. 6.5.1.5. [Update] – click the “Update” button to start the NetLinx system update procedure. After configuring your system, a successful update must be completed before Phoenix will be operational. During the update procedure all pertinent elements of the facility configuration, such as a room names, Television Managers, sources, etc., are sent down to the NetLinx control system.
Phoenix32 User Manual www.RealmCtrl.com regarding the NetLinx system update, see section 6.5.1.5. 6.5.4.The {All Default} menu item will tune all display devices to the Default Channel of the distribution group to which they are connected. The Default Channel for all distribution groups is defined on the Distribution Tab of the Server dialog. For more information regarding the Default Channel, see section 4.1.1.4. 6.5.5.
Phoenix32 User Manual www.RealmCtrl.com 6.7.2.The {About} menu item will show the version of Phoenix Server that you are running, as well as the licensing information acquired from NetLinx. The version and licensing information may be necessary if you contact RealmCtrl Technical Support for assistance with your Phoenix system. 7. The Phoenix Toolbar Several shortcuts are available via the Phoenix toolbar to assist with the regular use of your Phoenix system.
Phoenix32 User Manual www.RealmCtrl.com manual. 7.11. Button #11: [Unload All] – click this button to unload all events listed within the Past Events list. Be careful when using this button; it’s important to ensure that all decks are physically unloaded before clicking [Unload All]. Otherwise, individual events may be unloaded by double-clicking on the event (see section 5.8.5 for more information). 8.
Phoenix32 User Manual www.RealmCtrl.com 8.4. The Channels Tab The Channels Tab has also been covered previously. Refer to section 4.4 for information regarding this dialog. 8.5. The Categories Tab The purpose of the Categories Tab is to provide a means by which Channels may be grouped by logical genre. Phoenix provides an “All Channels” category that cannot be deleted. You may add as many additional Categories as desired. Examples would be: Educational, News, Sports, Christian, Children, etc.
Phoenix32 User Manual www.RealmCtrl.com to associate with the device and any titles within your collection that are recorded using the new format. Assuming the device is controllable using an existing Control Logic (such as one that is actually geared towards a VCR), you will be able to add the new device without requiring modifications to the Phoenix Server or NetLinx source code. It is strongly advised that you contact RealmCtrl before creating any new formats.
Phoenix32 User Manual www.RealmCtrl.com be double-booked. 8.8. System Events System Events are very powerful specialized events that can be used for facility management. An example of a System Event would be “Shut Down Campus” which would be scheduled nightly to turn off all display devices throughout the campus. An example of the System Events tab is shown in Figure 22: The System Events Tab. Figure 22: The System Events Tab 8.8.1.The first step to creation of a System Event is to give it a name.
Phoenix32 User Manual www.RealmCtrl.com [On], [Off], [Pulse], [Send String], and [Send Command]. The purpose of each of these System Event types is explained below: 8.8.3.1. [On] – this System Event type is used to engage channels on AMX control system devices. Any AMX control system device can be controlled in this manner. An example of how this System Event type would be used is a relay card that is connected to a lighting system that responds to contact closures.
Phoenix32 User Manual www.RealmCtrl.com 8.8.3.7. [TVs Off] – the TVs Off System Event is one of the built-in System Event types. It is used specifically to turn display devices off. This System Event is given an intuitive name but it is actually more robust than the name indicates. Any time a TVs Off System Event launches, the display devices to which the event is scheduled will be controlled according to their associated Control Logics (see section 4.1.3.6).
Phoenix32 User Manual www.RealmCtrl.com Live paging is an optional add-on feature that allows live audio/visual paging to the entire campus, or to specific zones. If your facility purchased the Paging add-on, a Paging tab will be visible within the Facility Configuration dialog. Otherwise, this tab will not be available. An example of the Paging tab is shown in Figure 23: The Paging Tab.
Phoenix32 User Manual www.RealmCtrl.com * Note: Phoenix is not intended as a failsafe mechanism for security purposes. RealmCtrl specifically disclaims any use of Phoenix for purposes of security as a “use at your own risk” feature. There are many variables that may cause a Page to fail including faulty wiring to the Television Manager, missing IR codes, and other unrelated factors that are outside of our control.
Phoenix32 User Manual www.RealmCtrl.com 8.9.2.Phoenix supports a maximum of 8 Paging Consoles. When configuring a Paging Console, first select the appropriate radio button and then proceed with the configuration. 8.9.3.After selecting a Console, enter its AMX AXlink bus ID within the field labeled, “AMX ID”. The convention is to address the first Paging Console at device 66 and increment subsequent Consoles from there. 8.9.4.
Phoenix32 User Manual www.RealmCtrl.com associated formats. An example of the Media Tab is shown in Figure 24: The Media Tab. Figure 24: The Media Tab 9.1.1.To create a new media title, click [New] and enter the name of the title. You may also enter additional information as described below. However, that same information can be entered on the tab itself and so there is no need to enter any additional data immediately, unless you prefer to enter all data while the New Title dialog is launched. 9.1.2.
Phoenix32 User Manual www.RealmCtrl.com that apply to the media title and the [New] and [Delete] buttons that apply to the formats. Be careful to use only the buttons that apply to the media formats when you are adding or deleting formats. 9.1.3.1. To add a format, click [New] and select the appropriate format. To delete a format, select it and click [Delete]. Note that you may assign an optional Media ID. This is a unique identifier that your facility may use for cataloguing purposes.
Phoenix32 User Manual www.RealmCtrl.com on the LVS must be entered. 9.2. The Users Tab This tab allows creation and management of all users of the Phoenix system. By enabling or restricting privileges, users can be granted various levels of access according to their needs. An example of the Users tab is shown below: Figure 25: The User Tab 9.2.1.To create a new user, click [New] and enter the user name and password.
Phoenix32 User Manual www.RealmCtrl.com tab later in order to define access privileges. For more information on Groups, see section 9.3. 9.2.3.1. To enroll a user within a Group, click [Add] within the “Group Memberships” section. This will launch the Add User To Groups dialog where you may enroll the user in one or more Groups. To enroll the user in multiple Groups, hold down the Ctrl or Shift keys while selecting Groups.
Phoenix32 User Manual www.RealmCtrl.com 9.2.4.2. Resource Privileges 9.2.4.2.1. [View Resources] – allows viewing of the facility configuration resources. This privilege regards the Server only. If a user cannot view resources, the system resources (the dialog that we are discussing now) will not be available to the user. 9.2.4.2.2. [Modify Resources] – this privilege is similar to the View Resource privileges except that it also allows resource modification.
Phoenix32 User Manual www.RealmCtrl.com privilege regards fall beneath the {Server/Networks/TCPIP Clients} menu item. 9.3. The Groups Tab This tab allows management of user Groups. Groups are conceptual groupings of users with similar roles at your facility. For example, you may wish to create a Group called “Media Center” that has administrative access to the Phoenix system, and another Group called “Teachers” that can only schedule and control events.
Phoenix32 User Manual www.RealmCtrl.com with almost all capabilities of the parent Group but one or more right(s) missing or added. For example, you may create a parent Group called “Faculty” that is a member of the Supervisor Group but does not have Control or User Privileges. This is tab where such privileges would be managed. Note: All Groups that you will create are technically Sub-Groups of the Supervisor Group.
Phoenix32 User Manual www.RealmCtrl.com Figure 27: The Members Tab 9.4.1.Before doing anything on the Members tab, be sure to select the Group that you are adding memberships to. This is accomplished via the [Group Name] dropdown, which will show a list of all Groups that have been previously defined on the Groups tab (see section 9.3).
Phoenix32 User Manual www.RealmCtrl.com User Defined Field 3, Media Length, and Format. For detailed explanations of these fields, see section 9.1. For each title or group of titles that you add, click [Add] to enroll the selected title(s) into the Group. When you are done, click [Done]. 9.4.2.2. [Channels] – The Channels Membership Type regards the channels that have been entered into the Phoenix database (see section 4.4 for information regarding management of channels).
Phoenix32 User Manual www.RealmCtrl.com Application preferences and miscellaneous properties of the Server application are set using the Defaults Tab, which is shown below: Figure 28: The Defaults Tab Following are descriptions of the various settings available on this tab: 9.5.1.Server Name – this is the “friendly” name that is assigned to the Server. This was originally implemented primarily for sake of MultiServer, which is obsolete.
Phoenix32 User Manual www.RealmCtrl.com event is soon to launch and nobody has indicated that the media has been loaded into the associated device (see section 5.8 for information regarding loading and unloading of sources). It is important to understand that Phoenix may not be aware of a source having been loaded when it has, in fact been loaded. Phoenix only thinks a source is loaded if you notify it by following the Load procedure.
Phoenix32 User Manual www.RealmCtrl.com 9.5.9.3. The Event List Defaults define the columns that will be visible on the event list. Note that the Show Channel checkbox works in conjunction with the View Channel checkbox. If the View Channel checkbox is not checked then the Show Channel checkbox will have no effect. On the other hand, if View Channel is checked and the Show Channel checkbox is unchecked, the event list will display all pertinent event flags (such as Record, AutoPlay, etc.).
Phoenix32 User Manual www.RealmCtrl.com and below the Start Time and End Time fields. Note that Periods may be defined in hours and minutes but not seconds. 9.7.2.To delete any Period, select it from the Periods list and click [Delete]. 9.7.3.Note that Periods may be edited using the Periods tab. Therefore, any Period can be edited without requiring deletion and re-creation. 9.8. The Types Tab The Types tab may be used to create logical groupings of Physical Items.
Phoenix32 User Manual www.RealmCtrl.com 9.9.3.The section labeled, “Maximum records per section” defines the number of records that XGen will display in the Past Events, Present Events, and Future Events sections of the Event List. It is recommended that this value be kept at 50 or below to prevent degradation, although that number may be increased if the Event List Refresh Rate is set to 1 minute or more.
Phoenix32 User Manual www.RealmCtrl.com reason, Phoenix will detect that no traffic has been received for a while. If that duration exceeds the Keep Alive Timeout value then Phoenix will flag the connection for deletion. If that amount of time passes again then Phoenix will assume that a problem on the client side has occurred, at which time it will drop the connection and free that license. 9.9.10.
Phoenix32 User Manual www.RealmCtrl.com CT5 as well as advanced control of DVD players, CDI players, and Laser Disc Players. Also, basic room control is provided such as Power On/Off, Volume Up/Down, etc. When using the CT5 remote control, the device required to receive the infrared codes transmitted by the remote control is any of the AMX Television Manager ™ family of devices.
Phoenix32 User Manual www.RealmCtrl.com 10.1.5. The [A] button is a general use button, usually used in conjunction with the keypad for site customization. An example would be a facility that needs the ability to toggle in and out of a local room control mode whereby the Television Manager would control a DVD/VCR combo unit that is mounted beneath the display device.
Phoenix32 User Manual www.RealmCtrl.com 10.1.7. The [Office] button works in conjunction with the AMX Paging Console. If your facility utilizes the AXU-SPL4 Paging Console for Zone Pages and All-Calls, this button can be used to send a message to anybody who has access to the Paging Console. An example would be a security issue where an end user needs to silently call for help.
Phoenix32 User Manual www.RealmCtrl.com control modes. When an event launches, the user is initially placed in Keypad mode, which means the numeric keys may be used, if the source supports numeric input. By pressing [ALT], the user can toggle into Navigation Mode, which will cause the “Response” light on the Destination’s Television Managers to turn on. The Response light may be used as visual confirmation that a user is in, or out, of Navigation Mode.
Phoenix32 User Manual www.RealmCtrl.com control system. To connect to the G1 Web Client, direct your browser URL to the IP address of the NetLinx device. The term “G1” refers to the fact that this version is the first generation of the web interface. The more recent version, known as XGen, is described in section 10.3 below. The following describes usage of the “generic” web client.
Phoenix32 User Manual www.RealmCtrl.com then click [OK] (do not press Enter since that will simply move the cursor to the next line). If you are concerned that somebody might view your password as you are entering it, click [Cancel] and a Yes/No dialog will surface that will ask if you want to use the secure login. Click [Yes] and a different keypad will pop up. On this keypad, you must click the keys instead of entering your password using your computer keyboard.
Phoenix32 User Manual www.RealmCtrl.com Figure 31: The G1 Web Client Control Page 10.2.4. To view or schedule events, click the [Schedule] button. This will display the Event List page as shown in Figure 32: The G1 Web Client Event List.
Phoenix32 User Manual www.RealmCtrl.com 10.2.4.1. To Edit or Delete an event, select it from the list by single-clicking on it. This will launch the Event Details dialog which includes buttons that allow for editing or deletion of the event. 10.2.4.2. To launch the Media, Channel, or Physical Item scheduling wizards, click the appropriate calendar at the upper right quadrant. 10.2.4.3. The Event List is first updated when you connect to this page.
Phoenix32 User Manual www.RealmCtrl.com entered. To reset the list such that is will show all titles, click [Reset]. 10.2.5.2. After selecting a title, you may want to view the notes associated with it. These are the notes entered in the Notes field on the Media tab (see section 9.1). To view notes, click [View Notes] after selecting the title. 10.2.5.3. If the title that you are scheduling exists on multiple formats, and if you want to specify the format to schedule, click [Formats].
Phoenix32 User Manual www.RealmCtrl.com selecting multiple rooms individually, there is no need to hold down the Shift or Ctrl key on your keyboard. Each title that you click on will be added. To deselect a title, click on it again. If you need to schedule all rooms on the entire campus, click [Select All]. To start over, click [Clear All]. 10.2.5.5.3. After selecting the desired destination, click [Next] to move to the next and final step of the scheduling wizard. 10.2.5.6.
Phoenix32 User Manual www.RealmCtrl.com 10.2.5.6.6. If you want to enter notes that will be visible as event properties, click [Notes] and enter the notes, then click [OK]. 10.2.5.6.7. Once you have defined all event parameters, click the [Request] button to send a request up to the Phoenix Server application. You will then receive a notification as to whether the request was granted or not. 10.2.6.
Phoenix32 User Manual www.RealmCtrl.com Figure 36: The G1 Web Client Physical Items Scheduling Page 10.3. The XGen Web Client XGen is the successor to the G1 Web Client solution described above. Unlike its G1 counterpart, XGen serves up from the Phoenix32 Server computer, or from any dedicated web server.
Phoenix32 User Manual www.RealmCtrl.com Figure 38: The XGen Room Selection page 10.3.3. Connecting to your room will link you to the Control Page. The Control Page is divided into two sections: upper and lower. The upper section will never change while the lower section will change occasionally, depending on the room configuration and the events that are active to the room, if any. Just as the G1 Web Client, XGen presents the user with context sensitive room and source controls.
Phoenix32 User Manual www.RealmCtrl.com Figure 39: The XGen Room Control page 10.3.4. Because the control functions available on the XGen Control Page are fairly intuitive, this document will not cover each one individually, with the exception of the [Tune] button. [Tune] will redirect the user to a page that will allow selection of channel categories.
Phoenix32 User Manual www.RealmCtrl.com Figure 40: The Discrete Channels Page 10.3.5. Click the [Schedule] button on the main menu if you want to view the event list or schedule new events via XGen. This will initially display the Event List, shown in Figure 41: The XGen Event List. From there, you may schedule Recorded Media, Broadcast Channels, or Physical Items. An example of the Recorded Media Scheduling Page is shown in Figure 42: The Recorded Media Scheduling Page.
Phoenix32 User Manual www.RealmCtrl.com Figure 41: The XGen Event List 10.3.6. When scheduling Recorded Media events, the basic options available mirror those seen on the Server scheduling window and the G1 Web Client scheduling pages. The bare minimum that one must select in order to schedule are: Start Date, End Date, Start Time, End Time, Title, and Destination.
Phoenix32 User Manual www.RealmCtrl.com Figure 42: The Recorded Media Scheduling Page 10.3.7. The Help Desk function, which may be accessed by clicking [Help] on the main menu, is a means by which end users and the Phoenix system itself can submit trouble tickets to the Media Center staff. Trouble tickets will be e-mailed to all Phoenix users who have the “Technician” privilege set (see section 9.
Phoenix32 User Manual www.RealmCtrl.com Figure 43: The Phoenix32 Online Help System 10.3.8. The Help Desk Manager is accessible only to those users who have the “Technician” privilege set on the Users Tab (see section 9.2). For all other users, the link will not be visible on the main menu. The Help Desk Manager is a simple means by which the Media Center staff can track trouble tickets and close them when they have been serviced, along with some notes regarding the action(s) taken to resolve the issue.
Phoenix32 User Manual www.RealmCtrl.com Figure 45: The Help Ticket Service Page. 11. Understanding Remote Systems Phoenix allows use of standalone NetLinx and Axcess control systems that communicate with the Head End control system via TCP/IP or RS-232. A Remote topology is employed when the distance to the destination exceeds the capabilities of the Axlink bus, or when advanced in-room control capabilities are required that fall outside the scope of the turnkey Phoenix feature set.
Phoenix32 User Manual www.RealmCtrl.com diagrams demonstrate one mechanism or the other, they may also be intermixed, creating a hybrid system with some rooms controlled by Head End AXlink, others controlled by remote AXcess (RS-232) systems, and others controlled by Remote NetLinx (TCP/IP) systems. Phoenix does also support NetLinx Remote systems using RS-232 as the communication mechanism but this is not a recommended topology. Remote systems may also be Crestron controlled.
Phoenix32 User Manual www.RealmCtrl.com 12. Understanding Hub Systems Hub Systems are similar to Remote systems but with a very important distinction: Hubs allow duplication of device IDs across multiple systems. Because the AMX AXcess devices must be addressed with unique IDs that range from 1-255, a mechanism must be in place for those facilities that need to control more than 255 rooms while using the AMX AXlink Television Managers.
Phoenix32 User Manual www.RealmCtrl.
Phoenix32 User Manual www.RealmCtrl.com 13. The Administrative Management System (AMS) The Administrative Management System is an option add-on that is used at some K-12 facilities to govern the broadcast of audio/video announcements and music, as well as the bell schedule. The touch panel interface used to configure and control AMS varies slightly at each campus due to the unique floorplans of each facility, and any custom features that may have been added to suit the special needs of the school.
Phoenix32 User Manual 13.3. www.RealmCtrl.com Section 1: Bells The “Bells” section is used to accomplish the following tasks: Associate Roland AR2000/3000 sounds and durations with manual and scheduled bells, play manual bells, enable/disable the active bell schedule, set the bell volume, and create/edit the bell schedule, and assign bells to zones. These capabilities are described in detail below: 13.3.1.
Phoenix32 User Manual www.RealmCtrl.com Press [Sound ID] to select the sound that you wish to associate with the event. A keypad will surface from which the desired sound may be selected. The IDs correspond to the unique ID of the sound on the Roland AR-2000/3000 MIDI device. Pressing the box between the arrows will cause a keypad to appear which may also be used to enter the duration. Press [Return] after you have entered the sound ID and the duration.
Phoenix32 User Manual www.RealmCtrl.com The Keymap divides the campus into zones. Each zone contains one or more rooms. Press the Keymap button to drill down to the rooms that are contained within the zone: To add a room to the zone, press the corresponding button so that it turns green. To remove it from the zone, press the button again so that it turns red. Press [Select All] to associate all rooms, or [Clear All] to remove all rooms.
Phoenix32 User Manual www.RealmCtrl.com To edit an existing scheduled event, press the corresponding button. Or, to create a new event, press an unused button.
Phoenix32 User Manual www.RealmCtrl.com Configure the scheduled bell event in same manner as the manual bell event. Use the Bell Schedule day/time page to assign the desired weekday and time to the bell event. Note that bell events configured with a frequency of “Once” will only activate one time. Those configured as Repeating will occur weekly and will be shown on the event list with an (R) suffix. After configuring the bell event day/time, sound, and zone, press [Enable Event] to activate it. 13.3.4.
Phoenix32 User Manual www.RealmCtrl.com 13.3.7. Restoring the bell schedule Press [Reload] to restore the bell schedule to a previously saved version. Any new events that were added since the previous save will be lost. 13.3.8. Press [Clear All] to completely reset the bell schedule. This will clear the active schedule and will also delete it from the internal NetLinx disk. AMS will prompt for confirmation. It is important to be absolutely certain before acknowledging this command. 13.3.9.
Phoenix32 User Manual 13.5. www.RealmCtrl.com Section 3: Keyswitch Paging Keyswitch paging is configured almost identically to the PA. Follow the same process to configure the keyswitch paging zones. To configure the broadcast mode preference, press the button within the Options section. The button will cycle through three options: [Broadcast PA and TVs], [Broadcast PA], or [Broadcast TVs]. If TVs are selected then the video will broadcast to the zone and will display the Broadcast Status page.
Phoenix32 User Manual www.RealmCtrl.com After selecting [Music] on the touch panel, the option will first be presented to select the music source. Select the CD or Tuner icon to jump to the desired page. CD and Tuner zones are configured using the same methodology as the bell, PA, and keyswitch zones.
Phoenix32 User Manual 13.7. www.RealmCtrl.com Section 5: System The System page provides overall system control capabilities. Power, volume, and password setup are provided on this page.
Phoenix32 User Manual www.RealmCtrl.com 13.7.1. To change the Level 1 and Level 2 passwords, press [Passwords] and enter the new access codes on the following page. Note that the Level 2 password is not used at this time. 13.7.2. To change the chime that plays immediately before an announcement is made, press [Announcement Chime] and enter the new Sound ID. 13.7.3. To clear an active Security Lockdown, press [All Clear]. More information pertaining to the Lockdown event will follow in this document. 13.7.
Phoenix32 User Manual www.RealmCtrl.com 13.9.2. To ring a bell using the telephone • Dial the telephone number for the Telephone Remote Access interface and enter the password followed by a pound (#) sign. Note: the telephone number and password will be provided separately. • Press 2 at the Main Menu to go to the Bell Sub-Menu. • Press 1 at the Bell Sub-Menu to sound the bell. 13.9.3. Description of the AMS main menu structure: “Please select from the following menu: Public Address Menu, Press 1.
Phoenix32 User Manual www.RealmCtrl.com display for the duration of the lockdown. • AMS will read back a condensed PA menu: To Start Public Address, press 1. To Stop Public Address, press 2. To Repeat This Menu, press 0. • AMS will remain in Lockdown Mode until cleared from the touch panel. The lockdown can be cleared either by pressing [All Clear] on the lockdown alert, or by pressing [All Clear] on the System page. Note that [All Clear] on the lockdown alert will fail if the user is not logged in.
Phoenix32 User Manual www.RealmCtrl.com AMS will prompt for an access code. This is the same numeric PIN number as is used to log into AMS: After entering the PIN number, press [Enter]. A campus lockdown will initiate immediately. The same tasks will occur as if the lockdown were initiated by dialing in.
Phoenix32 User Manual www.RealmCtrl.com The page displayed on the touch panel will differ slightly than the version that is displayed when the lockdown occurs by dial-in: • Press [All Clear] to end the lockdown. This can also be accomplished on the Security page by pressing [End Security Lockdown]. • Press [Make an announcement…] to activate an All Call to the campus. • Press [Close] to return to AMS while leaving the lockdown in effect.
Phoenix32 User Manual www.RealmCtrl.com 14. Appendix A: Control Logic Descriptions This appendix describes the behavior of the source Control Logics that govern families of devices. An important distinction to make when it comes to Control Logics is that there are two general categories of Control Logics: those geared towards a “device family” and those geared towards specific makes and models. By device family, we simply mean a grouping of devices that follow the same constraints in their behavior.
Phoenix32 User Manual www.RealmCtrl.
Phoenix32 User Manual www.RealmCtrl.
Phoenix32 User Manual www.RealmCtrl.
Phoenix32 User Manual Play Stop Pause while in Play mode Pause while in Pause mode Fast Forward while in Play mode Fast Forward while in Search Forward mode Rewind while in Play mode Rewind while in Search Rewind mode Step Forward www.RealmCtrl.
Phoenix32 User Manual Navigate Up Navigate Down Navigate Left Navigate Right Chapter Frame Center Toggle Display DVD07 Available Function Description Undeveloped www.RealmCtrl.
Phoenix32 User Manual www.RealmCtrl.com LDP02 Synergy counterpart: LDP2 Control: RS-232 Known supported device(s): Pioneer Laser Disc Players (all models that support RS-232) Note: this Control Logic supports barcode commands received from the Pioneer barcode scanning wand and the AMX TX-CTB handheld remote control with built in barcode scanning capabilities.
Phoenix32 User Manual www.RealmCtrl.
Phoenix32 User Manual www.RealmCtrl.
Phoenix32 User Manual www.RealmCtrl.
Phoenix32 User Manual www.RealmCtrl.
Phoenix32 User Manual www.RealmCtrl.com SAT04 Available Function Description Not implemented. Synergy counterpart: SAT4 Button Action Logic Control: N/A Slot SAT05 Available Function Description Not implemented. Synergy counterpart: SAT5 Button Action Logic Control: N/A Slot SAT06 Available Function Description Not implemented. Synergy counterpart: SAT6 Button Action Logic Control: N/A Slot SLD01 Available Function Description Not implemented.
Phoenix32 User Manual Available Function Description [x] – Enter (Direct Tuning) www.RealmCtrl.com Button N/A Action N/A Logic Send TUNE CHANNEL command Slot N/A TUNR02 Available Function Description Channel Up Channel Down Chapter-[x]-Enter (Direct Tuning) Synergy counterpart: TUNR2 Control: N/A Button Action Logic Slot PULSE Channel Up FWD PUSH 22 PULSE Channel Down REV PUSH 23 PULSE Digits 10-19 N/A N/A PULSE Enter 21 TUNR03 Available Function Description Not implemented.
Phoenix32 User Manual Forward while in Play mode Fast Forward / Search Forward while in Search Forward mode Fast Forward / Search Forward while in any other mode Rewind / Search Rewind while in Play mode Rewind / Search Rewind while in Search Rewind mode Rewind / Search Rewind while in any other mode Step Forward www.RealmCtrl.
Phoenix32 User Manual Step Reverse Record Stop/Rewind Select Audio Channel (LD) Stop/Zero-Back Tracking Up Tracking Down Reset Counter Clear www.RealmCtrl.
Phoenix32 User Manual Clear Display www.RealmCtrl.
Phoenix32 User Manual www.RealmCtrl.
Phoenix32 User Manual www.RealmCtrl.
Phoenix32 User Manual www.RealmCtrl.
Phoenix32 User Manual www.RealmCtrl.
Phoenix32 User Manual Skip Forward Skip Reverse www.RealmCtrl.
Phoenix32 User Manual www.RealmCtrl.
Phoenix32 User Manual Forward mode Rewind / Search Rewind while in Play mode Rewind / Search Rewind while in Search Rewind mode Step Forward Step Reverse www.RealmCtrl.
Phoenix32 User Manual www.RealmCtrl.
Phoenix32 User Manual Fast Forward / Search Forward while in Pause mode Rewind / Search Rewind while in Play mode Rewind / Search Rewind while in Play-Search Rewind mode Rewind while in Stop mode Rewind / Search Rewind while in Stop-Rewind mode Rewind / Search Rewind while in Pause mode Step Forward while in Play mode Step Forward while in Pause mode Step Forward while in Step Forward mode Step Forward while in Step Reverse mode Step Reverse while in Play mode Step Reverse while in Pause mode Step Reverse
Phoenix32 User Manual Pause while in Play mode Pause while in Pause mode Pause while in Record mode Pause while in Record-Pause mode Fast Forward / Search Forward while in Play mode Fast Forward / Search Forward while in Search Forward mode Fast Forward while in Stop mode Rewind / Search Rewind while in Play mode Rewind / Search Rewind while in Search Rewind mode Rewind while in Stop mode Rewind / Search Rewind while in Pause mode Step Forward www.RealmCtrl.
Phoenix32 User Manual www.RealmCtrl.
Phoenix32 User Manual www.RealmCtrl.com 15.
Phoenix32 User Manual www.RealmCtrl.
Phoenix32 User Manual www.RealmCtrl.
Phoenix32 User Manual # 1 2 3 9 TRANSPORT Play Stop Pause Power On/Off # 10 11 12 13 14 15 16 17 18 19 CHANNELS 0 1 2 3 4 5 6 7 8 9 21 Enter www.RealmCtrl.
Phoenix32 User Manual www.RealmCtrl.com Glossary A AMS – The Administrative Management System. AMS is an optional add-on to Phoenix. Its primary purpose is to control the bells and Public Announcement capabilities in K-12 environments. Axcess – The predecessor to NetLinx, Axcess is an earlier control system available from AMX Corporation. Axcess was the control system utilized by Synergy.
Phoenix32 User Manual www.RealmCtrl.com Therefore, to set a value to 5 seconds, you would enter the value of 50. If you enter only the number 5 then you will be setting the corresponding timing parameter to ½ second. D Default Channel – the broadband channel or baseband crosspoint that a destination will tune to when no event is active to it. This is also the channel/crosspoint that the room will tune to whenever a user presses the Local button. DHCP – An acronym for Dynamic Host Configuration Protocol.
Phoenix32 User Manual www.RealmCtrl.com J K L LAN – An acronym for Local Area Network. This term would refer to the campus network to which the computers and the NetLinx system are connected. Local Mode – When no event is active to a destination, it is said to be in “Local Mode”. When in this mode, users may cycle through the Channel Ring using the Source Up/Down buttons on the handheld remote control or the web client.
Phoenix32 User Manual www.RealmCtrl.com device power state if the previous command was ineffective. This is based off the reading of the sync sensor or the I/O port that is connected to the Power Current Sensor (depending on the method used to detect power – see sections 4.1.3.2 and 4.1.3.3 for more information regarding power sensing). This setting is critical to the proper functioning of the Television Manager.
Phoenix32 User Manual www.RealmCtrl.com V W X 32 XGen Web Client – The “NeXt Generation” of the Phoenix web client interface. Unlike it’s predecessor (G1), XGen serves up from the Phoenix Server computer, or from any dedicated web server computer. XGen is far more robust with a richer interface than G1 in all respects. XGen requires Windows XP Professional or Windows Server 2003 in order to operate properly.
Phoenix32 User Manual www.RealmCtrl.com Version History 10/21/04 (Version 1.0): Version 1.0 Released. 10/21/04 (Version 1.1): • Updated graphics to use new logo. • Updated section 6.7 to reflect the addition of comprehensive Help to the Phoenix product offering. 10/30/04 (Version 1.2): • Moved the information about performing the NetLinx update.
Phoenix32 User Manual www.RealmCtrl.com 08/13/09 (Version 1.6) • Added information pertaining to the Administrative Management System (AMS) • Updated the XGen screenshots to reflect the new look and feel of XGen.NET. • Fixed a few typos and grammatical errors. 09/17/09 • Added information pertaining to the security lockdown procedure when initiated from the AMS touch panel.