instruction manual AXB-REL8 Axcess Relay Controller AXlink Bus Controllers
AMX Limited Warranty and Disclaimer AMX Corporation warrants its products to be free of defects in material and workmanship under normal use for three (3) years from the date of purchase from AMX Corporation, with the following exceptions: • Electroluminescent and LCD Control Panels are warranted for three (3) years, except for the display and touch overlay components that are warranted for a period of one (1) year.
Table of Contents Table of Contents Product Information .................................................................................................1 Front and Rear Panels ...................................................................................................... 1 Specifications .................................................................................................................... 1 Connection and Wiring ........................................................................
Table of Contents ii AXB-REL8 Axcess Relay Controller
Product Information Product Information The AXB-REL8 Relay Controller provides remote control for up to eight relay functions. Suitable for stand-alone or rack mount applications, the AXB-REL8 may be used with AXCESS or AXCENT systems via the four-wire AXlink data bus. Front and Rear Panels The front and rear panels of the AXB-REL8 are shown in FIG. 1.
Product Information Specifications (Cont.) Dimensions (HWD) 1.51" x 5.55" x 5.45" (3.84 cm x 14.10 cm x 13.84 cm) Enclosure Non-glare, high-impact black matte plastic Power Consumption Baseline draw • 90 mA @ 12 VDC (min) With all 8 relays On • 170 mA @ 12 VDC (max) Front Panel Components AXlink Status indicator AXlink LED (green and blinks to indicate AXlink communication activity and power: • Full-Off indicates no power is being received or the controller is not functioning properly.
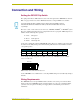
Connection and Wiring Connection and Wiring Setting the DEVICE Dip Switch The eight-position Device DIP switch is located on the front panel of the AXB-REL8 as shown in FIG. 1 on page 1. Each device in the AXlink bus must have a unique AXlink device number. If you later change the device number, remove and reconnect the AXlink connector. This enters the new device number into memory. The device number takes effect only on power-up.
Connection and Wiring Do not connect power to the AXB-REL8 until the wiring is complete. If you are using a 12 VDC power supply, apply power to the AXB-REL8 only after installation is complete. Preparing captive wires To connect the wiring into a captive-wire connector: 1. Strip 1/4 inch off the wire insulation for all four wires. 2. Tin 2/3 of the exposed wire. 3. Insert each wire into the appropriate captive-wire connector up to the insulation. 4.
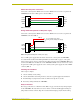
Connection and Wiring AXlink data and power connections Connect the control system's AXlink connector to the AXlink connector on the rear panel of the AXB-REL8 for data and 12 VDC power as shown in FIG. 3. PWR + PWR + AXP/TX AXP/TX AXM/RX AXM/RX GND - GND AXB-REL8 Central Controller FIG. 3 AXlink wiring Wiring AXlink with optional 12 VDC power supply Connect the control system's AXlink connector to the AXlink connector on the rear panel of the AXB-REL8 as shown in FIG. 4.
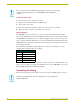
Connection and Wiring 1 2 3 4 5 A B A B A B RELAYS SHARING A COMMON Jumper "A" pins with tab strip A B A B A 6 7 B A B RELAYS WITH DISCRETE COMMONS Wire commons individually A 8 B FIG. 5 Relay wiring diagram Testing the installation 1. Check AXlink status LED - it should blink once per second (see Specifications table for AXlink status LED). 2. Relay LED lights, but source does not activate: 3. Check wiring continuity. 4. Check jumpers used for shared commons. 5.
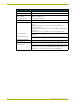
Connection and Wiring System Worksheet and Installation Guide AXB-REL8 Dealer ID# Dealer PO# Job SO# Description Serial# AXP AXM PWR GND 8 B 7 A B 5 6 A B A B 4 A B 3 A B 1 2 A B A B A AXlink Device # 1 2 3 4 5 Wiring Function Color/Pin AMX Cable/Infc # Source A B A B A B A B A B A 6 7 B A B A 8 B AXB-REL8 Axcess Relay Controller 7
brussels • dallas • los angeles • mexico city • philadelphia • shanghai • singapore • tampa • toronto* • york 3000 research drive, richardson, TX 75082 USA • 469.624.8000 • 800.222.0193 • fax 469.624.7153 • technical support 800.932.6993 032-004-1021 6/02 ©2002 AMX Corporation. All rights reserved. AMX, the AMX logo, the building icon, the home icon, and the light bulb icon are all trademarks of AMX Corporation. AMX reserves the right to alter specifications without notice at any time.