
User Guide


Upgrading the Firmware
47
AXB-PT15 PosiTrack Camera Controller
Upgrading the Firmware
This section outlines the steps necessary to setup a valid connection to a target Axcess Master and
then update the on-board firmware.
Before beginning:
1. Setup and configure your target Axcess Master.
2. Verify that the Master is receiving power and is turned On.
3. Verify that you have the latest NetLinx Studio installed on your PC.
4. If an update is necessary, download the latest Studio software by first logging in to
www.amx.com and then navigate to Tech Center > Downloadable Files > Application Files
> NetLinx Studio 2.4. This program is used to setup a System number, obtain/assign the IP/
URL for the connected NetLinx Master, and transfer firmware Kit files to the Master.
5. Verify that the proper AXlink and RS-232 connections have been made between your
computer, the Controller, and the target AXlink device.
6. Connect an RS-232 programming cable from the Program Port on the Controller to the rear
COM port connector on the PC being used for programming (this step establishes DB9
communication).
Communicating with the Controller via the Program Port
1. Launch NetLinx Studio 2.4 (default location is Start >Programs > AMX Control Disc >
NetLinx Studio > NetLinx Studio 2.4).
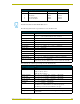
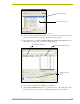
2. Select Settings > Master Communication Settings, from the Main menu, to open the Master
Communication Settings dialog (FIG. 22).
The NetLinx Studio application can perform firmware upgrades for both Axcess and
NetLinx devices using the options in the NetLinx Studio Firmware sub-menu.
FIG. 22 Assigning Master Communication Settings and Baud Rates
The default setting for most
Masters is 38400