
User Guide


Pre-Installation
9
AXB-PT15 PosiTrack Camera Controller
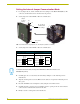
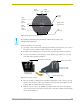
4. Carefully pull the connector panel away from the main unit until the bottom edge of the cover
clears the connector panel. Be careful not to damage the pins attached to the connector panel.
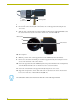
FIG. 7 illustrates how to remove the control panel.
5. Using the 1/16” Allen wrench, remove the 14 BHSC screws, from the left, right, top, and back
sides of the PosiTrack unit.
6. Carefully pull the cover straight up from the main unit, until the bottom edge of the cover
clears the connector panel and then slide it backwards (as seen in FIG. 8).
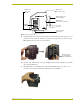
FIG. 6 Pan-head screw locations
FIG. 7 Control panel removal for AXB-PT15
FIG. 8 Removing cover on the AXB-PT15
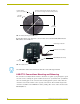
AMX
LENS POWER
CAM
RS-232
LENS
AXlink
BHSC screws
(two screws
in rear)
BHSC screws
(five screws on each side)
BHSC screws
(two screws on top)
Tilt-head screws (four
screws available)
Connector panel
(four screws)
Power
Switch
Pins that connect
the control panel
to the motherboard