instruction manual AXB-EM232 Enhanced Master RS-232 Controller A x c e s s C e n t ra l C o n t r o l l e r s
AMX Limited Warranty and Disclaimer AMX Corporation warrants its products to be free of defects in material and workmanship under normal use for three (3) years from the date of purchase from AMX Corporation, with the following exceptions: • Electroluminescent and LCD Control Panels are warranted for three (3) years, except for the display and touch overlay components that are warranted for a period of one (1) year.
Table of Contents Table of Contents Product Information .................................................................................................1 Product Information ........................................................................................................... 1 Specifications .................................................................................................................... 2 Installation ...............................................................................
Table of Contents ii AXB-EM232 Enhanced Master RS-232 Controller
Product Information Product Information Product Information The AXB-EM232 Enhanced Master RS-232 Controller (FIG. 1) is an AXlink bus device that functions like an AMX Master Card in a single compact enclosure. It is fully compatible with the Axcess Control System and can be used either as a stand-alone device or with other AMX bus devices. The AXB-EM232 runs complete Axcess programs, and controls other AXlink components and two devices using RS-232 as a control protocol.
Product Information Specifications The following table lists the specifications for the AXB-EM232.
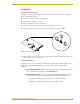
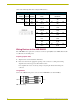
Product Information Installation Setting the internal jumpers Some RS-232 devices require that the bus be terminated at 100 ohms. Follow these steps if your device requires this termination. 1. Discharge the static electricity from your body. 2. Unplug the two-pin power connector. 3. Remove the two screws on the front panel. 4. Remove the front panel, and slide the circuit board out of the enclosure. 5. Remove the jumper on pin trio E1 from pins 2-3 and place it on pins 1-2 (FIG. 2).
Product Information Refer to the following table when setting the DIP switches.
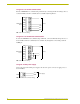
Product Information Using Ports 1 and 2 for RS-232 data communication 1. Connect the RS-232 wiring to Port 1, as shown in FIG. 4. GND GND RX1 TX TX1 RX Device RS232/422 485EN Port 1 RX1RX1+ not used TX1TX1+ FIG. 4 RS-232 Port 1 wiring 2. Connect the RS-232 wiring to Port 2, as shown in FIG. 5. RS232 Port 2 GND GND RX2 TX TX2 RX CTS2 Device not used RTS2 FIG. 5 RS-232 Port 2 wiring 3.
Product Information Using Port 1 for RS-422 communication Wire the AXB-EM232 for communicating via RS-422 by connecting the RS-422 wiring to Port 1, as shown in FIG. 7. RS-422 communication is available only through Port 1. GND RX1 TX1 RS232/422 485EN Port 1 RX1- TX- RX1+ TX+ TX1- RX- TX1+ RX+ Device FIG. 7 RS-422 Port 1 wiring Using Port 1 for RS-485 data communication To wire the AXB-EM232 for communicating via RS-485, connect the RS-485 wiring to Port 1, as shown in FIG. 8.
Product Information RS-232 male program connector Use either an AMX RS-232 cable (FG 10-726 ) for a DB-25 connector or AMX Programming cable (FG10-727) for a DB-9 port to connect your PC to the AXB-EM232 and download the Axcess program. Do not use a null modem cable. Program Connector and Pinouts Pin 1 Pin 9 Pin Signal 2 RXD 3 TXD 4 +12 VDC 5 GND 7 +12 VDC Only an AMX Programming cable or equivalent is to be used due to the voltage on pins 4 and 7.
Product Information 5. Carefully slide one battery out of its socket, and insert the new battery. 6. Plug the 2-pin power connector in to reapply power. Wait one minute; then, remove the power connector again. 7. Carefully slide the other battery out of its socket, and insert the new battery. 8. Plug in the 2-pin power connector. 9. Slide the circuit board back into the enclosure. 10. Replace the front panel and refasten the two screws. 11. Reconnect any connectors you removed.
Programming Programming Use the NetLinx Studio software program to create and edit an Axcess Control program for the AXB-EM232: ! The AXB-EM232 occupies address 0. ! Port 1 is AXlink Device 1, and Port 2 is AXlink Device 2. ! To communicate directly with the AXB-EM232, use Terminal Emulation mode. ! To display a list of the commands in the Terminal Emulation mode, type help or ? and press ENTER. ! For online help while in Axcess, press F6.
Programming Send_Strings This device also has some special Send_String escape sequences. If any of the three-character combinations in the following table are found anywhere within a Send_String program instruction, they will be treated as a command and not the literal characters. Send_String sequences "27,17,
Programming AXB-EM232 Enhanced Master RS-232 Controller 11
brussels • dallas • los angeles • mexico city • philadelphia • shanghai • singapore • tampa • toronto* • york 3000 research drive, richardson, TX 75082 USA • 469.624.8000 • 800.222.0193 • fax 469.624.7153 • technical support 800.932.6993 032-004-1013 10/03 ©2003 AMX Corporation. All rights reserved. AMX, the AMX logo, the building icon, the home icon, and the light bulb icon are all trademarks of AMX Corporation. AMX reserves the right to alter specifications without notice at any time.