
Instruction manual

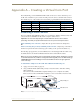


Appendix A – Creating a Virtual Com Port
69
DGX Transmitters & Receivers Instruction Manual
Identifying the Virtual Com Port
To enable communication between the Control PC and the module, you must identify the virtual Com
port assigned to the USB connector.
The module must be connected to the PC via the USB port and powered up before you start the following
procedure, so that the PC can display the port number.
To identify the virtual Com port:
1.
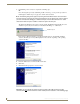
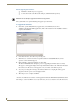
Open the Windows Device Manager (Start/Settings/Control Panel/System/System Properties/
Hardware tab/Device Manager button) and expand Ports by clicking on the “+.”
(The Device Manager may have a different location depending on the operating system and theme
selected.)
2. If the port specifies the Com number, go to Step 4.
If the port does not specify the Com number, right-click AutoPatch USB Bridge, select Properties,
and complete all remaining steps.
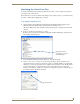
3. In the AutoPatch USB Bridge Properties dialog box, select the General tab.
4. Make note of the Com port assigned to the AutoPatch USB Bridge. This port number must be
entered when setting a connection in a software program or a terminal emulation program. The PC
will always associate a specific USB connector with the assigned virtual Com port. The PC will not
recognize the module if you disconnect and reconnect using a different Com port on the PC.
However, it will attempt to install a new virtual Com port using the new port. If completed, the new
port will be assigned a different Com number.
Assigned port number
(if not displayed, complete
all remaining steps)
Assigned port number