
Instruction manual


Appendix A – Creating a Virtual Com Port
68
DGX Transmitters & Receivers Instruction Manual
3. If establishing a new connection, complete the remaining steps.
Or
If reconnecting after previously establishing a USB connection, go to Step 5 of the procedure for
identifying the virtual Com port on page 69 to run the desired software.
Note: The following dialog boxes appear only during the initial USB connection. Once the virtual
Com port has been assigned to the module, the dialog boxes do not appear again. If they do appear,
you have connected the USB plug to a different Com port on the PC than the initial one – either
switch to the initial Com port or establish a virtual Com port for the new port.
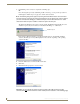
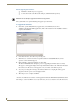
The Found New Hardware notice window appears briefly. The Hardware Wizard will refer to the
virtual Com port used by the module as an “AutoPatch USB Bridge” or “USB Device.”
The Found New Hardware Wizard opens with the default selected to automatically install the
software. (The dialog boxes may differ slightly from those shown, depending on the operating
system for the PC.)
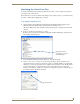
4. Insert the AMX AutoPatch CD into the PC’s CD holder.
5. Click Next.
6. Click Finish when prompted to close the wizard.
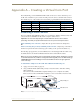
Important: You must identify the virtual Com port assigned to the USB connector to enable
communication between the Control PC and the module (see the instructions on the following page).
Virtual Com port