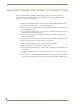
Instruction Manual DGX Transmitters & Receivers AVB-TX-DGX-HD15-SC Fiber AVB-TX-DGX-DVI-SC Fiber AVB-RX-DGX-SC Fiber-HD15 AVB-RX-DGX-SC Fiber-DVI AutoPatch DGX Fiber Modules REV C: 3/19/2010
AMX Limited Warranty and Disclaimer This Limited Warranty and Disclaimer extends only to products purchased directly from AMX or an AMX Authorized Partner which include AMX Dealers, Distributors, VIP’s or other AMX authorized entity.
Contents Contents ESD Warning .......................................................................................................1 Important Safety Information and Instructions ....................................................2 Information et directives de sécurité importantes...............................................3 Notices ................................................................................................................4 Overview and Specifications ............................
Contents Appendix A – Creating a Virtual Com Port ....................................................... 67 Establishing a Virtual Com Port ............................................................................................. 67 Identifying the Virtual Com Port............................................................................................ 69 Appendix B – Restoring Default Settings ......................................................... 71 Appendix C – Upgrading the Firmware .......
ESD Warning ESD Warning To avoid ESD (Electrostatic Discharge) damage to sensitive components, make sure you are properly grounded before touching any internal materials. When working with any equipment manufactured with electronic devices, proper ESD grounding procedures must be followed to ensure people, products, and tools are as free of static charges as possible. Grounding straps, conductive smocks, and conductive work mats are specifically designed for this purpose.
Important Safety Information and Instructions Important Safety Information and Instructions When using and installing your AMX AutoPatch product, adhere to the following basic safety precautions. For more information about operating, installing, or servicing your AMX AutoPatch product, see your product documentation. Read and understand all instructions before using and installing AMX AutoPatch products. Use the correct voltage range for your AMX AutoPatch product.
Information et directives de sécurité importantes Information et directives de sécurité importantes Veuillez vous conformer aux directives de sécurité ci-dessous lorsque vous installez et utilisez votre appareil AMX AutoPatch. Pour de plus amples renseignements au sujet de l’installation, du fonctionnement ou de la réparation de votre appareil AMX AutoPatch, veuillez consulter la documentation accompagnant l’appareil.
Notices Notices Copyright Notice AMX© 2010 (Rev C), all rights reserved. No part of this publication may be reproduced, stored in a retrieval system, or transmitted, in any form or by any means, electronic, mechanical, photocopying, recording, or otherwise, without the prior written permission of AMX.
Notices Trademark Notices AMX®, AutoPatch®, NetLinx®, and SmartScale™ are trademarks of AMX. Windows®, Windows 2000®, Windows NT®, and Windows XP Professional® are registered trademarks of Microsoft Corporation. HyperTerminal® is a copyright product of Hilgraeve Inc. 3M™, Desco®, Richmond Technology®, and Plastic Systems® are registered trademarks. Neuron® and LonTalk® are registered trademarks of Echelon. TosLink® is a registered trademark of the Toshiba Corporation.
Notices 6 DGX Transmitters & Receivers Instruction Manual
Overview and Specifications Overview and Specifications Applicability Notice The information in this manual applies to the four DGX Transmitter (TX) and Receiver (RX) modules listed in the table below. Important: These modules are compatible only with each other and with other AMX AutoPatch DGX Signal Management products.
Overview and Specifications DGX TX and DGX RX Module Features Designed for use with single strand multimode fiber cable with SC connectors. DGX technology provides a common signal transport and matrix switching layer that transcodes between analog and digital signals; this allows compatibility among all the DGX Fiber modules and with other AMX AutoPatch DGX Signal Management products.
Overview and Specifications AVB-TX-DGX-HD15-SC Fiber DGX HD-15 TX Front View Signal presence LEDs - Video & Audio EDID LED USB mini-B port Power LED Video Type LEDs Mode (resolution) button & LEDs - Auto & Manual FIG. 1 DGX HD-15 TX front view The following components are located on the front of the DGX HD-15 TX (left to right): Power LED – indicates whether or not the module is powered on. Video and Audio LEDs – indicate the presence of video and audio signals through the module.
Overview and Specifications DGX HD-15 TX Rear View RS-232 (Serial Data Interface) Port Video (HD-15) Local Output Fiber (SC) Output EDID W / WP Switch & Sync Set B / A Switch Power Jack Video (HD-15) Input Digital (RCA digital audio input) Stereo (3.5 mm analog stereo audio input) FIG. 2 DGX HD-15 TX rear view The following components are located on the rear of the DGX HD-15 TX (from left to right): Power receptacle – a 2.
Overview and Specifications AVB-TX-DGX-DVI-SC Fiber DGX DVI TX Front View Signal presence LEDs - Video & Audio EDID LED USB mini-B port Power LED FIG. 3 DGX DVI TX front view The following components are located on the front of the DGX DVI TX (left to right): Power LED – indicates whether or not the module is powered on. Video and Audio LEDs – indicate the presence of video and audio signals through the module.
Overview and Specifications DGX DVI TX Rear View RS-232 (Serial Data Interface) Port Video (DVI) Local Output Fiber (SC) Output EDID W / WP Switch Power Jack Video (DVI) Input Digital (RCA digital audio input) Stereo (3.5 mm analog stereo audio input) FIG. 4 DGX DVI TX rear view The following components are located on the rear of the DGX DVI TX (left to right): Power receptacle – a 2.1 mm DC jack for connecting power (an ENERGY STAR® qualified desktop power supply is provided).
Overview and Specifications AVB-RX-DGX-SC Fiber-HD15 DGX HD-15 RX Front View USB mini-B port Scaling button & LEDs - Bypass, Auto, & Manual Power LED Signal presence LEDs - Video & Audio FIG. 5 DGX HD-15 RX front view The following components are located on the front of the DGX HD-15 RX (left to right): Power LED – indicates whether or not the module is powered on. Video and Audio LEDs – indicate the presence of video and audio signals through the module.
Overview and Specifications DGX HD-15 RX Rear View SC Fiber Input Stereo (3.5 mm analog stereo audio output) Power Jack RS-232 Port HD-15 Output Digital (RCA digital audio output) FIG. 6 DGX HD-15 RX rear view The following components are located on the rear of the DGX HD-15 RX (left to right): Power receptacle – a 2.1 mm DC jack for connecting power (an ENERGY STAR® qualified desktop power supply is provided).
Overview and Specifications AVB-RX-DGX-SC Fiber-DVI DGX DVI RX Front View USB mini-B port Scaling button & LEDs - Bypass, Auto, & Manual Power LED Signal presence LEDs - Video & Audio FIG. 7 DGX DVI RX front view The following components are located on the front of the DGX DVI RX (left to right): Power LED – indicates whether or not the module is powered on. Video and Audio LEDs – indicate the presence of video and audio signals through the module.
Overview and Specifications DGX DVI RX Rear View SC Fiber Input Stereo (3.5 mm analog stereo audio output) Power Jack RS-232 Port DVI Output Digital (RCA digital audio output) FIG. 8 DGX DVI RX rear view The following components are located on the rear of the DGX DVI RX (left to right): Power receptacle – a 2.1 mm DC jack for connecting power (an ENERGY STAR® qualified desktop power supply is provided).
Overview and Specifications DGX TX and DGX RX Specifications General Specifications Parameter Value Approvals UL, cUL, CE, FCC Class A, RoHS AC Power 100 VAC to 240 VAC single phase, 50 Hz to 60 Hz 0.6 A @ 115 VAC max. Power Consumption (max.) +12 V, 1.25 A (15 W) Thermal Dissipation (max.) 51 BTU/hr. Power Connector* 2.
Overview and Specifications Compatibility Note: These modules are compatible only with each other (either TX to either RX) and with other AMX AutoPatch DGX Signal Management products. DGX Fiber modules are not compatible with third-party optical distribution amplifiers or multimode to single-mode converters.
Overview and Specifications DVI Video Specifications TX Input Signal Type DVI-D (single link) DDC/EDID Support EDID provided by DGX TX EDID is user re-programmable HDCP Support No Input Voltage (nominal) 1.0 Vpp differential Input Connector DVI-I (DVI-D single link is the supported signal type) DVI Local Out Nominal Voltage 1.0 Vpp differential DVI Local Out Re-clocking (CDR) Yes DVI Local Out +5 V DDC Pin 50 mA DVI Local Out Rise Time / Fall Time 75 ps min. to 240 ps max. (20% to 80%) 0.
Overview and Specifications Audio Specifications Table Audio Specifications (Digital and Analog) TX Input Signal Types Stereo analog, S/PDIF (2 Channel L-PCM) Video signal must be present to pass audio Analog Input Level (max.) +8 dBu, unbalanced Analog Input Impedance 2 kohms S/PDIF Resolution 16 bit to 24 bit S/PDIF Sample Rate 32 kHz, 44.1 kHz, 48 kHz, 96 kHz* S/PDIF Input Signal Level Range 200 mVpp to 2.
Overview and Specifications Serial Data Specifications TX Input Signal Type Unidirectional RS-232: the control signal is transmitted in the same direction as video/audio Video signal must be present to pass serial data Input Signal Level (max.) +/-15 V Baud Rate (max.) 115.2 k baud, 25 ft. (7.6 m) copper cable Baud Rate (typical) 57.6 k baud, 150 ft. (45.7 m) copper cable Input Connector Pluggable 3.
Overview and Specifications 22 DGX Transmitters & Receivers Instruction Manual
Installation and Setup Installation and Setup UL Safety Certifications, Notices, and Recommendations for Laser Products Per UL requirements, make note of the following: The DGX TX Fiber modules comply with IEC Standard: IEC 60825-1, 2001. The modules also comply with 21 CFR 1040.10 and 1040.11 except for deviations pursuant to Laser Notice No. 50, dated June 24, 2007. The DGX TX Fiber modules are CLASS 1 LASER PRODUCTS. The maximum output power of the laser radiation is 4.08 mW.
Installation and Setup Site Recommendations When placing the modules, follow the recommendations and precautions in this section to reduce potential installation and operation hazards. Environment Choose a clean, dust free, (preferably) air-conditioned location. Avoid areas with direct sunlight, heat sources, or high levels of EMI (Electromagnetic Interference). Module Accessibility Make sure the front of each module is accessible, so that you can monitor the LED indicators.
Installation and Setup Unpacking Tips Before fully unpacking the module(s), inspect the shipping box(es) for any signs of damage. If a box is partially crushed or any sides have been broken open, notify the shipping agency immediately and contact your AMX representative (see the warranty on the AMX AutoPatch CD or at www.amx.com). Once unpacking is complete, closely check the physical condition of the module(s). Collect all documentation.
Installation and Setup Control PC for setup – only necessary for systems with special requirements Source Device USB USB Destination Device DGX RX DGX TX Fiber up to 3000 ft. (914 m) FIG. 10 DGX TX and DGX RX modules in point-to-point solution Control PC for setup – only necessary for systems with special requirements Source Device USB USB Destination Device DGX RX DGX TX Fiber up to 3000 ft. (914 m) on each side of matrix switcher Matrix switcher with DGX Fiber boards FIG.
Installation and Setup Mounting Options The DGX TX and RX modules are classified as V Style modules, which require V Style mounting hardware. These versatile mounting options include rack trays and mounting brackets for desktops, under desks, poles, and walls. For details on kit options, see www.amx.com. Rack tray with spacer Pole mounts Mounting brackets FIG.
Installation and Setup 3 RCA Breakout Cable HD-15 to 3 RCA Breakout Cable (FG10-2170-03) This cable is available from AMX and can be used for either Y/Pb/Pr or RGsB signals from the source device to the TX. The connection information is the same as the HD-15 to 5 BNC breakout cable. Note: This cable cannot be used with an RX, as the RX can only send an RGBHV signal to the destination. FIG. 16 HD-15 to 3 RCA breakout cable, 6 ft. (1.83 m) HD-15 Pinout The pinout in FIG.
Installation and Setup Basic Installation Installation Scenario 1 (Basic) Automatic Image Adjustment and Automatic EDID Scaling The flow chart in FIG. 19 assumes that the results from the automatic image adjustment and automatic EDID scaling require no further adjustment. Basic Installation TX Attach connectors Apply power RX Attach connectors Apply power DGX HD-15 TX only Set the A/B Sync Set switch FIG.
Installation and Setup To attach signal cables to a TX: Digital audio EDID switch must be set to WP HD-15 cable SC fiber cable Analog stereo audio cable Digital audio EDID switch must be set to WP SC fiber cable DVI cable Analog stereo audio cable FIG. 20 Attach signal cables to DGX HD-15 TX (top) or DGX DVI TX (bottom) 1. Check the EDID switch on the rear of the TX to be sure that it remains in the down position for WP (write protect). 2.
Installation and Setup TX – Wiring for RS-232 Data Transfer The RS-232 port is a unidirectional interface. Important: The RS-232 connection on the modules requires management of the RS-232 data line in relation to switching operations. In an upstream matrix switching scenario, we recommend that RS-232 control commands (via the DGX RS-232 data connection) are not sent immediately prior or subsequent to a matrix switching command.
Installation and Setup DGX DVI TX – Indicator LEDs at Initial Power Up TX LED Normal State Indicates Power Constant red Constant green Initial application of power (red for a brief time only) Power is in an operational state Video Constant green A video signal is present through TX Audio Constant green An audio signal is present through TX EDID Off EDID is in Write-Protect mode (EDID switch on rear is flipped down) For information on restoring the TX default settings on power up, see page 71
Installation and Setup Digital audio SC fiber cable HD-15 cable Analog stereo audio cable Digital audio SC fiber cable DVI cable Analog stereo audio cable FIG. 22 Attach signal cables to DGX HD-15 RX (top) or DGX DVI RX (bottom) To attach signal cables to the RX: 1. Attach the connector for the HD-15 cable for the destination device to the Video Output receptacle. HD-15 connectors on the module use the pinout information in FIG. 17. 2.
Installation and Setup To wire the RS-232 port on the RX for data transfer: 1. Wire the RS-232 connector according to the pinout directly above the connector (FIG. 23). RS-232 pinout FIG. 23 Wire RX for RS-232 data transfer RX – Applying Power Caution: If you are providing the power supply, use a UL (or equivalent) listed power supply. To avoid damage to the module, the electrical ratings must not exceed those indicated in the “Specifications” table on page 17. To apply power to the RX: 1.
Installation and Setup Addressing Special Installation Requirements For most installations, the basic installation steps just covered will provide a satisfactory image on the destination device. If the installation has special requirements (or in some cases when the TX is used in conjunction with a DGX matrix switcher), three additional scenarios are presented which indicate how to handle them. The information necessary to complete these scenarios is covered in the chapters referenced under each scenario.
Installation and Setup Installation Scenario 4 – Automatic Image Adjustment Using Custom EDID When you need to read a custom EDID from the destination device and write it to the TX, the flow chart in FIG. 26 shows the sequence to follow.
Scaling Options Scaling Options Applicability This chapter deals with the SmartScale™ feature (controlled through the Auto option) on both the DGX HD-15 RX and the DGX DVI RX, as well as Bypass and Manual (the other two Scaling options). The section on the Manual Scaling option provides an overview of the Scaler Override utility along with instructions for setting a specific resolution or a custom resolution.
Scaling Options Auto Option (SmartScaleTM) In most cases, selecting the DGX HD-15 RX and DGX DVI RX Auto option (default) provides a satisfactory image on the destination monitor or device. In this case, no other action is required. Note: The Auto option automatically persists when the power is cycled on the RX, unless the persisted state has been changed (see page 37).
Scaling Options How the Scaler Override Utility Works Important: If breakout cables are used between the DGX HD-15 RX and the destination monitor (or device), the Scaler Override utility cannot read the EDID. When the Scaler Override utility is launched, it attempts to obtain the EDID information from the destination monitor.
Scaling Options Before starting the Scaler Override procedure (applies to either DGX RX): Connect the DGX RX to a PC using a USB (mini-B) cable (FG10-5965 provided). A virtual Com port must be established; see page 67. On the PC, install the Scaler Override utility from the AMX AutoPatch CD (:\Configuration\ScalerOverride) or from www.amx.com).
Scaling Options Option B (B) To set to a standard preset for the RX: Note: If the Manual option is not selected in Step 1, the RX automatically goes to the Manual option when the utility is opened or when either the Apply or the Save button in the utility is selected. (If the Save button is selected, the Manual option persists when power is cycled on the RX.) The Manual option remains selected until the Scaling button on the RX is pressed to activate another option. 1.
Scaling Options Option C (C) To set a custom resolution for the RX with optional advanced timing parameters: Note: If the Manual option is not selected in Step 1, the RX automatically goes to the Manual option when the utility is opened or when either the Apply or the Save button in the utility is selected. (If the Save button is selected, the Manual option persists when power is cycled on the RX.) The Manual option remains selected until the Scaling button on the RX is pressed to activate another option.
Scaling Options 10. Click Save* to store the currently displayed settings (if the setting have been changed since clicking Apply, the newest settings will be saved) on the RX and persist them in memory. (The RX will power up in the Manual option.) * If you click Close instead of Save immediately after applying settings, the utility asks if you want to save prior to exiting.
Scaling Options Maintain Aspect Ratio and Stretch to Fit Maintain Aspect Ratio (default) – This option maintains the incoming video’s aspect ratio, but will scale the image until the display’s video fills either the horizontal or vertical direction first. If the vertical direction is filled first, then the video will have pillar box black bars on the sides of the display (display on left in FIG. 31).
Adjusting Video with BoardConfig Software Adjusting Video with BoardConfig Software Applicability This chapter applies only to the DGX HD-15 TX module and covers manual adjustment for fine tuning an image. BoardConfig software is provided for manually adjusting the video image, if necessary. Important: Because the basic installation steps (see page 29) normally produce a satisfactory image, you will not need the information in this chapter unless the installation has special requirements.
Adjusting Video with BoardConfig Software System Requirements Control PC Windows 2000® or Windows XP Professional® Minimum Hardware: 166 MHz, 128 MB RAM, 20 MB free disk space*, 800x600 display Recommended Hardware: 2.0 GHz, 512 MB RAM, 20 MB free disk space*, 1024x768 display USB port** * The installation process requires 20 MB of disk space for the BoardConfig installer. Once installed, the tool requires 5 MB of disk space.
Adjusting Video with BoardConfig Software Determining Resolution and Refresh Rate for Source PC The instructions below assume that the basic installation has been completed and the DGX HD-15 TX has been connected to the Source PC. Before attempting to adjust the video display with the DGX-HD15 Wizard, verify the resolution and refresh rate on the Source PC using the following instructions. To determine video card resolution/refresh settings on Windows© operating systems: 1.
Adjusting Video with BoardConfig Software Adjustment Tips: Be sure the source device that is sending the signal to the Display Monitor (or device) has a sharp picture before you start. The Destination Monitor controls may also need adjusting during the video display adjustment procedure with the wizard. CRT monitors seem more sensitive to losing sync when changing vertical position. “ReSync Monitor” under the Options menu can be useful when closing in on the final settings.
Adjusting Video with BoardConfig Software Important: After the resolution values have been verified, further adjustments may not be required. If this is the case, go to Step 9 to complete the procedure. 6. On the Source PC, open the test image PDF that matches the resolution setting. If an image does not appear, change the Source PC’s video card settings to match one of the supported resolutions (see the “EDID Specifications” table on page 19). 7. Select the Horizontal Total Pixels icon.
Adjusting Video with BoardConfig Software 50 DGX Transmitters & Receivers Instruction Manual
EDID Programmer EDID Programmer Applicability This chapter applies to both the DGX HD-15 TX and the DGX DVI TX modules and covers reading the EDID from the destination device and writing the EDID to the TX. Important: Because the basic installation steps normally produce a satisfactory image, you will not need the information in this chapter unless the installation has special requirements or in some cases when a DGX TX is used in conjunction with a DGX matrix switcher.
EDID Programmer DGX TX Modules and EDID As long as the source signal being transmitted is supported by the display device, the result should be a good image on the display. If the source signal being transmitted is not supported by the display device, the result will be either a badly distorted image or no image at all. To address these issues, the DGX TX comes with an EDID EEPROM chip for the input connector, which has been pre-loaded with an AMX AutoPatch EDID set.
EDID Programmer Installing the EDID Programmer PC Requirements (EDID Programmer v1.2.0) Windows 2000® or Windows XP Professional® Minimum Hardware: 166 MHz, 128 MB RAM, 20 MB of free disk space*, 800x600 display, video card with dual outputs** Recommended Hardware: 2.0 GHz, 512 MB RAM Serial port * The installation process requires 20 MB of disk space for the EDID Programmer installer. Once installed, the EDID Programmer requires 5 MB of disk space.
EDID Programmer To read and save EDID data from the destination: 1. On the PC, open the EDID Programmer.
EDID Programmer Writing EDID Data to the TX DGX HD-15 TX The instructions that follow cover the situation in which the EDID Programmer is used to write EDID information to the EDID chip for the Video Input connector on a previously unprogrammed DGX HD-15 TX using an HD-15 cable. DGX DVI TX The instructions that follow can be adapted to cover the situation in which the EDID Programmer is used to write EDID information to the EDID chip for the Video Input connector on a previously unprogrammed DGX DVI TX.
EDID Programmer 56 DGX Transmitters & Receivers Instruction Manual
Troubleshooting Troubleshooting DGX TX and DGX RX Troubleshooting The troubleshooting suggestions/strategies provided apply to both the TX and RX modules, unless otherwise noted. Important: The Power LED can illuminate solid amber at any time, not just at power up. If this occurs, check the error code (see page 62) and contact technical support (page 64). Four potential types of problems are covered in full-page flow charts on the following pages.
Troubleshooting Flow Chart 1: Power Up What to Expect for Normal Power Up Operation Upon power up, the Power indicator LED on the front of the TX and the RX illuminates solid red for a short time while the module is performing power up testing. The solid red LED is normal at power up and indicates that power up is in process. Once the power up testing is complete, the LED illuminates solid green.
Troubleshooting Flow Chart 2: Video or Audio Signal Not Present (LEDs not illuminated) What to Expect when Video and Audio Signals are Transmitted Normally The normal display for the Video and Audio LEDs when the signals are present is: the LEDs illuminate during power up, turn off, and then illuminate again.
Troubleshooting Flow Chart 3: No Video Image (with Video LED illuminated on the TX) What to Expect with Normal Video Display On power up, the Video LED illuminates, turns off, and then illuminates indicating that the video signal is present. On both DGX RX modules, the LED sequence for the Scaling LEDs is: all illuminate, all turn off, and then the Auto LED illuminates as the video displays at the destination (assumes power up is in Auto).
Troubleshooting Flow Chart 4: No Audio What to Expect with Normal Audio The normal display for the Audio LED (and Video LED) at power up when an audio signal is present is: the LED illuminates, turns off, and then illuminates again as the audio is heard at the destination. Important: Video must be present or audio cannot be transmitted.
Troubleshooting Error Code Reporting (Power LED is Solid Amber) Error code reporting is available via a terminal emulation program, such as Windows® HyperTerminal. If the Power LED illuminates solid amber, we recommend determining the error code before contacting technical support. PC Requirements Windows XP Professional® or Windows 2000® Terminal emulation program USB port To determine the error code (error code reporting): 1. Connect the module to a PC via the USB port. 2.
Troubleshooting Live Status Update Messages Live status update messages will appear at times in a terminal emulation program, such as Windows® HyperTerminal when a module is connected to a PC via the USB port (see page 67). These messages can be helpful for technical support when assessing the state of the system. Certain activity/conditions in the system can trigger live status update messages.
Troubleshooting Non-DGX Matrix Switcher Routing Behavior Corrupted or Lost RS-232 Data The RS-232 connection on the modules requires management of the RS-232 data line in relation to switching operations. In an upstream matrix switching scenario, we recommend that RS-232 control commands (via the DGX RS-232 data connection) are not sent immediately prior, during, or subsequent to a matrix switching command.
Troubleshooting 3. Enter ~scr! Splash screen information appears (see examples in FIG. 38). ~scr! [Accessory Module] AMX AutoPatch DGX DVI RX [host software] 1.0.0 [hardware driver] 1.0.0 [hardware id] 01 [FPGA code] 0001001C [build date] Feb 14 2010, 5:15:37 [Temperature Sensors] [ambient] 36c [core] 54c ~scr! [Accessory Module] AMX AutoPatch DGX HD-15 TX [host software] 1.0.0 [hardware driver] 1.0.0 [hardware id] 01 [lookup table] 0.1.1, Feb 14 2010 [build date] Feb 14 2010, 7:25:46 FIG.
Troubleshooting 66 DGX Transmitters & Receivers Instruction Manual
Appendix A – Creating a Virtual Com Port Appendix A – Creating a Virtual Com Port The USB (mini-B) port on the DGX TX and RX modules can be used to create a virtual Com port on the PC. Once a virtual Com port is created, the USB port acts the same as a standard serial connection. The virtual Com ports on the modules can be used with the programs/utilities listed in the table below.
Appendix A – Creating a Virtual Com Port 3. If establishing a new connection, complete the remaining steps. Or If reconnecting after previously establishing a USB connection, go to Step 5 of the procedure for identifying the virtual Com port on page 69 to run the desired software. Note: The following dialog boxes appear only during the initial USB connection. Once the virtual Com port has been assigned to the module, the dialog boxes do not appear again.
Appendix A – Creating a Virtual Com Port Identifying the Virtual Com Port To enable communication between the Control PC and the module, you must identify the virtual Com port assigned to the USB connector. The module must be connected to the PC via the USB port and powered up before you start the following procedure, so that the PC can display the port number. To identify the virtual Com port: 1.
Appendix A – Creating a Virtual Com Port 5. Set up and run the desired application: Scaler Override utility – see page 38 BoardConfig software – see page 45 HyperTerminal (error code reporting and live status updates) – page 62 and page 63 FW (Firmware) Upgrade Tool – see page 73 Important: When a PC application has established an active connection (virtual COM port) with the module and then power is cycled on the module, the connection must be reestablished.
Appendix B – Restoring Default Settings Appendix B – Restoring Default Settings This appendix covers the following: Restoring the factory default settings on the DGX HD-15 TX module Restoring the factory default settings on the DGX HD-15 RX or DGX DVI RX module TX (DGX HD-15 TX only) – Restoring the Factory Default Settings To restore the factory default settings to the TX: 1. If the TX is powered, unplug its power connector. 2.
Appendix B – Restoring Default Settings 72 DGX Transmitters & Receivers Instruction Manual
Appendix C – Upgrading the Firmware Appendix C – Upgrading the Firmware The firmware on the TX and RX can be upgraded in the field using the Firmware Upgrade Tool v1.0.0 found on the AMX AutoPatch CD in the Utilities folder. Laser calibration is retained across firmware upgrades. Important: You must have adequate rights to install the Firmware Upgrade Tool. Before proceeding, check with your System Administrator to be sure you have the required access.
Appendix C – Upgrading the Firmware Before Upgrading the Firmware: Establish a virtual Com port (see page 67). Connect the module to the PC via the USB port (cable FG10-5965 provided). Caution: Do not attempt to upgrade the firmware during runtime. The system will be non-operational during the upgrade procedure below. To upgrade the firmware: 1. On the PC, open the FW (Firmware) Upgrade Tool (on the AMX AutoPatch CD at :\Configuration\FWUpgradeTool).
3/2010 ©2010 AMX. All rights reserved. AMX and the AMX logo are registered trademarks of AMX. AMX reserves the right to alter specifications without notice at any time. It’s Your World - Take Control™ 3000 RESEARCH DRIVE, RICHARDSON, TX 75082 USA • 800.222.0193 • 469.624.8000 • 469-624-7153 fax • 800.932.6993 technical support • www.amx.