
Programming instructions


4
Step 5: Addressing The Dimmers via The Web
Interface
Once you have installed the ALD-H48 and dimmers using
the hardware installation literature included with the unit,
you must now address the dimmers.
You can only select addresses available on the bus to
which the dimmer is physically connected. For example,
if you want to assign address 17 to a particular dimmer, it
must be connected to bus 3 of the ALD-H48 as indicated
below.
To address the dimmers:
1. Using your web browser, go to the target NetLinx
Master’s web page. Note: Refer to the NetLinx Master
documentation for more detailed information concern-
ing the NetLinx Master Web Interface.
2. Click on Lights and all connected modules are dis-
played below Lights. There is only one module per
device.
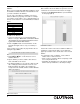
Upon your first visit to Lights, the page will have the fol-
lowing message, FIG. 2.
3. Click Address Mode to set the master to look for
available dimmers.
4. Tap the dimmer you wish to address three times to
make it available to the master.
5. The displayed addresses are only those that are avail-
able on that physical bus that have not been used.
Bold text indicates the address has already been
assigned. Pick an available number and click Select to
address the dimmer.
Controlling Dimmers via the Web Page
Once a dimmer has been addressed, you have access to
a few basic level controls from the master’s web page.
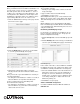
1. Click the button Dimmer Control to open the Dimmer
Control page.(FIG. 4)
Listed in the column on the left are all dimmer addresses
available for control. On the right is a percentage bar-
graph representation of the current state of the selected
dimmer.
2. To change the state of a dimmer, select a dimmer
address in the column on the left.
• Click on 100% to ramp the dimmer completely on and
0% to ramp the dimmer off.
• Click within the bargraph area on the right to shift the
dimmer state up and down to a desired percentage.
FIG. 3 Dimmer Address
FIG. 2 Initial Lights Configuration Page
FIG. 4 Dimmer Control
Bus Address Location
Bus Address
1 1-8
2 9-16
3 17-24
4 25-32
5 33-40
6 41-48