
Programming instructions


3
Quick Start Guide
For more detailed programming instructions, refer to the
ALD-H48 Instruction Manual available on-line at
www.amx.com.
Overview
The ALD-H48 from AMX is a Lutron lighting solution with
a complementary Duet module. The result is a Lutron
device that functions within a NetLinx project.
After you have installed the ALD-H48, using the installa-
tion documentation included with the unit, you can create
a NetLinx project and configure the dimmers. You need
NetLinx Studio v2.3 or higher and a NetLinx Master capa-
ble of running Duet modules (firmware version 3.0.XXX
or higher).
Using the web interface capabilities of your NetLinx mas-
ter you can configure dimmers connected to your ALD-
H48.
The web interface supports:
• Internet Explorer v 6.0 (and higher)
• Mozilla Firefox v 1.0 (and higher)
Step-By-Step Instructions
Step 1: Downloading The ALD-H48 Workspace
First you must attain the ALD-H48 Workspace file
(.AXW). To download the Duet module go to either
amx.com > Dealers > InConcert or the Product Catalog
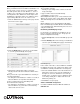
page for the ALD-H48. From the InConcert page you can
search for and download the ALDH48 Duet module, they
are indicated by the D within the legend displayed below.
Included in the .AXW file:
• The NetLinx Main Code (.AXS)
• The Duet module (.JAR)
• Associated TPD4 files
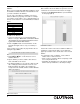
Step 2: Setting The ALD-H48 IP Address
In order for the NetLinx Master to locate the ALD-H48,
you must set the IP address for the device.
1. Connect your PC to the H48 serial port using a stan-
dard DB-9 serial cable.
2. Open your preferred serial client (HyperTerm, TELNET,
etc...)
3. Make sure your serial connection baud rate and hand-
shaking settings match the H48 serial settings.
(Default Baud Rate 9600, Data Bits: 8, Parity: None,
Stop Bits: 1, Flow Control: None)
4. Upon a successful connection, you are prompted with
L232>. At the prompt type SETIP,1, xxx.xxx.xxx.xxx .
Follow the onscreen instructions from this point.
(Where 1 is the number of processors present on the
H48 and xxx.xxx.xxx.xxx is the IP address to be
decided by you.)
Further, at the prompt type HELP and a list of all support-
ed command is displayed. In order to get the correct syn-
tax to set the IP address type at the prompt HELP,
SETIP.
Step 3: Opening The ALD-H48 Workspace
After you have downloaded the ALD-H48 Workspace file
you need to open your NetLinx project. The .AXW file
provided by AMX is intended to be a starting point for
your ALD-H48 project.
5. Launch NetLinx Studio v2.3 or higher.
6. Select File > Open Workspace to launch the Open
Workspace dialog.
7. Browse to the location where you saved the ALD-H48
Workspace file (.AXW) and click Open.
8. Manually enter the IP address assigned to the ALD-48
within Lutron_H48_UI.axs and then recompile the proj-
ect before transferring it to the NetLinx Master.
You can also make any additional edits to the ALD-H48
project or elect to send the file to the NetLinx Master as
is.
Step 4: Transferring The ALD-H48 Project to A
NetLinx Master
NetLinx Studio can transfer the ALD-H48 project file to
any connected NetLinx Master with firmware version
3.XX or higher.
1. Select Tools > File Transfer to open the File Transfer
dialog.
2. If the Workspace file is not already listed in the window
click Quick Load to open the corresponding dialog.
3. In the drop down list select the ALD-H48 Workspace.
4. Click Select All.
5. Click OK.
6. Make sure there is a check in the box next to the ALD-
H48 workspace within the File Transfer dialog and
click Send.
FIG. 1 Module Legend