
Instruction manual


Appendix C – Virtual NetLinx Master
122
Instruction Manual – DXLink™ Twisted Pair Transmitters/Receiver
To assign a device ID and set the connection type:
1.
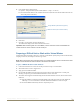
From the Tools menu in NetLinx Studio, select Telnet Session.
The Telnet Settings dialog box opens.
2. Click the New button.
The New Telnet Address dialog box opens.
3. Enter the default static IP address for the DXLink unit: 192.168.1.2 and click OK.
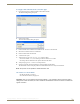
4. Select the new address in the List of Addresses.
5. Click the Select button and click OK.
6. A Telnet session opens.
7. At the prompt (>), type SET DEVICE <num> and press Enter.
For the variable <num>, the valid range of device numbers is 0 to 31999.
Setting a device number does not require a reboot to take effect.
8. At the prompt, type SET CONNECTION and press Enter.
9. Specify TCP for the connection and the PC’s static IP address for the Master.
The Transmitter or Receiver displays under the Virtual Master and is now ready for file transfers.
Note: The process can be repeated for additional DXLink units.
File transfers via a Virtual Master:
IRL file transfers, see page 73
Firmware file transfers, see page 103
Important: Once you have finished using the Virtual Master – If you disabled a network connection before
setting the PC’s static IP address, be sure to disable the Virtual Master’s network connection and enable the
original connection.