
Instruction manual


Appendix B – Telnet (Terminal) Commands
107
Instruction Manual – DXLink™ Twisted Pair Transmitters/Receiver
Appendix B – Telnet (Terminal) Commands
Establishing a Terminal Connection Via Telnet
Telnet terminal communication is accessed remotely via TCP/IP. The Transmitter or Receiver must have its own TCP/IP
address for a Telnet connection. The connection can be started from the Windows taskbar (see below) or in NetLinx
Studio (see the following page).
By default, a User Name and Password are not applied to the Telnet port (Port 23). Therefore, the port does not require
login credentials.
Welcome Banner with and without Security Enabled:
Without Telnet security enabled, a session will begin with a welcome banner similar to the following:
Welcome to DXLINK-HDMI-RX 0.0.106.0 Copyright AMX LLC 2011
>
If Telnet security is enabled, user credentials are required:
Enter username: admin
Enter protected password: ****
Welcome to DXLINK-HDMI-RX 0.0.106.0 Copyright AMX LLC 2011
>
Note: When security is enabled, a user can retry logging in three times before being disconnected
(for information on setting a username and password, see page 108).
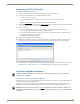
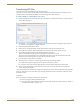
To establish a terminal connection via Telnet at the CMD prompt:
1.
From your Windows Taskbar (at the far left), select Start > Run to open the Run dialog box.
2. Type cmd in the Open field.
3. Click OK to open an instance of the Windows command interpreter (cmd.exe).
4. At the prompt (>), type telnet followed by a space and the Transmitter or Receiver’s IP address.
Example:
>telnet XXX.XXX.XXX.XXX
A Telnet session opens for the Transmitter or Receiver and the welcome banner appears.*
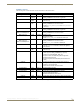
5. At the prompt, type the Telnet command (see the table starting on page 109) and press Enter.
* If you are using Windows 7 and receive an error message, you may need to enable Telnet by completing the
following: (1) go to Start / Control Panel / Programs and Features, (2) on the left, select “Turn Windows features
on or off,” (3) select the check-boxes Telnet Client and Telnet Server, and (4) click OK.