
User Manual

23
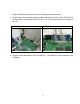
4. Power on Utilities
There are six power-on utilities to set up and test printer hardware. These utilities are
activated by pressing FEED button and by turning on the printer power simultaneously.
The utilities are listed as below:
1. Gap/Black Mark sensor calibration
2. Gap/black mark sensor calibration, Self-test and Dump mode
3. Printer initialization
4. Black mark sensor calibration
5. Gap sensor calibration
6. Skip AUTO.BAS
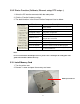
4.1 Gap/Black Mark Sensor Calibration
Gap/black mark sensor sensitivity should be calibrated at the following conditions:
1. A brand new printer
2. Change label stock.
3. Printer initialization.
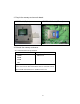
Please follow the steps below to calibrate the gap/black sensor:
1.Turn off the power switch.
2. Hold on the button then turn on the power switch.
3 Release the button when LED becomes red and blinking. (Any red will do during the 5
blinks).
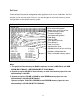
It will calibrate the gap/black mark sensor sensitivity.
The LED color will be changed as following order
Amber red (5 blinks) amber (5 blinks) green (5 blinks) green/amber (5
blinks) red/amber (5 blinks) solid green
It calibrates the sensor and measures the label length.
Note:
Please select gap or black mark sensor by GAP or BLINE command prior to
calibrate the sensor.
For more information about GAP and BLINE command, please refer to
programming manual.