INSTALLATION & MAINTENANCE GUIDE AMP® Low Voltage Landscape Lighting AMP® ForesterPro Downlight AAL-1015-40-B-BZ Help Hotline: 1-813-978-3900 • Mon-Fri 9am-6pm (EST) w w w. a m p l i g h t i n g .
INSTALLATION & MAINTENANCE GUIDE AMP® ForesterPro Downlight AAL-1015-40-B-BZ ! Important Safety Instructions: Read Before Installation This luminaire is intended for installation in accordance with local codes and the National Electric Code (NEC). Failure to adhere to these codes and instructions may result in serious injury, property damage and void the warranty. These instructions do not intend to cover all variations in installation, operation maintenance or mounting situations. 1.
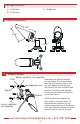
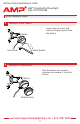
Package Contents A. (1) Fixture B. (3) Screws C. (3) Spacers Product Dimensions 6 5/8” 4.68” 4 1/8” 1 Install Fixture Foot Washer (optional, not supplied) Self-tapping Screw Spacer Fixture Determine the desired location for the fixture. Place the washers onto the self-tapping screws. Pass the self-tapping screws through the holes of the feet of fixture and spacers. Thread the self-tapping screws into the desired location to secure the fixture.
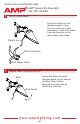
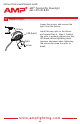
INSTALLATION & MAINTENANCE GUIDE AMP® ForesterPro Downlight AAL-1015-40-B-BZ 2 Wire Connections Strip both leads from the luminaire pigtail. Using two wire connectors (sold separately), connect the leads from the luminaire to the main supply cable leads. Pigtail Wire Connectors Main Supply Cable 3 Adjust Glare Guard Direction Loosen the knob and rotate the glare guard to your desired direction. Hand tighten the knob once your desired direction is achieved. Knob Glare Guard w w w.
INSTALLATION & MAINTENANCE GUIDE AMP® ForesterPro Downlight AAL-1015-40-B-BZ Install/Replace Optic 4 Remove Glare Guard Loosen the set screw and remove the glare guard from the fixture. Fixture Set Screw 5 Glare Guard Remove Fixture Lens Turn the fixture lens counterclocwise and remove it from the fixture. Fixture Fixture Lens customersupport@amplighting.com • 813.978.
INSTALLATION & MAINTENANCE GUIDE AMP® ForesterPro Downlight AAL-1015-40-B-BZ 6 Replace Optic Loosen the screws, and remove the optic from the fixture. Fixture LED Board Optic Screw Install the new optic in the fixture and reverse Step 6 - Step 4. Confirm the optic is properly aligned over the LED board before tightening down. Improper alignment when tightening the screws can cause the optic to break. w w w. a m p l i g h t i n g .
customersupport@amplighting.com • 813.978.
Help Hotline: 1-813-978-3900 • Mon-Fri 9am-6pm (EST) Specifications and product details subject to change without notice. © Copyright 2019, AMP® Lighting, Lutz FL USA 33549 • All rights reserved. customersupport@amplighting.com • 813.978.3900 w w w. a m p l i g h t i n g . c o m IS-AAL-1015-40-B-BZ-ver2.