
User Manual


CONNEX
TM
User Guide
25
Setting Up the CONNEX Ground Unit
We highly recommend that you use the provided Amimon cables. If an alternate cable is
used, make sure that it is of the highest quality.
To set up the CONNEX Ground Unit:
1 Refer to the
Placement Guidelines – Ground Unit
section on page 26 for a description of
the mandatory requirements and the best practices for optional placement of the
Ground Unit and its antennas.
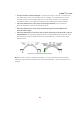
2 Screw on the five provided antennas to the five Ground Unit antenna connectors, as
shown below:
Figure 29: Connecting the Ground Unit Antennas – Box 4
3 Enable the display of the received video by connecting the provided Standard HDMI
cable (Box 7) from the Ground Unit HDMI port to the monitor’s HDMI port (Figure
11).
4 Connect the provided power AC adapter (Box 5) to the power port on the Ground Unit
labeled 7-17-VDC (Figure 11) and connect the other end to a power source. The
provided power AC adapter should only be used in doors. The objective is to see all
three LEDs on the Ground Unit light up (On), as described below.
Table 6: Ground Unit – Power LED
On (White)
The Ground Unit is powered On and the unit’s On/Off switch (Figure 11) is
on.
Off
No power is being supplied to the Ground Unit.
Blinks Quickly
Indicates a system error.
Table 7: Ground Unit – Video LED
On (Blue)
The video signal from the Ground Unit is locked, meaning that it is being
received from the Air Unit.
Off
The Ground Unit is powered down.